You may view and create various system scheduling tasks, such as system housekeeping, email delivery, submission of various application forms for review and effective dates, among other things. Most schedules are automatic schedules running in the background of the system, and do not need human intervention; schedules can also be created manually, executed, cancelled or redone when necessary. Scheduled operations are distributed to various nodes and are executed in the background; the purpose of executing in the background is because some tasks may require longer execution times, such as: generating reports, etc.
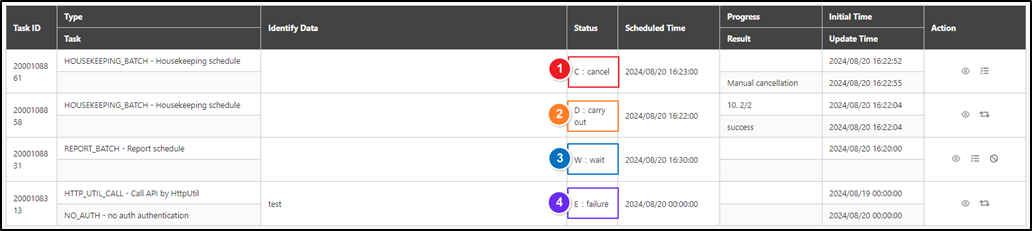
The statuses of scheduled operations include: ➊ C: cancel, ➋ D: carry out, ➌ W: wait, ➍ E: failure and R: Executing.
When the schedule status is ➊ C: cancel, it can be executed.
When the schedule status is ➌ W: wait, it can be executed and cancelled.
When the schedule status is ➋ D: carry out, ➍ E: failure and R: Executing it can be redone.
Create Scheduled Tasks
Most scheduled tasks are scheduled automatically by the system, but schedules can also be created manually.
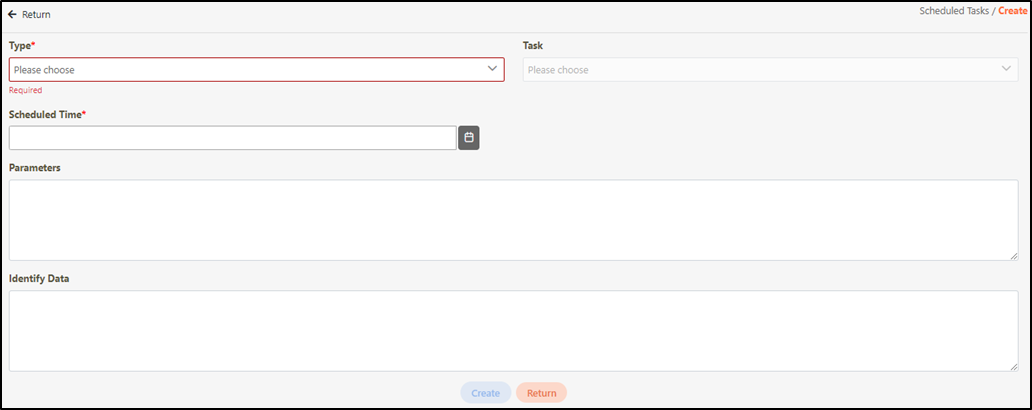
Click Create to access the creation page.
Fill in the data or make selections as instructed below. The fields marked with “*” are required.
Type*: Type of the scheduled task.
Task: Item of the scheduled task. The Type* field must be set before proceeding with the selection in this field.
Scheduled Time*: Time to execute the schedule.
Params: Parameters with specific formats that must be pre-designed, such as API specifications.
Identify Data: If it was not entered by the creator, when the system executes the schedule, the system will establish the default format, which can also be used for remarks. Conversely, if the creator did enter the parameters, the system will not apply the system defaults.
Click Create to save and exit.
Scheduled tasks are built into the system. To add new scheduled tasks, please contact TPIsoftware.
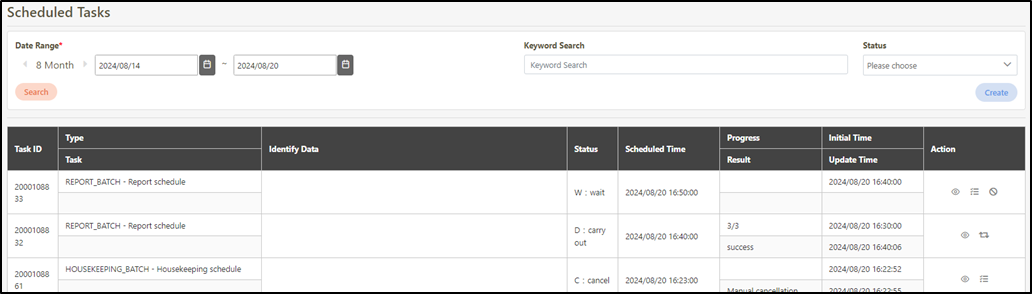
Search Scheduled Tasks
Start and end dates or entering keywords can be used to search scheduled tasks.
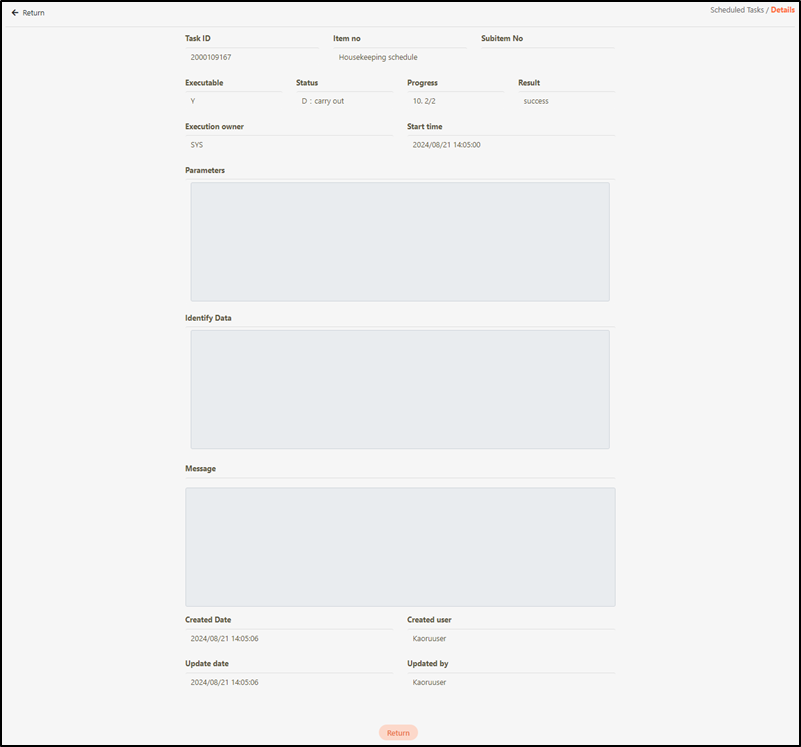
View Scheduled Tasks
Search for the schedule to view details, and click on theicon to access the schedule details page.
Execute and Redo Scheduled Tasks
You can click on the icon on waiting and cancelled schedules to execute the schedule (as shown in ➊ below). You can also click on the icon on successful and failed schedules to redo the schedule (as shown in ➋ below).
Cancel Scheduled Tasks
Waiting schedules can be cancelled; click the icon to cancel the schedule.
Restore Factory Settings with Scheduled Task
This is used to reset the Admin Console client password; the password is recorded in the Setting table and has been encrypted due to information security purposes. The encryption algorithm uses AES and default keys, but the installation in each customer environment should have the AES key changed and have the password reset to ensure security. The key value is string and is set in the boot shell script variable ‘TAEASK’. Its second function is to change the system’s menu according to the license; menu changes should be decided whether the version would be Community or Enterprise when the system was first installed.
Reset Password with Parameter reset.mima
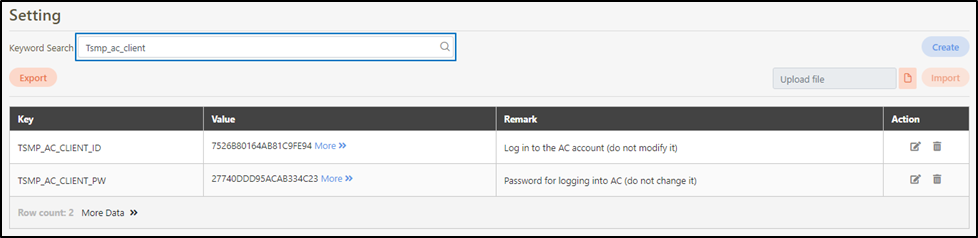
Search for Tsmp_ac_client in System Configs >Setting and check the original username and password.
Go to System Information > Scheduled Tasks, and click Create to proceed.
Fill in the data or make selections as instructed below. The fields marked with “*” are required.
Type*: select Reset to default settings from the drop-down menu.
Parameters: enter reset.mima
Click Create to save and exit, and the schedule is successfully created.
Go to System Configs >Setting and search for Tsmp_ac_client. You will see that the password has now been changed.
Press F12 key and log in to the system again; the API calls the access_token.
Apply License Key with Parameter reset.func
To apply the license key, initiate the Restore factory settings function with the parameter reset.func. Wait for the scheduled execution to complete, log in to the system again, and the Menu List will reflect the available license key.
This action should be performed by installation personnel, and the version (digiRunner Express or Enterprise) must be determined during the initial installation.
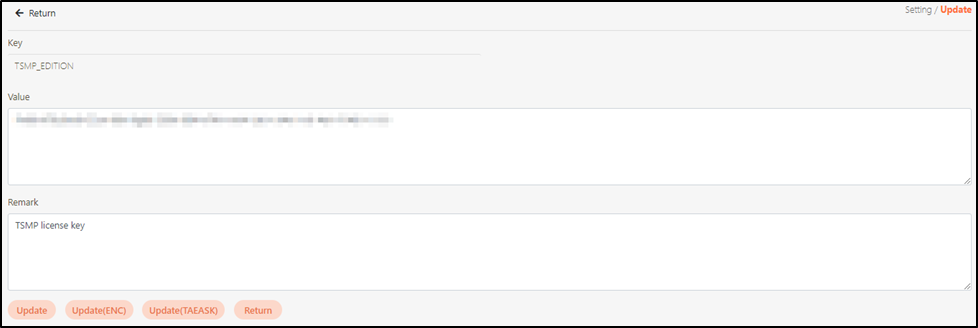
Search for TSMP_EDITION in System Configs >Setting. Click the icon to access the page.
Update the value with the applicable user license key.
Go to System Information > Scheduled Tasks, and click Create to proceed.
Fill in the data or make selections as instructed below. The fields marked with “*” are required.
Type*: select Reset to default settings from the drop-down menu.
Parameters: enter reset.func
Click Create to save and exit, and the schedule is successfully created.
Log in to the system again, and it will change to the version that can be used by the user.


 icon to access the page.