LogoLogo
TPI.devCommunityGithub
  • Overview
    • Introduction
      • Future Features
    • License & Disclaimer
    • APIM Architecture
      • Production Deployments and Capacity
      • Functions
      • Integration
    • Key Concepts
      • API Group
      • API Scope
      • API Client
      • End-to-End Workflow Combining API Group, API Scope, and API Client
        • Scenario: API Management for an E-commerce Platform
    • Support
    • Glossary
    • Scenarios
      • Financial Industry
        • Transforming Financial Services with digiRunner API Management
        • Redefining Financial Data Migration with digiRunner API Management Platform
      • Manufacturing Industry
        • Enabling Smart Manufacturing with Seamless API Integration and Automation via digiRunner
        • Streamlining Global Operations with API Management via digiRunner
      • Medical Industry
        • Enhancing Healthcare Data Integration and Security with digiRunner API Management
        • Revolutionizing Healthcare Interoperability with digiRunner’s Advanced API Framework
      • Insurance Industry
        • Modernizing Insurance Services with digiRunner API Management
        • Modernizing Insurance with digiRunner—Bridging Legacy Systems and Microservices
      • Government and Public Services
        • Empowering Open Government Services with digiRunner: A Mission for Integration and Transformation
        • Streamlining Public Sector Innovation via digiRunner: Driving Citizen-Centric Digital Transformation
  • Get Started
    • Installing digiRunner API Management
      • SMTP Configuration
    • Registering Your First APIs with digiRunner
    • Client Authorization and Calling APIs
    • Rate Limiting
    • Proxy Caching
    • Load Balancing
    • Sandbox Testing
    • VIP Gateway Priority Settings
    • JWE Certificate
  • Configuring IP Whitelisting via IP Binding
  • Most common use cases
    • Obtaining API Keys and Calling APIs
    • API IP Diversion
    • Viewing Real-time API Logs
    • Enabling APIs and No Auth in Batches with API Imported
    • Role-Based Access Management within a Hierarchical Structure
    • Simplified OIDC Login with Predefined Organizational Frameworks
    • Resetting User Password and Confirmation Email for Admin Console User
  • Guide
    • AC User Management
      • Users
      • My Profile
      • Roles
      • Role Mapping
      • Organization
      • Role & txID
      • Delegate AC User
      • AC OAuth 2.0 IdP
      • AC LDAP IdP
      • AC MLDAP IdP
      • AC API IdP
    • Development Mode
      • Function Management
      • Rtn Code Management
      • Embedded Function Management
    • Client Management
      • API Client
      • API Group
      • API Scope
      • Authentications
      • Security Level
      • GTW OAuth 2.0 IdP
      • GTW LDAP IdP
      • GTW API IdP
      • GTW JDBC IdP
      • Client Export/Import
    • API Management
      • API List
      • API Registry
      • API Test
      • API Modify Batch
    • Monitor & Alert
      • digiRunner Server
      • Alert Settings
    • Reports
      • API Calls
      • API RESP distribution
      • API Avg. RESP Time
      • API GTW traffic
      • Bad Attempt Report
    • Certificate Management
      • JWE Cert. List
      • JWE Cert. Management
      • TLS Cert. List
      • TLS Cert. Management
    • Application Forms
      • API Key
      • Applications
      • Approval Flow Settings
    • System Information
      • API Key Approval History
      • Scheduled Tasks
      • Recurring Tasks
      • Mail Log
    • System Configs
      • Setting
      • Items
      • Files
      • Customer Setting
      • Online Console
      • WebSocket Proxy Management
      • Static Webpage Reverse Proxy
      • RDB Connection
      • Mail Template Export/Import
  • API Integration Guide
    • Using Token for Authentication and Authorization
      • OpenID Connect (OIDC) Mode
      • Client Credentials Mode
      • Password Mode
    • Using X API Key for Authentication and Authorization
      • Applying for X API Key
      • Obtaining X API Key
      • Calling APIs Registered in digiRunner with X API Key
    • Using API Key for Authentication and Authorization
      • Applying for API Key
      • Obtaining API Key and Secret Key
      • Calculating the Signature and DGRK
      • Calling APIs Registered in digiRunner with API Key
    • Using HTTP Basic and OAuth for Authentication and Authorization
      • Calling APIs Registered in digiRunner with Basic Auth
      • Calling APIs Registered in digiRunner with No OAuth
    • Token Lifecycle Management Mechanism
      • Applying Refresh Token
      • Token Revocation
      • Token Introspection
    • JWS/JWE Integration
      • JWS Workflow
      • JWE Workflow
      • Exchanging Public Keys
      • Generating Certificate
      • Operating with JWS
      • Operating with JWE
Powered by GitBook
On this page
  • Create Setting
  • Search Setting
  • Import and Export Setting
  • Update Setting
  • Delete Setting

Was this helpful?

Export as PDF
  1. Guide
  2. System Configs

Setting

PreviousSystem ConfigsNextItems

Last updated 5 months ago

Was this helpful?

Path: System Configs > Setting

Setting allows users to maintain digiRunner functions, such as: whether to enable skip all API path checkers. If true is entered, it is enabled; otherwise, fill in false.

Most items are necessary settings required for system operation; if users change them randomly, it may result in system errors, such as: Setting AUTH_CODE_EXP_TIME is an instruction file used to set the expiry time (ms) for Auth code; this function is similar to the registry in Windows. Do not change them by yourself without the instruction of TPIsoftware personnel.
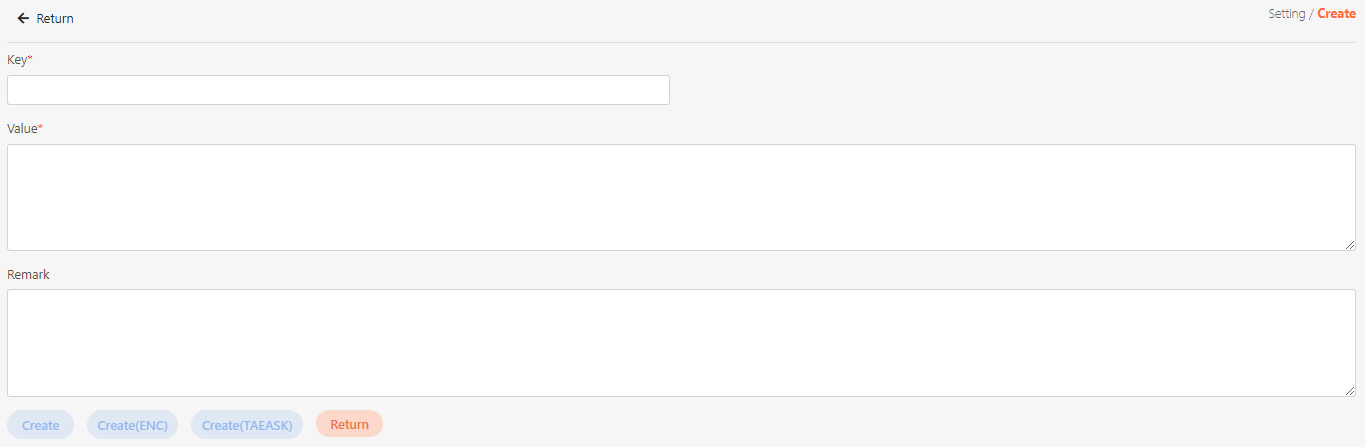
Create Setting

  1. Click Create to access the creation page.

  1. Fill in the data or make selections as instructed below. The fields marked with “*” are required.

  • Key*: Name of setting.

  • Value*: Value that will trigger this setting.

  • Remark: Description of this setting.

  1. Click Create to save and exit.
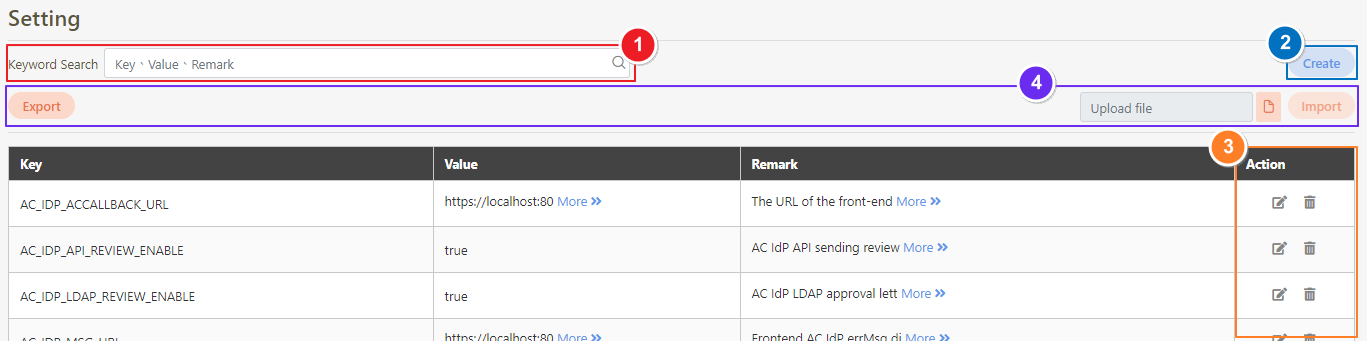
Search Setting

Keywords can be entered to search for Setting.

Import and Export Setting

The rules are as follows: based on ID, if a duplicate exists, it will be updated; if no duplicate exists, a new record will be added.

NOTE: The file naming convention must not be changed.
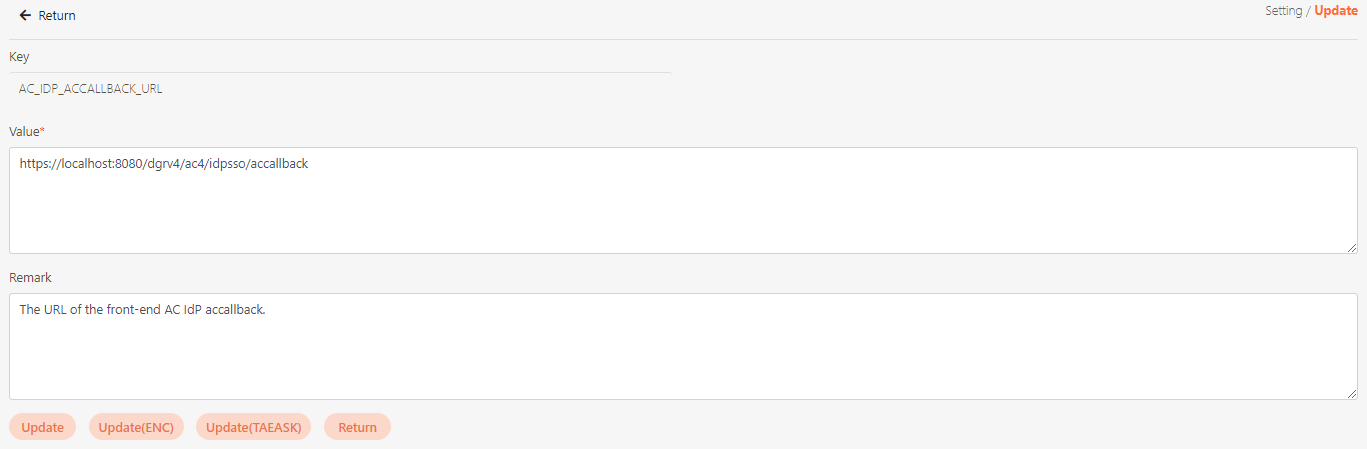
Update Setting

  1. Modify the desired fields, and click Update to save and exit.
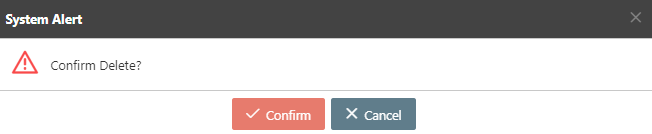
Delete Setting

  1. Click Delete to proceed.

  1. A warning prompt displaying the message “Confirm Delete?” will pop up. Click Confirm to delete this setting and exit.

To modify multiple settings at once, click Export to export the settings as an .xlsx file. Modify the desired fields, click on the icon, and then click Import to import the modified file without needing to rename it.

Search for the setting to modify, and click on the icon to access the update page.

Search for the setting to delete, and click on the icon to access the Delete page.