LogoLogo
TPI.devCommunityGithub
  • Overview
    • Introduction
      • Future Features
    • License & Disclaimer
    • APIM Architecture
      • Production Deployments and Capacity
      • Functions
      • Integration
    • Key Concepts
      • API Group
      • API Scope
      • API Client
      • End-to-End Workflow Combining API Group, API Scope, and API Client
        • Scenario: API Management for an E-commerce Platform
    • Support
    • Glossary
    • Scenarios
      • Financial Industry
        • Transforming Financial Services with digiRunner API Management
        • Redefining Financial Data Migration with digiRunner API Management Platform
      • Manufacturing Industry
        • Enabling Smart Manufacturing with Seamless API Integration and Automation via digiRunner
        • Streamlining Global Operations with API Management via digiRunner
      • Medical Industry
        • Enhancing Healthcare Data Integration and Security with digiRunner API Management
        • Revolutionizing Healthcare Interoperability with digiRunner’s Advanced API Framework
      • Insurance Industry
        • Modernizing Insurance Services with digiRunner API Management
        • Modernizing Insurance with digiRunner—Bridging Legacy Systems and Microservices
      • Government and Public Services
        • Empowering Open Government Services with digiRunner: A Mission for Integration and Transformation
        • Streamlining Public Sector Innovation via digiRunner: Driving Citizen-Centric Digital Transformation
  • Get Started
    • Installing digiRunner API Management
      • SMTP Configuration
    • Registering Your First APIs with digiRunner
    • Client Authorization and Calling APIs
    • Rate Limiting
    • Proxy Caching
    • Load Balancing
    • Sandbox Testing
    • VIP Gateway Priority Settings
    • JWE Certificate
  • Configuring IP Whitelisting via IP Binding
  • Most common use cases
    • Obtaining API Keys and Calling APIs
    • API IP Diversion
    • Viewing Real-time API Logs
    • Enabling APIs and No Auth in Batches with API Imported
    • Role-Based Access Management within a Hierarchical Structure
    • Simplified OIDC Login with Predefined Organizational Frameworks
    • Resetting User Password and Confirmation Email for Admin Console User
  • Guide
    • AC User Management
      • Users
      • My Profile
      • Roles
      • Role Mapping
      • Organization
      • Role & txID
      • Delegate AC User
      • AC OAuth 2.0 IdP
      • AC LDAP IdP
      • AC MLDAP IdP
      • AC API IdP
    • Development Mode
      • Function Management
      • Rtn Code Management
      • Embedded Function Management
    • Client Management
      • API Client
      • API Group
      • API Scope
      • Authentications
      • Security Level
      • GTW OAuth 2.0 IdP
      • GTW LDAP IdP
      • GTW API IdP
      • GTW JDBC IdP
      • Client Export/Import
    • API Management
      • API List
      • API Registry
      • API Test
      • API Modify Batch
    • Monitor & Alert
      • digiRunner Server
      • Alert Settings
    • Reports
      • API Calls
      • API RESP distribution
      • API Avg. RESP Time
      • API GTW traffic
      • Bad Attempt Report
    • Certificate Management
      • JWE Cert. List
      • JWE Cert. Management
      • TLS Cert. List
      • TLS Cert. Management
    • Application Forms
      • API Key
      • Applications
      • Approval Flow Settings
    • System Information
      • API Key Approval History
      • Scheduled Tasks
      • Recurring Tasks
      • Mail Log
    • System Configs
      • Setting
      • Items
      • Files
      • Customer Setting
      • Online Console
      • WebSocket Proxy Management
      • Static Webpage Reverse Proxy
      • RDB Connection
      • Mail Template Export/Import
  • API Integration Guide
    • Using Token for Authentication and Authorization
      • OpenID Connect (OIDC) Mode
      • Client Credentials Mode
      • Password Mode
    • Using X API Key for Authentication and Authorization
      • Applying for X API Key
      • Obtaining X API Key
      • Calling APIs Registered in digiRunner with X API Key
    • Using API Key for Authentication and Authorization
      • Applying for API Key
      • Obtaining API Key and Secret Key
      • Calculating the Signature and DGRK
      • Calling APIs Registered in digiRunner with API Key
    • Using HTTP Basic and OAuth for Authentication and Authorization
      • Calling APIs Registered in digiRunner with Basic Auth
      • Calling APIs Registered in digiRunner with No OAuth
    • Token Lifecycle Management Mechanism
      • Applying Refresh Token
      • Token Revocation
      • Token Introspection
    • JWS/JWE Integration
      • JWS Workflow
      • JWE Workflow
      • Exchanging Public Keys
      • Generating Certificate
      • Operating with JWS
      • Operating with JWE
Powered by GitBook
On this page
  • Create API Scope
  • Search API Scope
  • View API Scope
  • Update API Scope
  • Delete API Scope
  • Differences Between API Group and API Scope

Was this helpful?

Export as PDF
  1. Guide
  2. Client Management

API Scope

PreviousAPI GroupNextAuthentications

Was this helpful?

Path: Client Management > API Scope

The API Scope function is for outsourced vendors to use to apply for API functions from our bank in place of users. For example, when a user wants to query his/her demand deposit balance at TPIsoftware Bank through the authentication network, the authentication network will redirect the user to the application authorization page of TPIsoftware Bank, where TPIsoftware Bank will verify the personal information of the user, then ask the user to select the information he/she wishes to view, and authorize it.

API Scope Management is for creating and maintaining APIs that can be selected and authorized for end users.

APIs with the same authentication type can be placed under the same scope here, and the APIs in this scope will correspond to authorizable client permissions according to the security level set.

Create API Scope

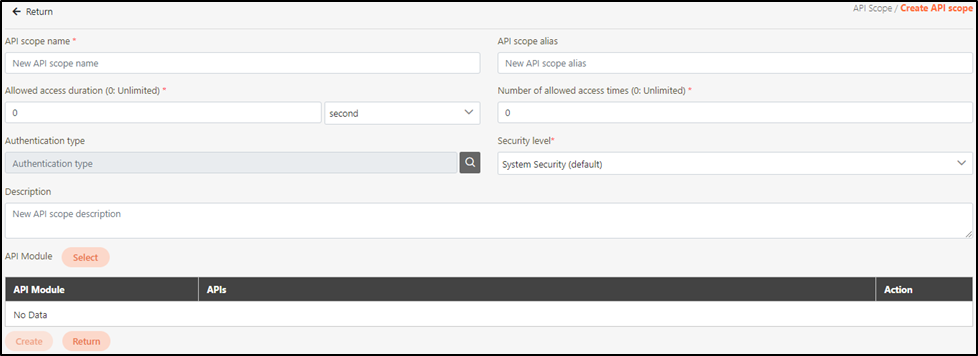
  1. Click Create API scope to access the creation page.

  1. Fill in the data or make selections as instructed below. The fields marked with “*” are required.

  • API scope name*: Name of the scope.

  • API scope alias: Alias to help identify the scope.

  • Allowed access duration*: Number of days valid for this scope; it will become invalid once expired.

If set to 0, it means there are no limits.

  • Number of allowed access times*: The maximum number of times this scope of APIs can be authorized; it can no longer be used after the number of times has exceeded.

If set to 0, it means there are no limits.

  • Authentication type: Authentication type required for the APIs in this scope; multiple choices allowed.

  • Security level*: Security levels A~F; the security level must correspond to the security level of the client’s account.

    • Simply select the default system security for the security level.

    • If C is selected as the security level for the client, security levels A and B cannot be found here at API Group. For more information, refer to Security level.

  • Description: Description or remarks of the scope.

  • API Module: Enter to select the API module currently mounted on the digiRunner platform.
  1. Further instructions for completing the fields.

  • API Module: Click Select module to enter and select the API module currently mounted on the digiRunner platform.

    • Access the selection page and search for the module to add with the search field, then click Select at the left to add it into the module list. To cancel, click Delete at the right of the selected module.

  • At this time, module is added but not API. It is only added to the scope name, but there is nothing inside. Click Select API to complete adding API to the module.

  • After selecting the API to add, click Apply.

  • If the scope is created with no API added to the module, this module will not be added to the scope.

  1. Click Create to save and exit.

Search API Scope

To search for an API scope, enter the keywords or the authentication type or security level here to search for related API scopes.

View API Scope

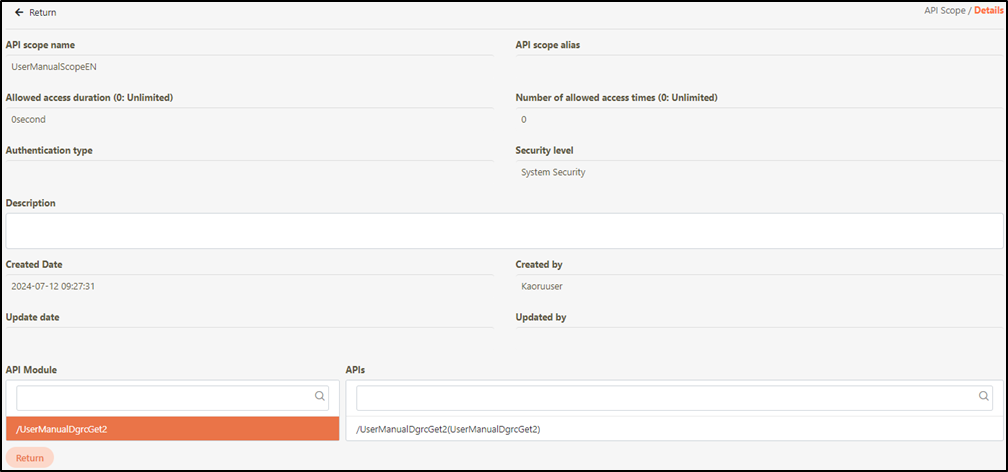
The information in Details can only be viewed and not edited.

Update API Scope

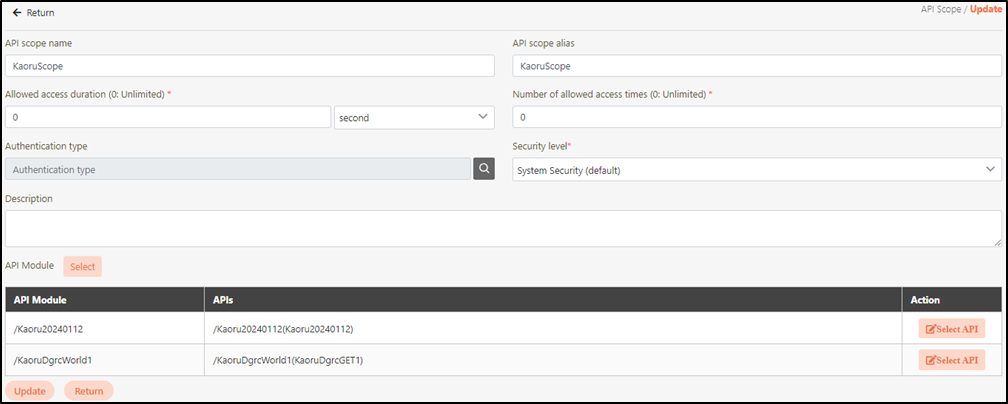
  1. Modify the desired fields, and click Update to save and exit.

Delete API Scope

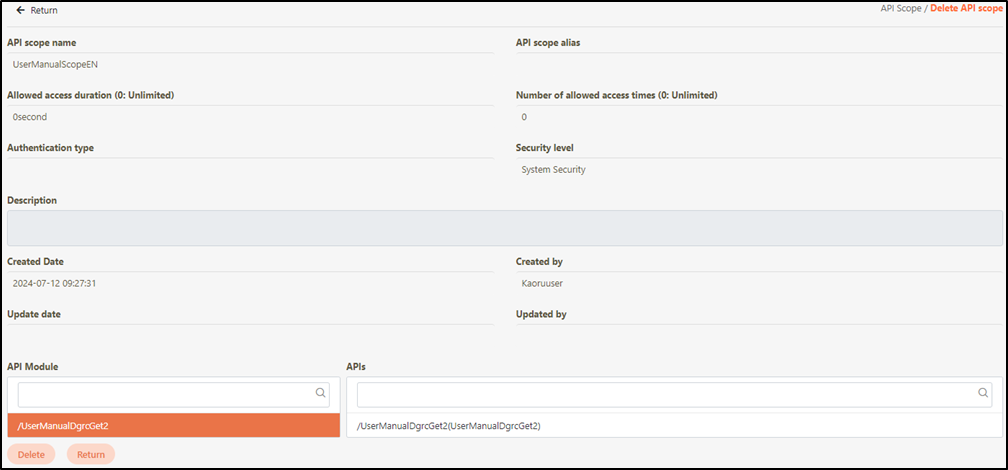
  1. Click Delete to delete the API scope and exit.

Delete the API scope in the Delete API scope page, the warning prompt for deletion will NOT appear.

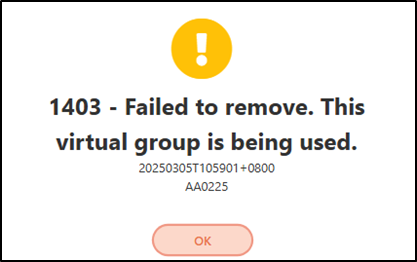
If this scope is set as available for clients under API Client > Security > API Scope, the error “1403 - Failed to remove. This virtual group is being used.” will appear, meaning that this API scope is in use and cannot be deleted.

Differences Between API Group and API Scope

For example, if Bank A has two apps—one is Bank A's own app, "Bank A App," and the other is an outsourced app, "Online Bank":

When a user applies for account A, the user will be authorized to view the account balance through the "Bank A App."

However, when applying for the outsourced app "Online Bank," the user must authorize and agree for the agent to check the account balance with Bank A. The role of the API Group is similar to "Bank A App," while the role of API Scope is akin to "Online Bank."

Authentication type: Click on the icon to access and select from the authentication list; multiple choices allowed as mentioned above.

Search for the API scope to view details, and click on theicon to access the API scope details page.

Search for the API scope to modify, and click on the icon to access the update page.

Search for the API scope to delete, and click on the icon to proceed.