Loading...
Loading...
Loading...
Loading...
Loading...
Loading...
Loading...
Loading...
Loading...
Loading...
Loading...
Loading...
Loading...
Loading...
Discover real-world scenarios across various industries, showcasing how digiRunner is applied in different fields.
Loading...
Loading...
Loading...
Loading...
Loading...
Loading...
Loading...
Loading...
Loading...
Loading...
Loading...
Loading...
Loading...
Loading...
Loading...
Loading...
Loading...
Loading...
Loading...
Loading...
Loading...
Loading...
Loading...
Loading...
Loading...
Loading...
Loading...
Loading...
Loading...
Loading...
Loading...
Loading...
Loading...
Loading...
Loading...
Loading...
Loading...
Loading...
Loading...
Loading...
Loading...
Loading...
Loading...
Loading...
Loading...
Loading...
Loading...
Loading...
Loading...
Loading...
Loading...
Loading...
Loading...
Loading...
Loading...
Loading...
Loading...
Loading...
Loading...
Loading...
Loading...
Loading...
Loading...
Loading...
Loading...
Loading...
Loading...
Loading...
Loading...
Loading...
Loading...
Loading...
Loading...
Loading...
Loading...
Loading...
Loading...
Loading...
Loading...
digiRunner is a mission-critical, flexible, lightweight, and blazing-fast Open Source solution that helps your organization control who, when, and how users access your APIs. As an API Management solution, it enables you to effortlessly manage the lifecycle of your APIs. Download digiRunner to document, discover, and publish your APIs.
digiRunner is particularly important in microservices architectures, which often consist of multiple backend services, each providing specific functionality. It can abstract these backend services into a single API endpoint, making it easier for clients to access and use.
Intelligent Routing: Efficiently directs API requests to the appropriate backend service based on request parameters, ensuring optimized performance.
Comprehensive Security: Protects your APIs with multi-layered authentication and authorization mechanisms to safeguard against threats.
Real-time Monitoring: Tracks API performance with detailed metrics for proactive issue detection and quick resolution.
Traffic Management: Maintains system stability by controlling the frequency of API access and setting usage quotas.
Streamlined Frontend Development: Simplifies development by providing a unified API entry point, reducing complexity for frontend developers.
Improved System Stability: Increases reliability with advanced traffic control mechanisms and comprehensive error handling.
Enhanced Security: Protects your system with robust, multi-level security measures to mitigate potential risks.
Efficient Microservices Management: Facilitates unified governance of microservices through centralized API management.
API Consolidation: Unify multiple backend services into a single, accessible API to streamline system interactions.
Access Control: Implement robust security measures to prevent unauthorized API access and ensure data integrity.
Usage Insights: Gain in-depth visibility into API usage patterns with comprehensive monitoring data.
Rate Limiting: Prevent system overload by enforcing rate limits, ensuring consistent performance and stability.
Data Transformation: Transform API outputs into various formats (e.g., JSON, XML) to support diverse client requirements.
For easy access to digiRunner API Management Platform, please refer to the following section:
Container: an environment such as Docker, Podman, K8s, OCP
Router: a concept for LB, such as Nginx, F5, Ingress
Gateway: digiRunner Gateway, including Admin Console.
Gateway(Master): a concept of zookeeper for all gateway(Slave)
Gateway
4.2.0
APIM
H2DB
1.4.200
Connection pool
OS: RHEL 8.x or above
Java: JDK 17 or above
Container
docker 19.03 or above
podman 3.2.3 or above
DB support
MariaDB 10.6.x
MSSQL 2017 or above
Oracle 11g or above
PostgreSQL 9.6 or above
H2DB(default)
CPU Core
4
2
Memory GB
16(<80%)
4(<80%)
HDD(TB)depending on log size and keeping period(10KB log * 1M transit/ annual)
10TB
0.5 TB( testing only )
TPS(Transit per second )
200~1000
100~300
In API Management, API Group, API Scope, and API Client are commonly used concepts for managing API access control, organizational structure, and user authorization. Below are detailed explanations and use cases:
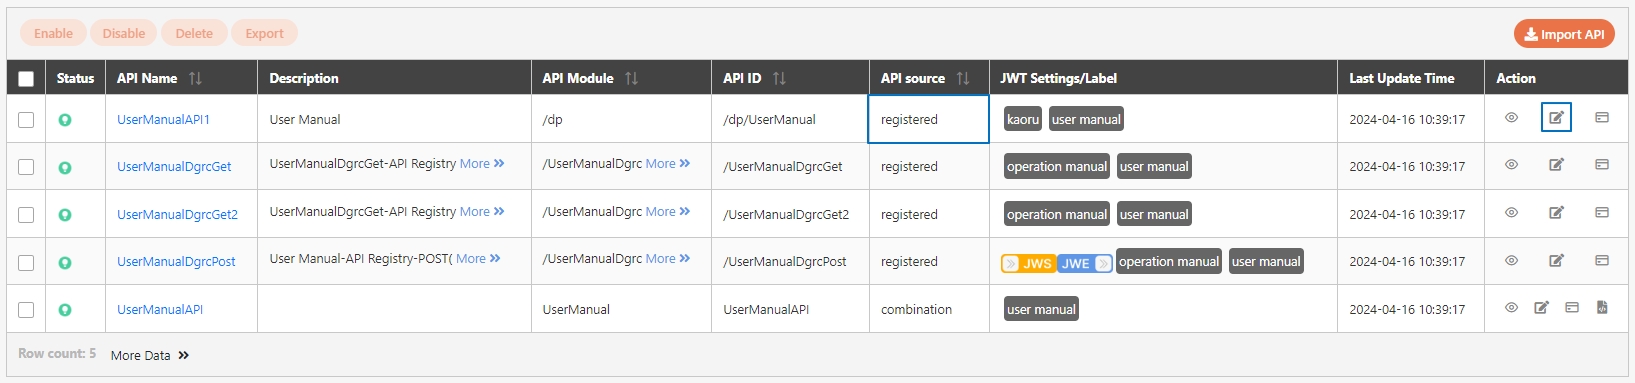
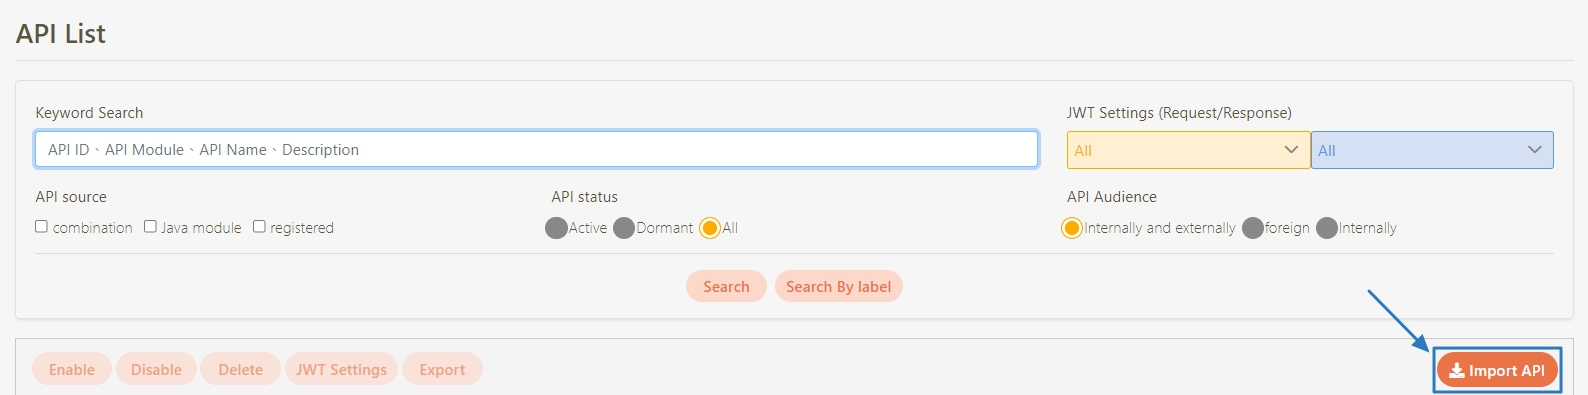
Path: API Management > API List
All APIs on the system will be placed in the API list; API related information will be displayed here, and APIs can also be tested here. Whether to enable registered or designed APIs is also set here.
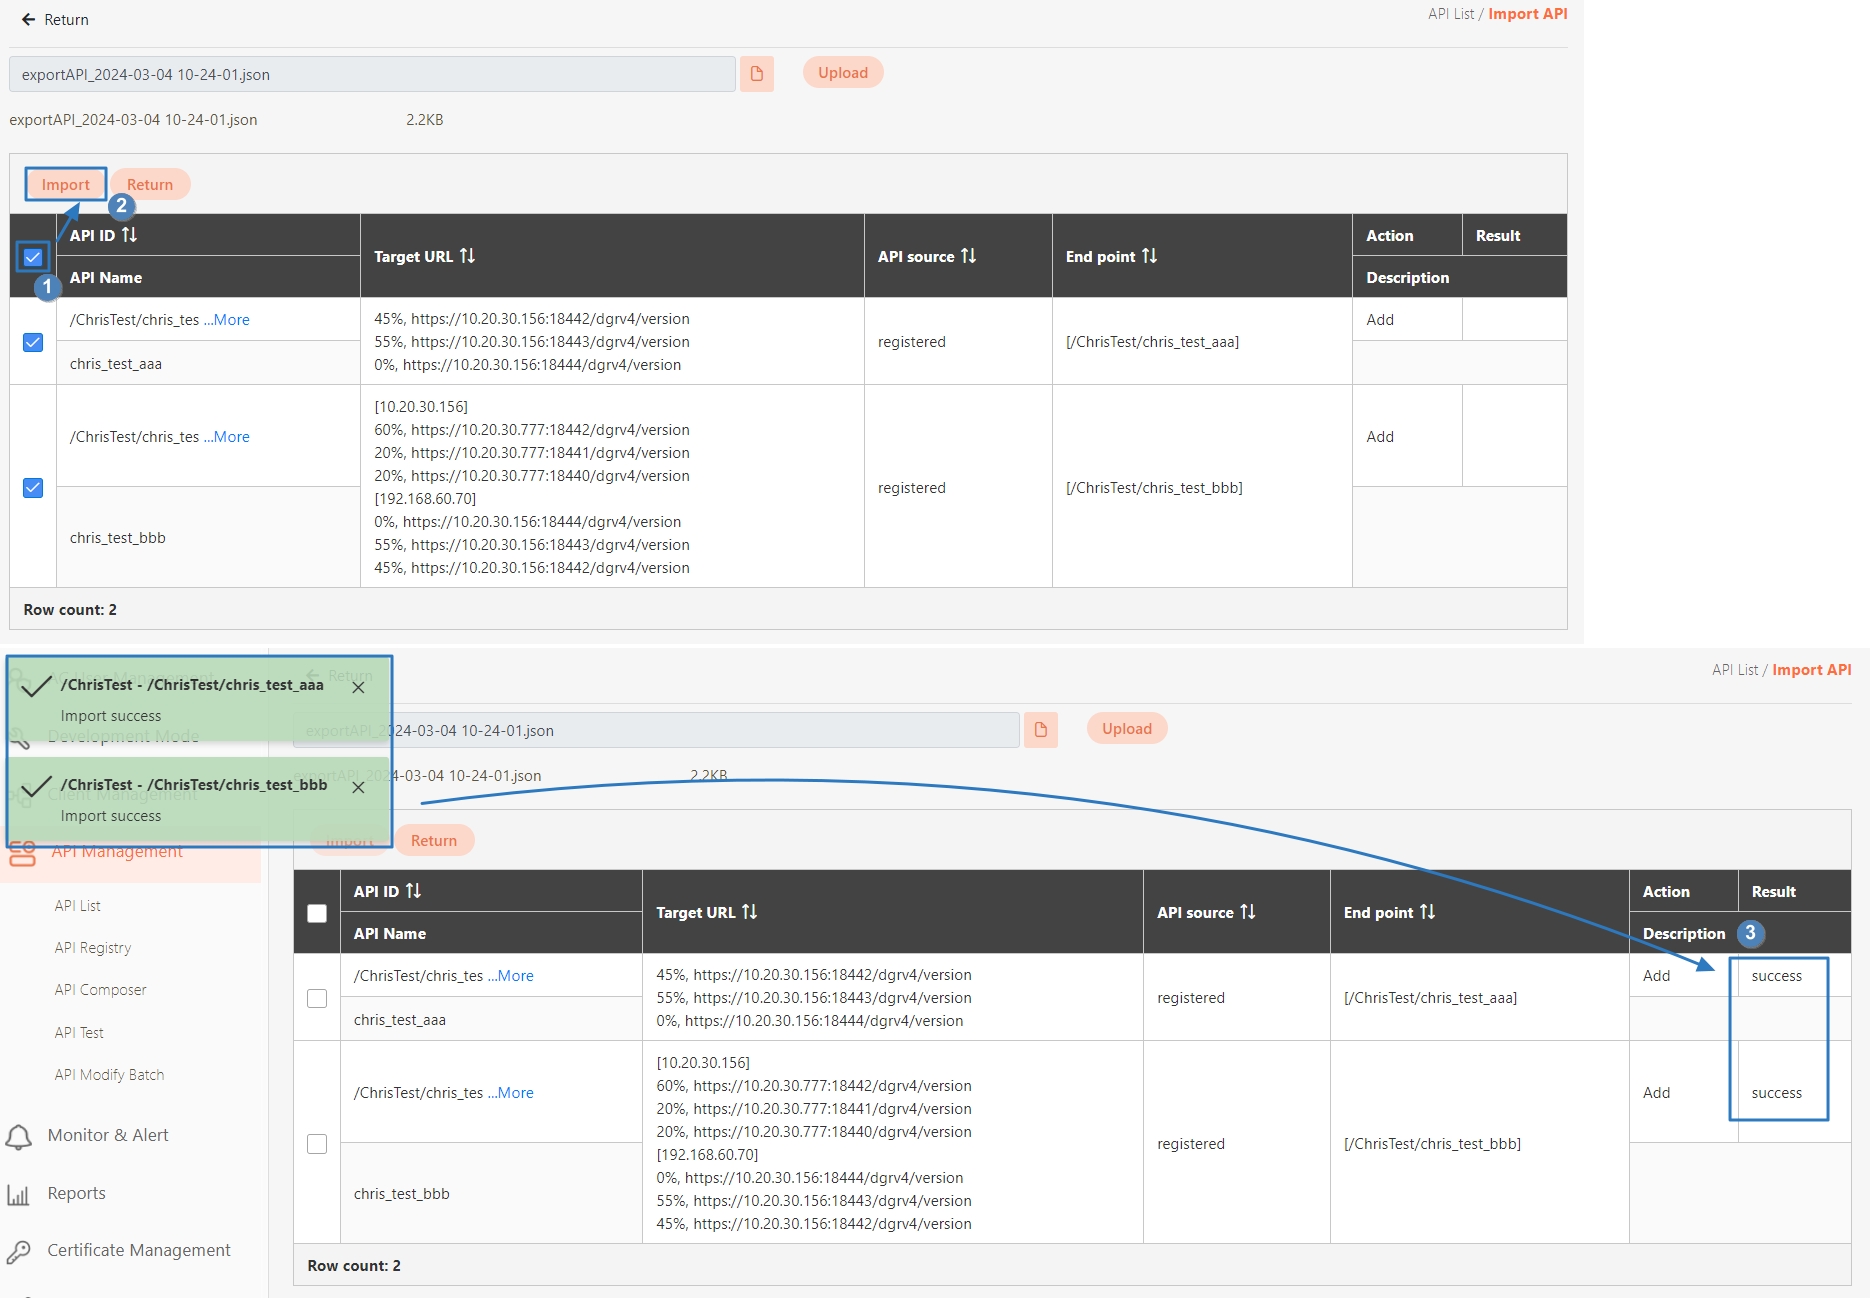
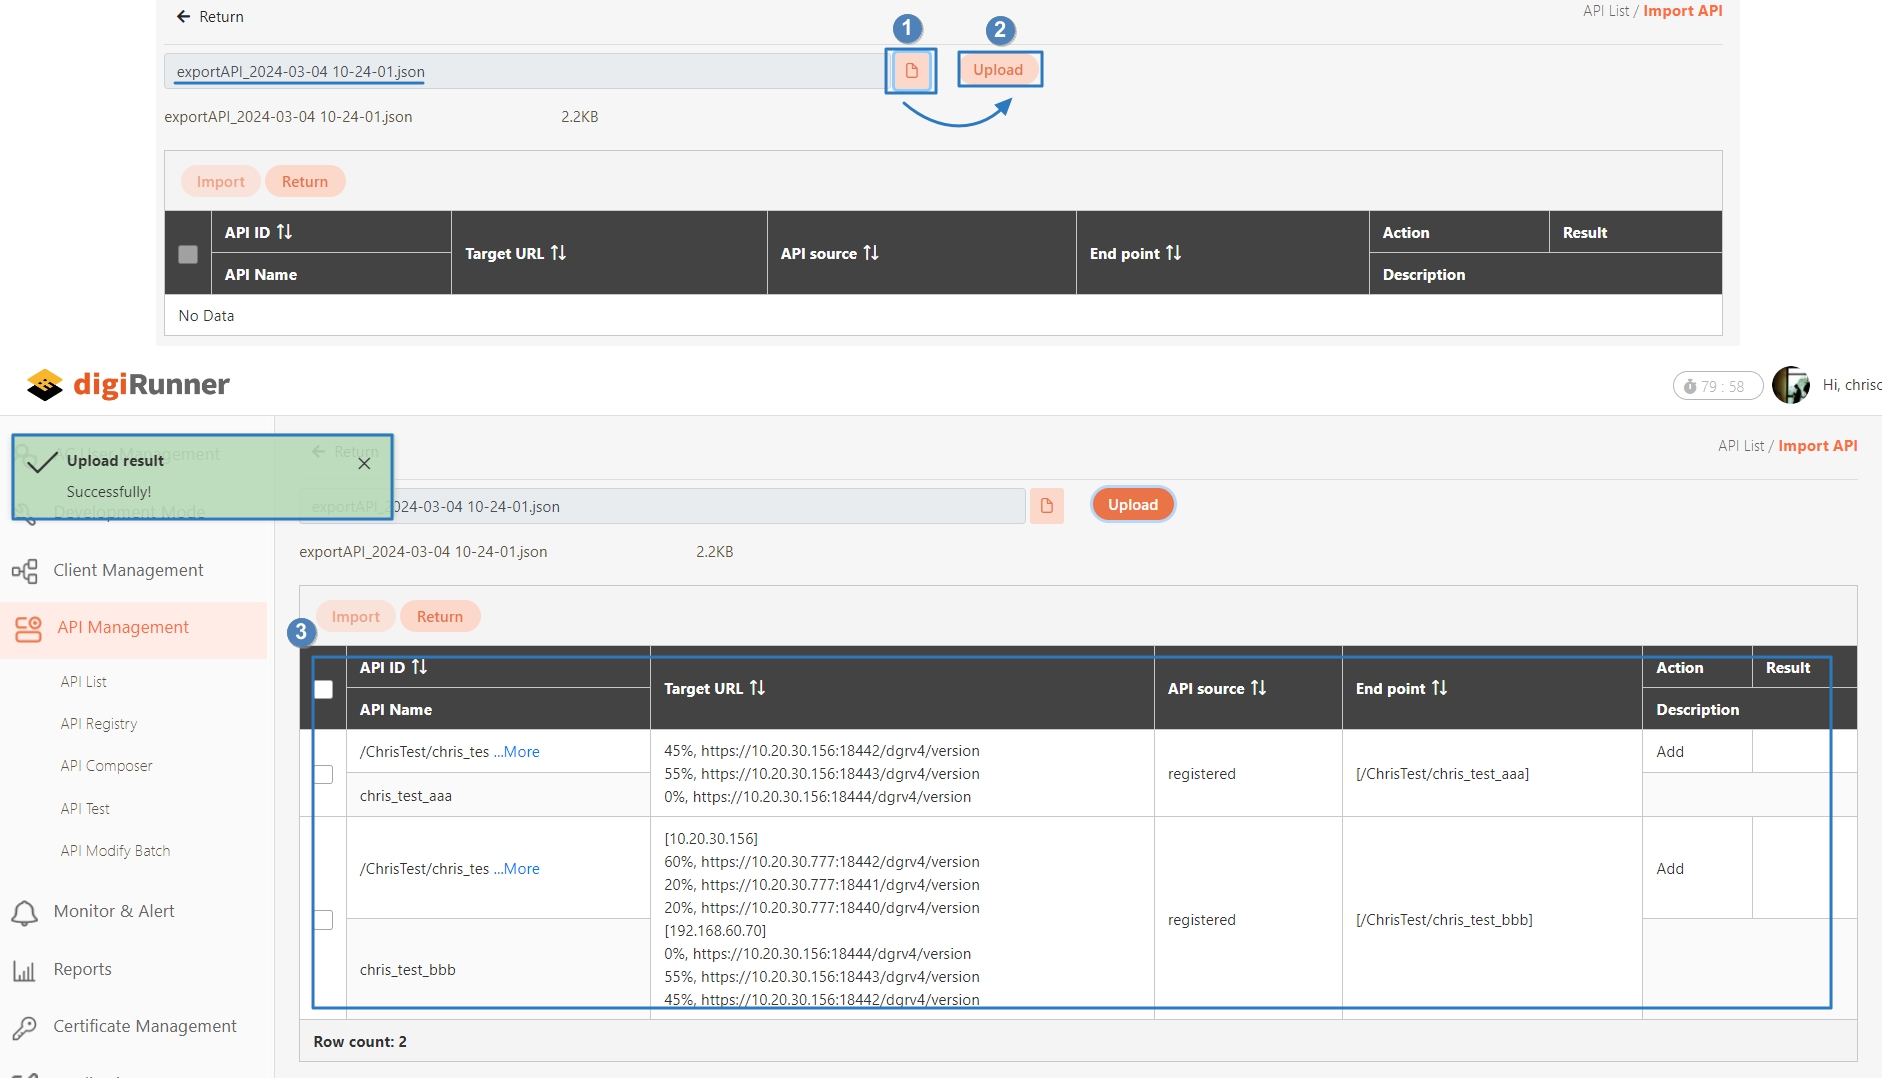
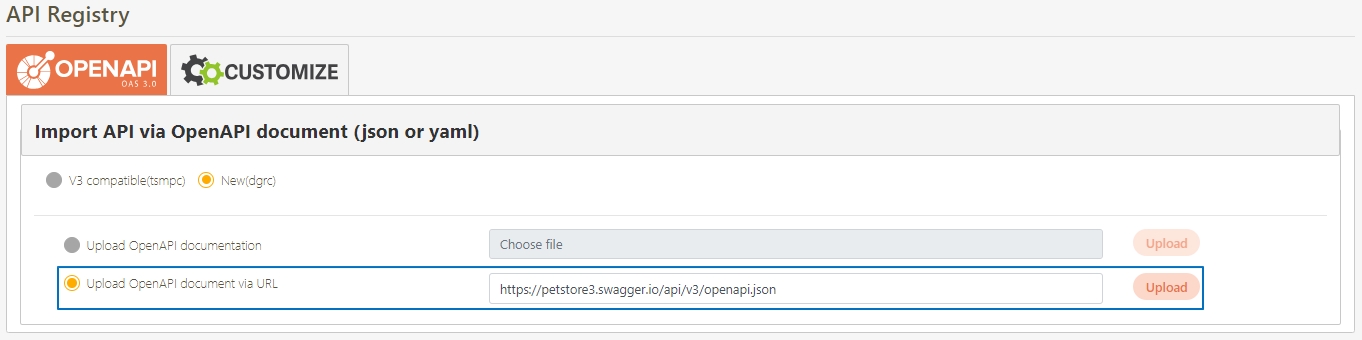
In this section, you can find instructions on how to import registered/combined APIs.
JSON files can be uploaded; after selecting the file, click Upload.
Uploaded API will be displayed in the table below; however, no APIs were uploaded to the system yet at this time. First, select the APIs to import, and click Import.
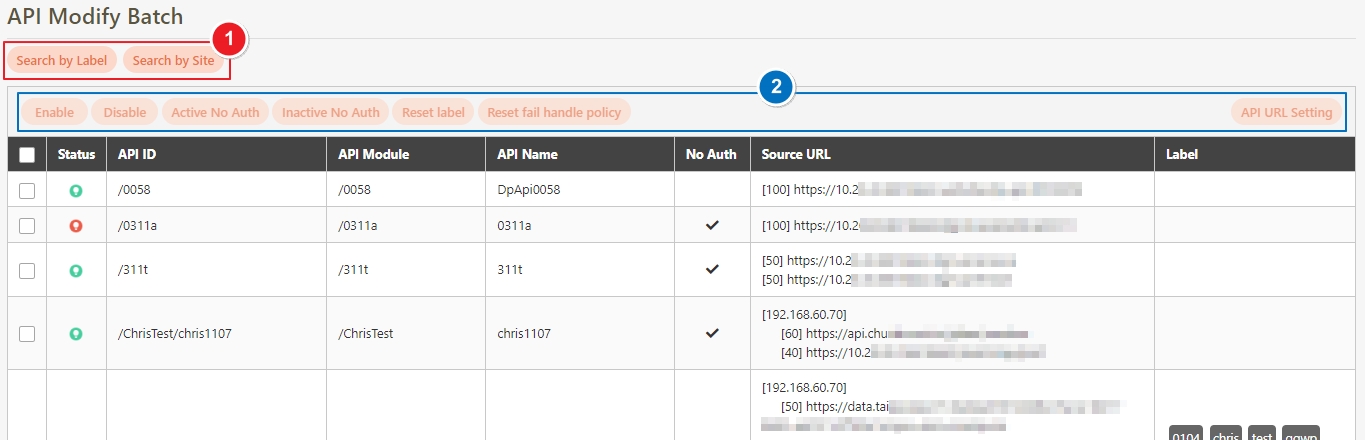
Search: Enter the keyword and click Search to search for desired APIs.
Search By label: The Search By label feature is independent, and will not be affected by the basic keyword search or API sources.
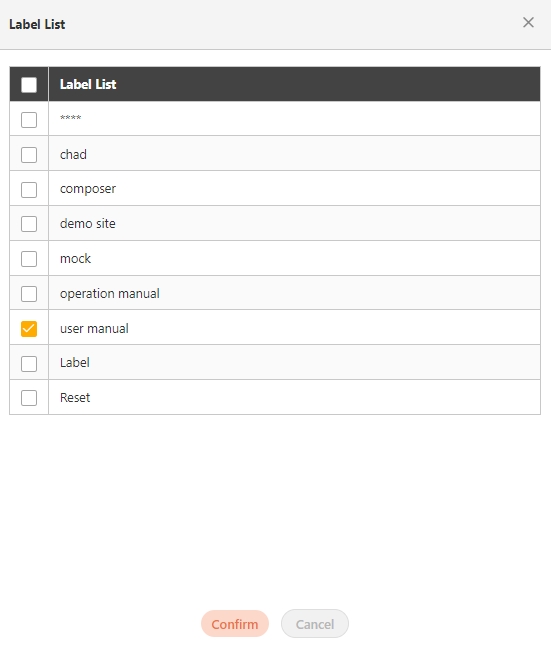
Enter the keyword, click Search By label, and the Label List will pop up.
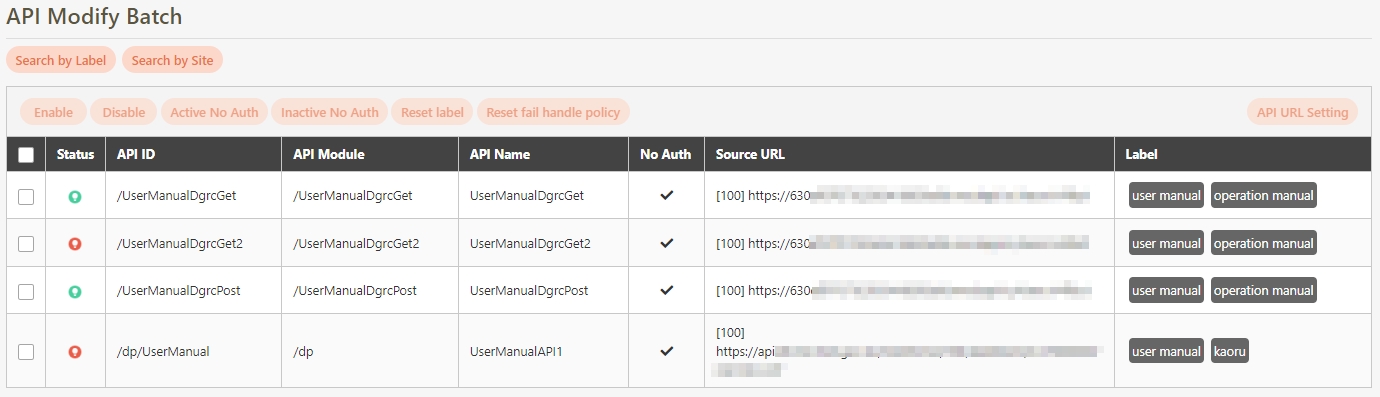
Check the desired label, and click Confirm. The APIs match the label will be displayed.
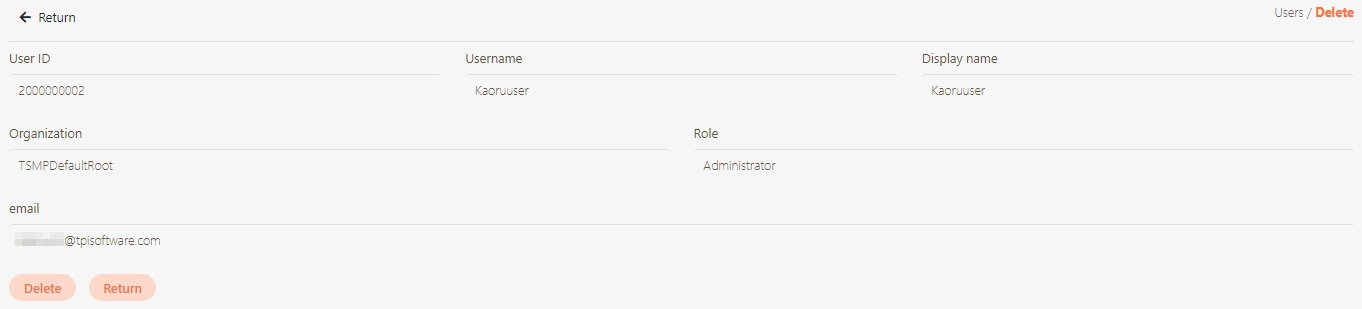
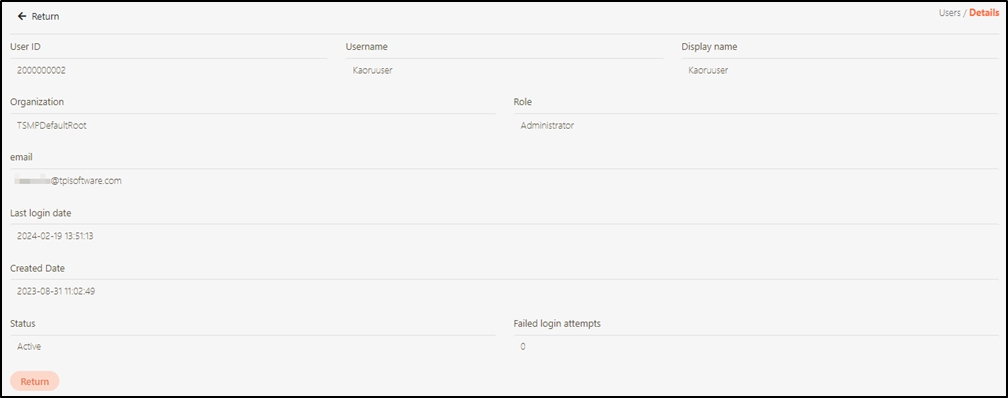
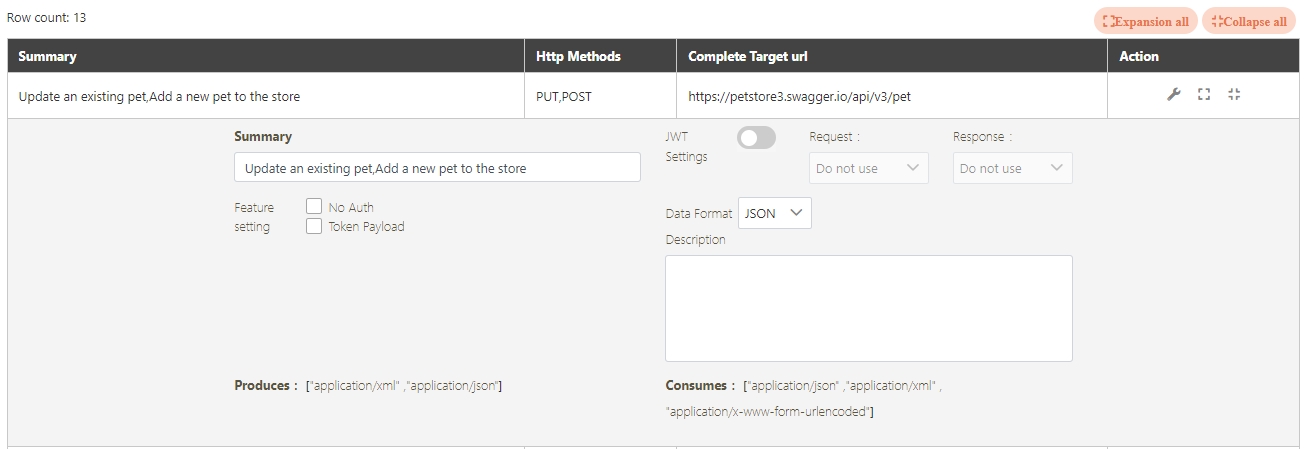
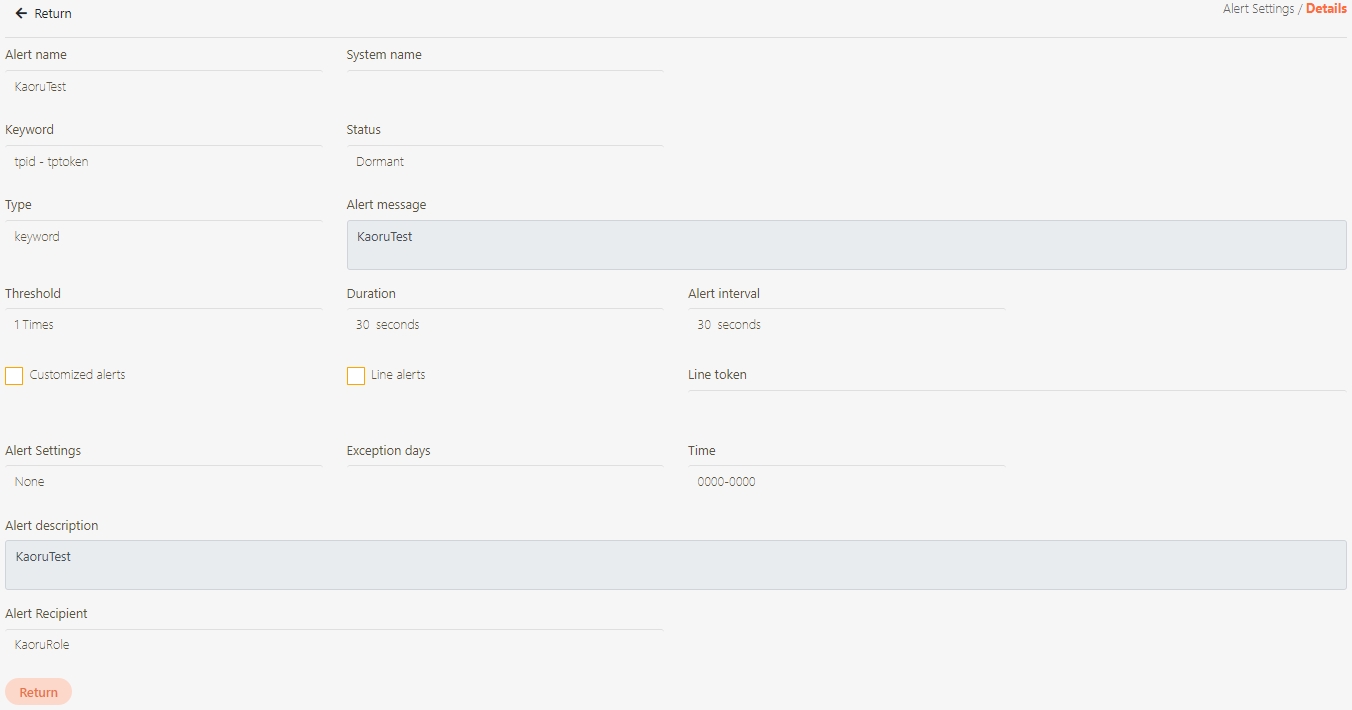
The information in Details can only be viewed and not edited.
If the source is an API combination, upon accessing the update page, you will see the Open Composer button.
Click Open Composer to access the API Composer page.
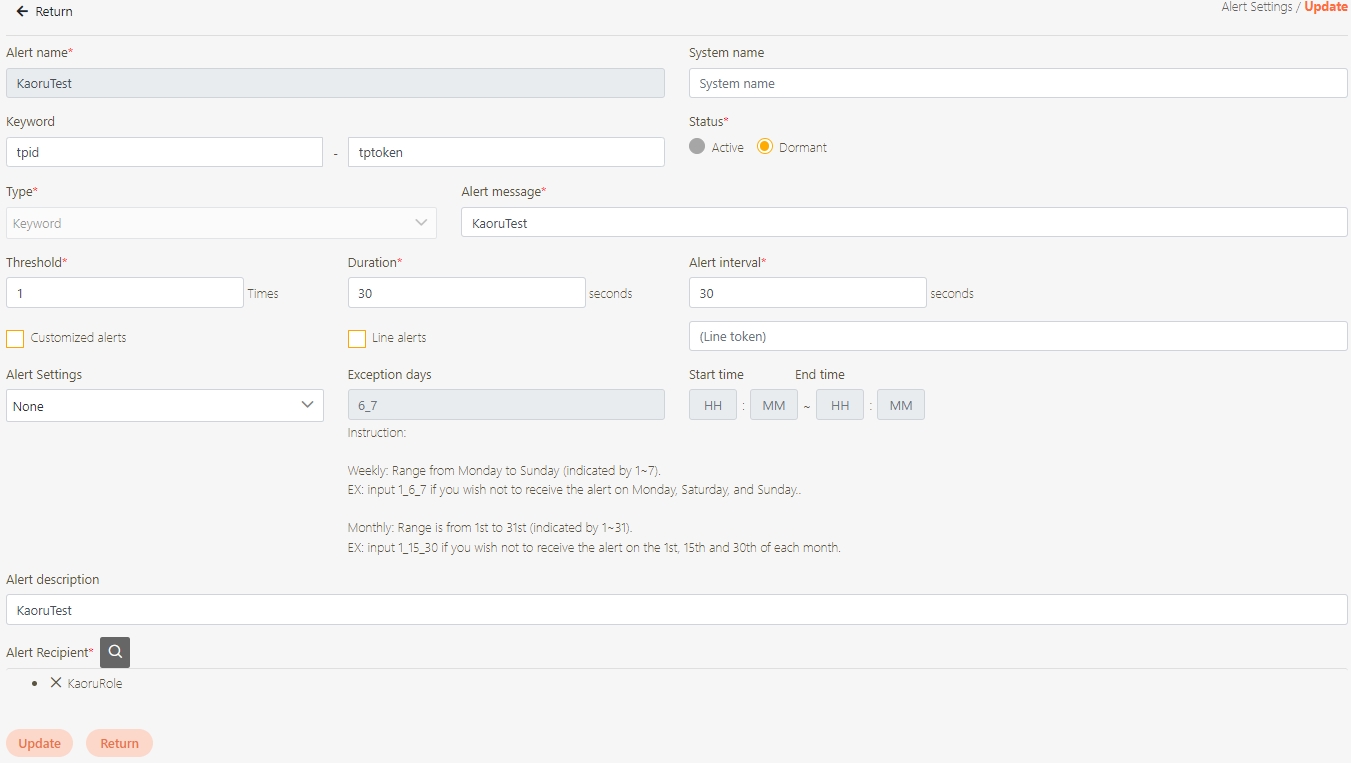
Modify the desired fields, and click Update to save and exit.
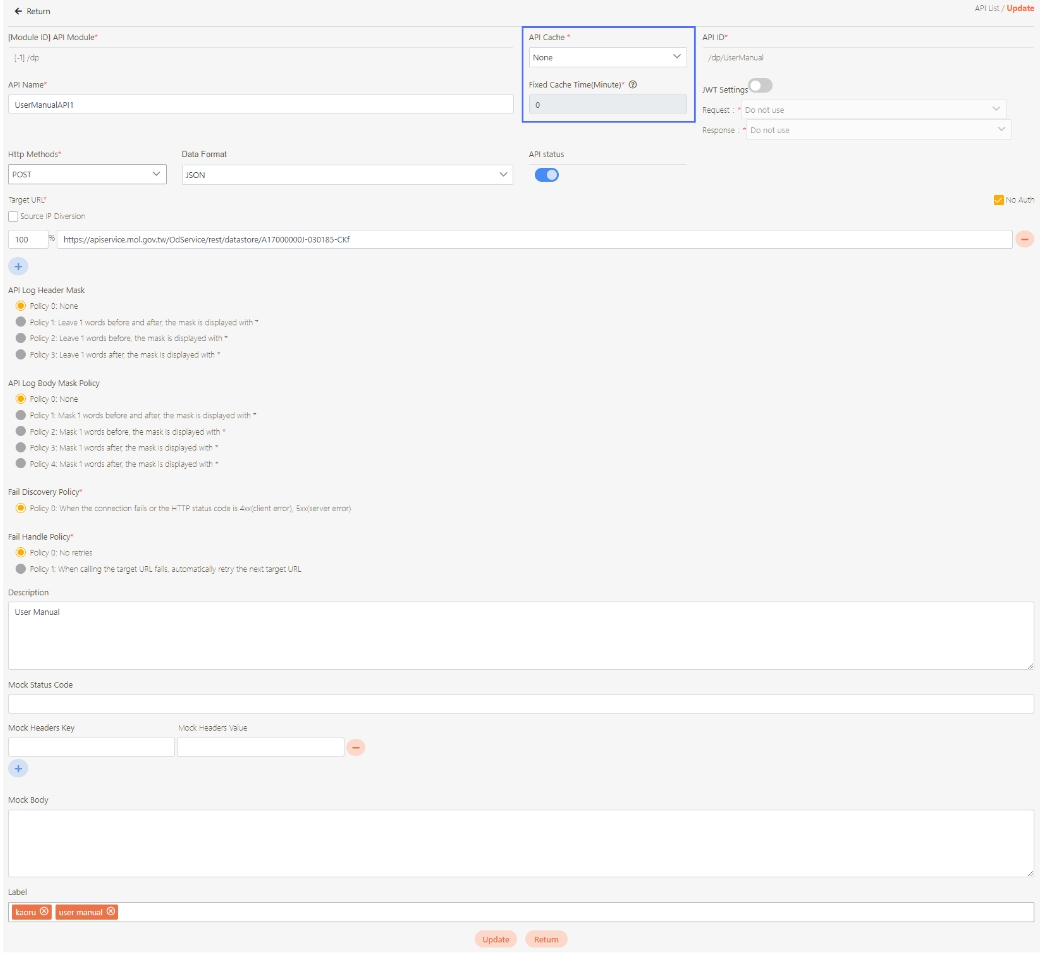
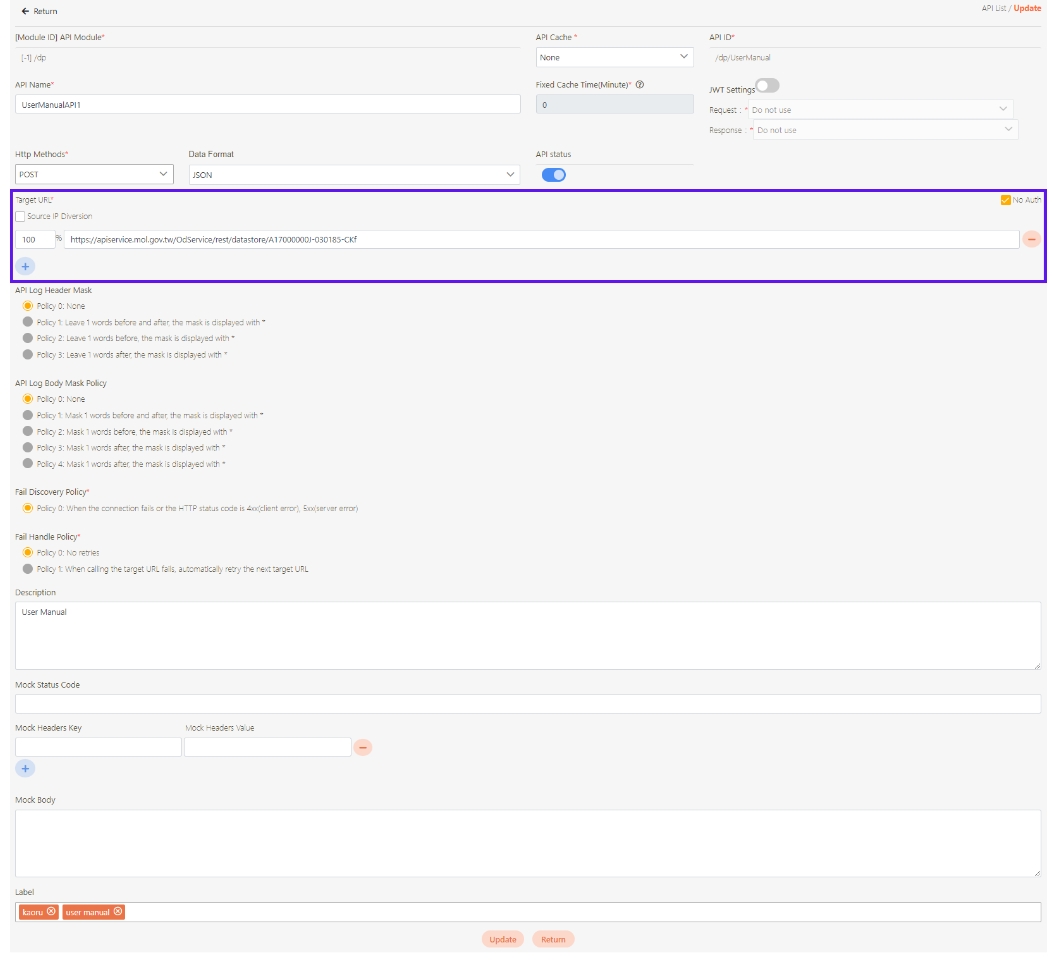
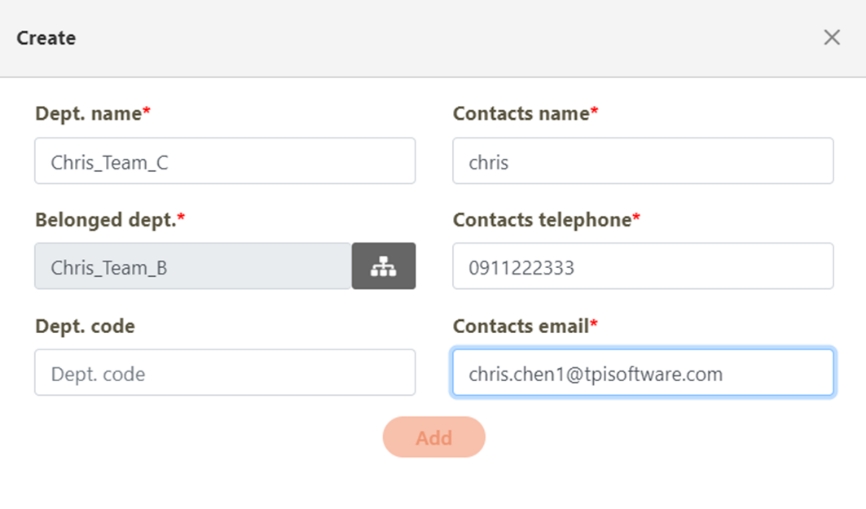
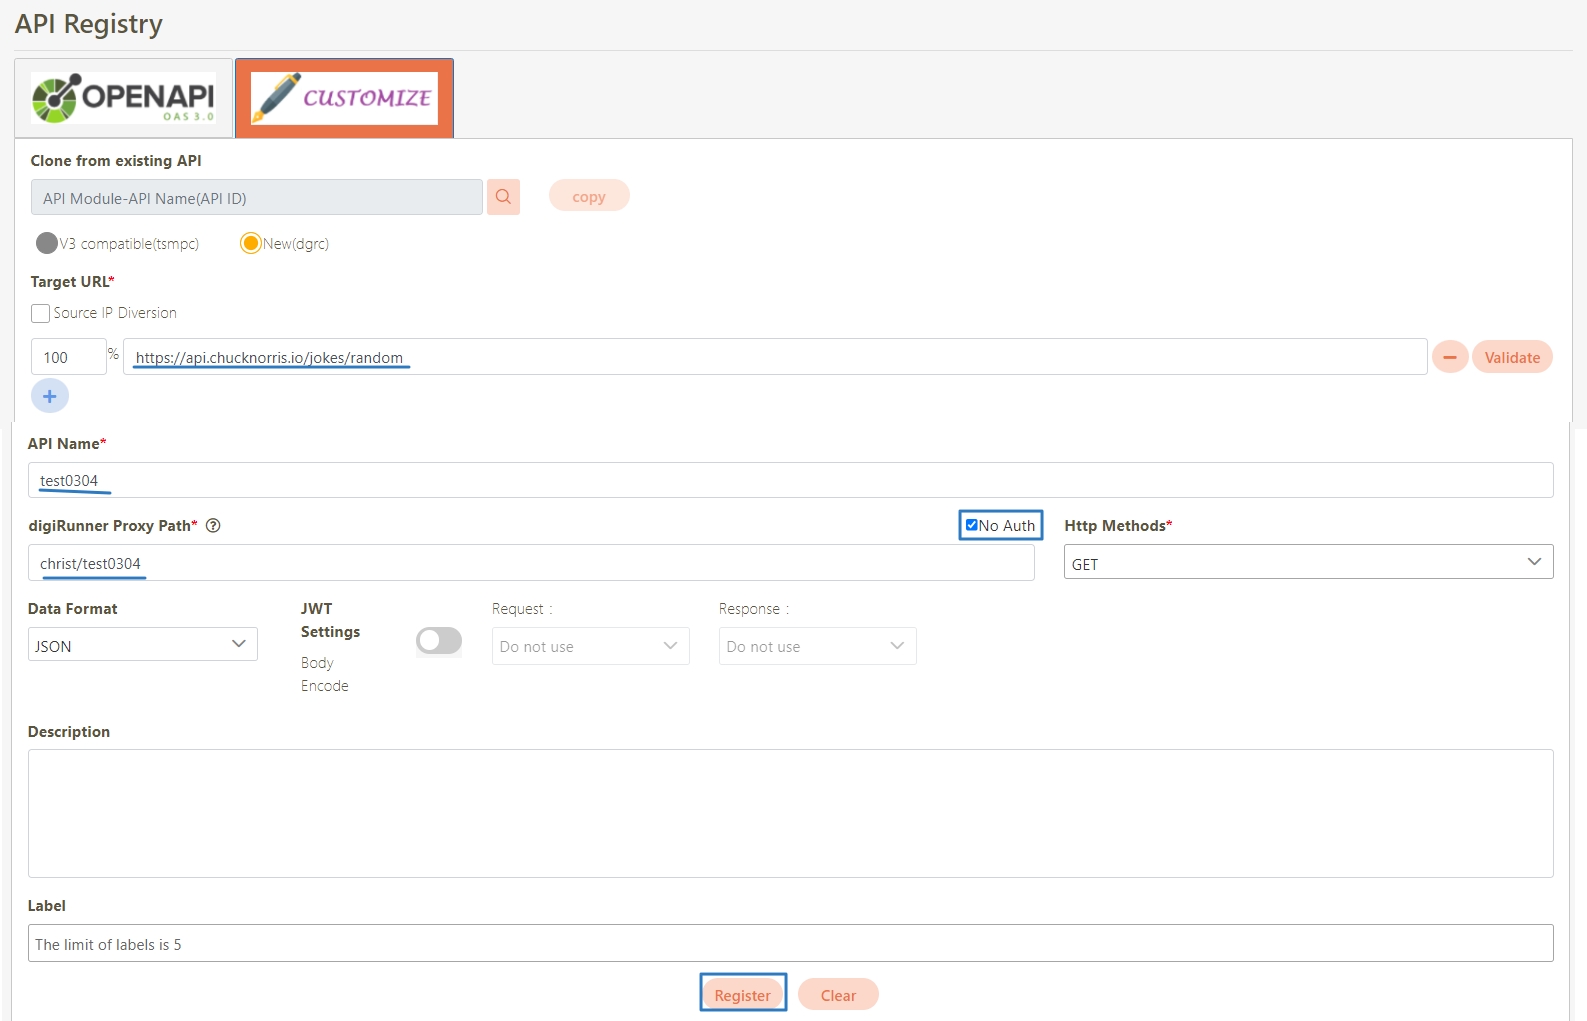
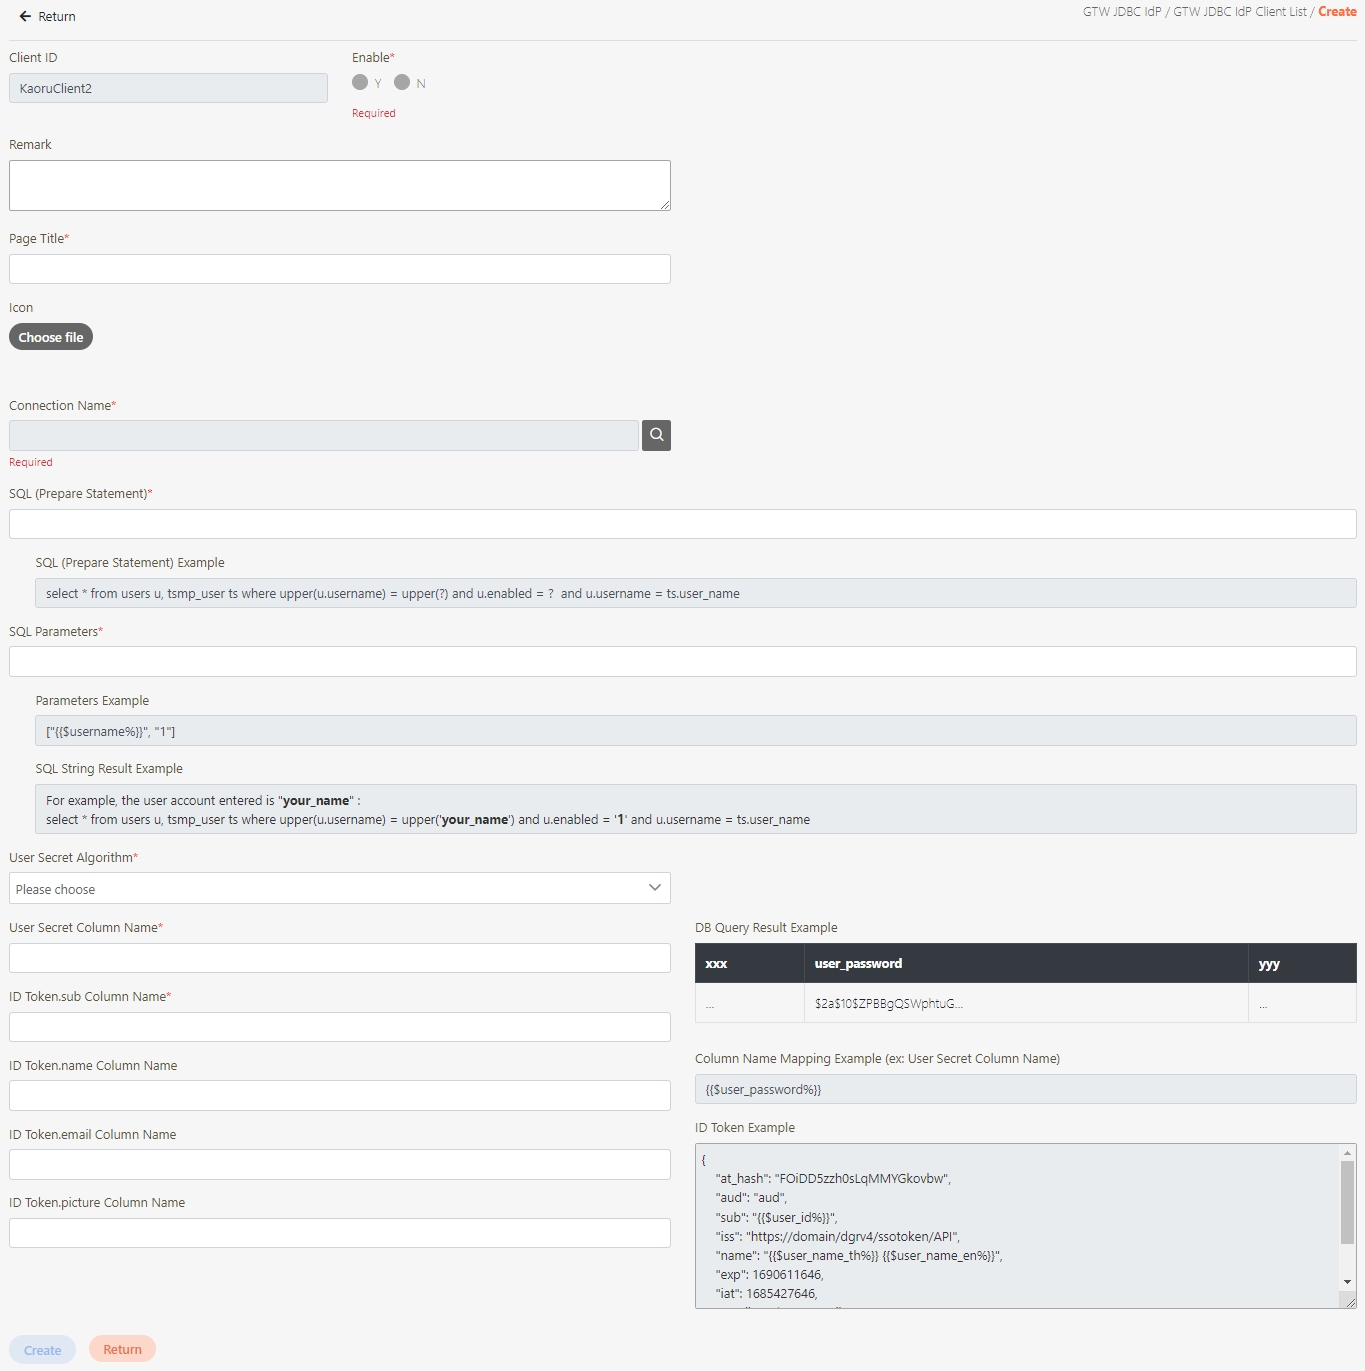
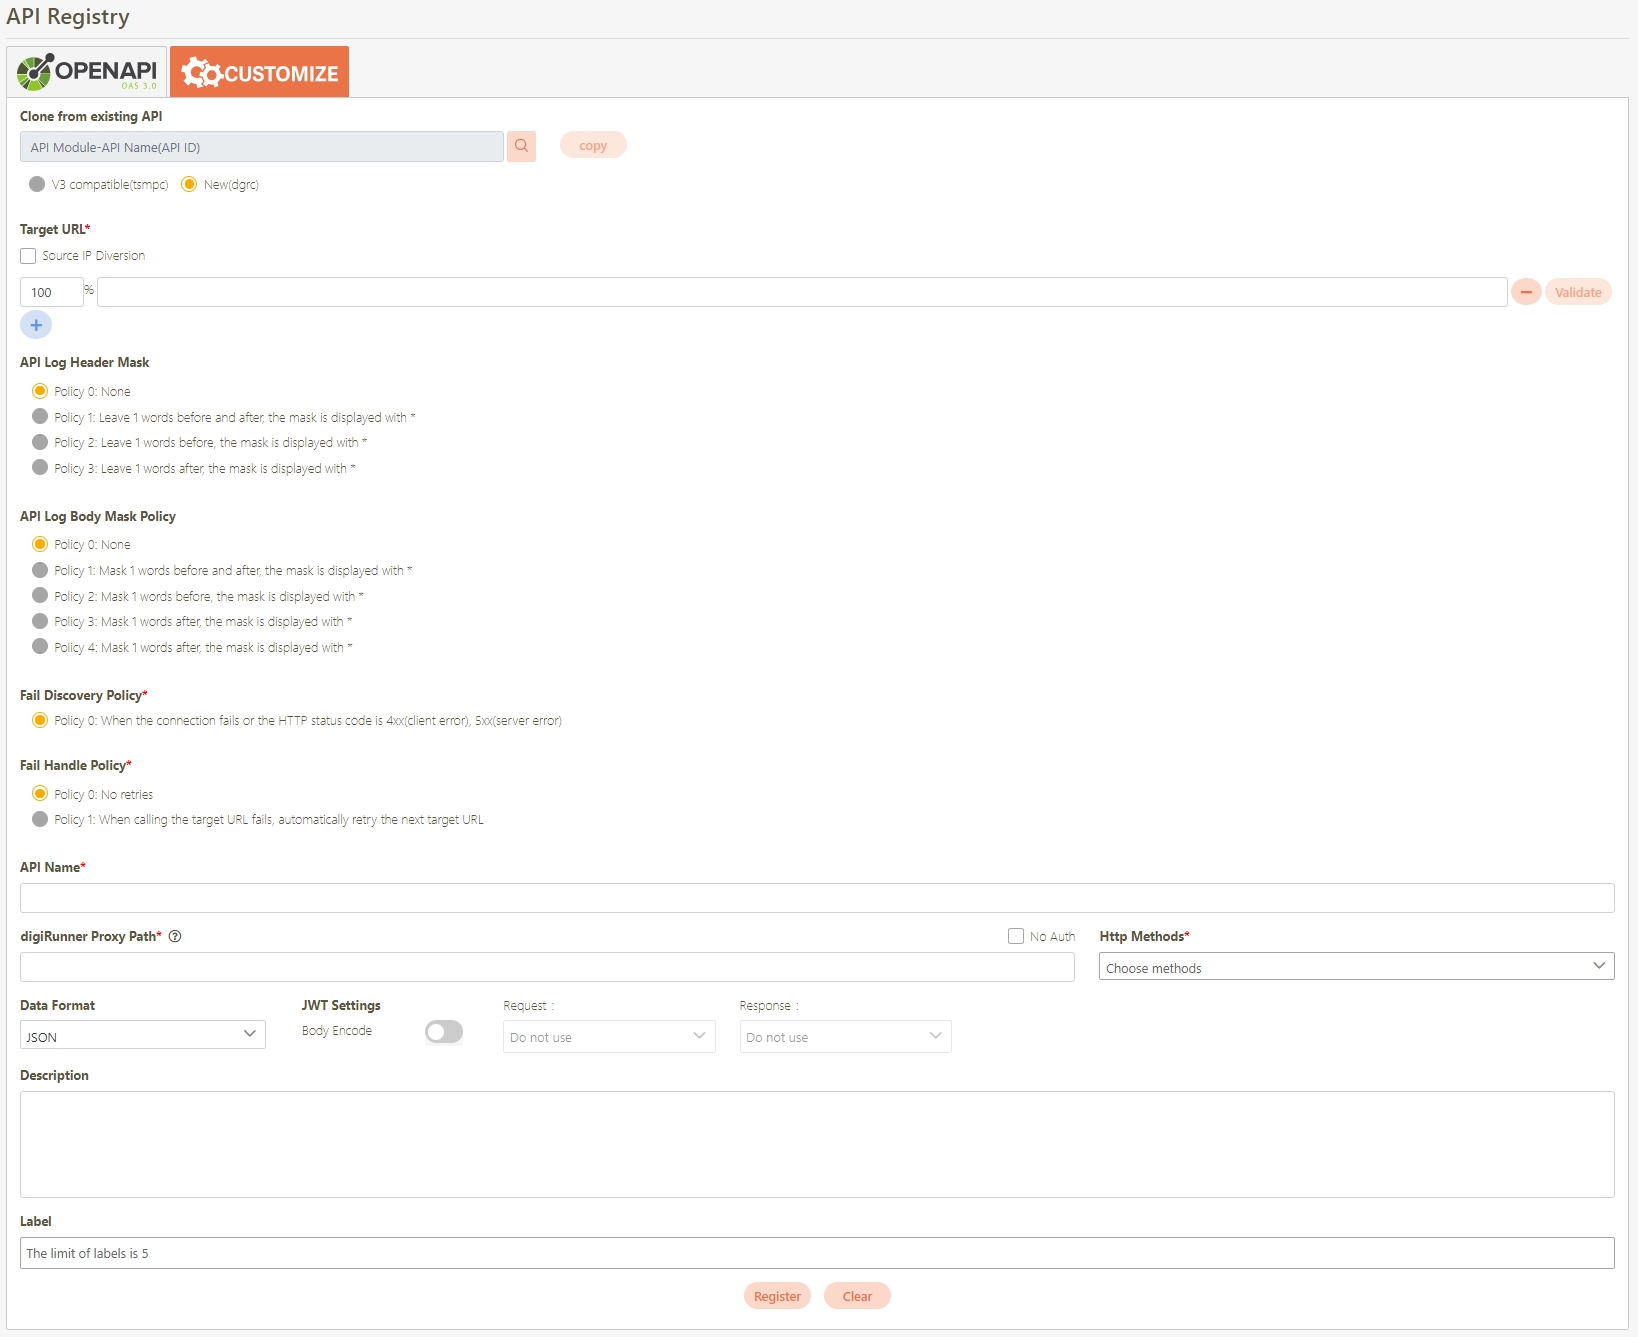
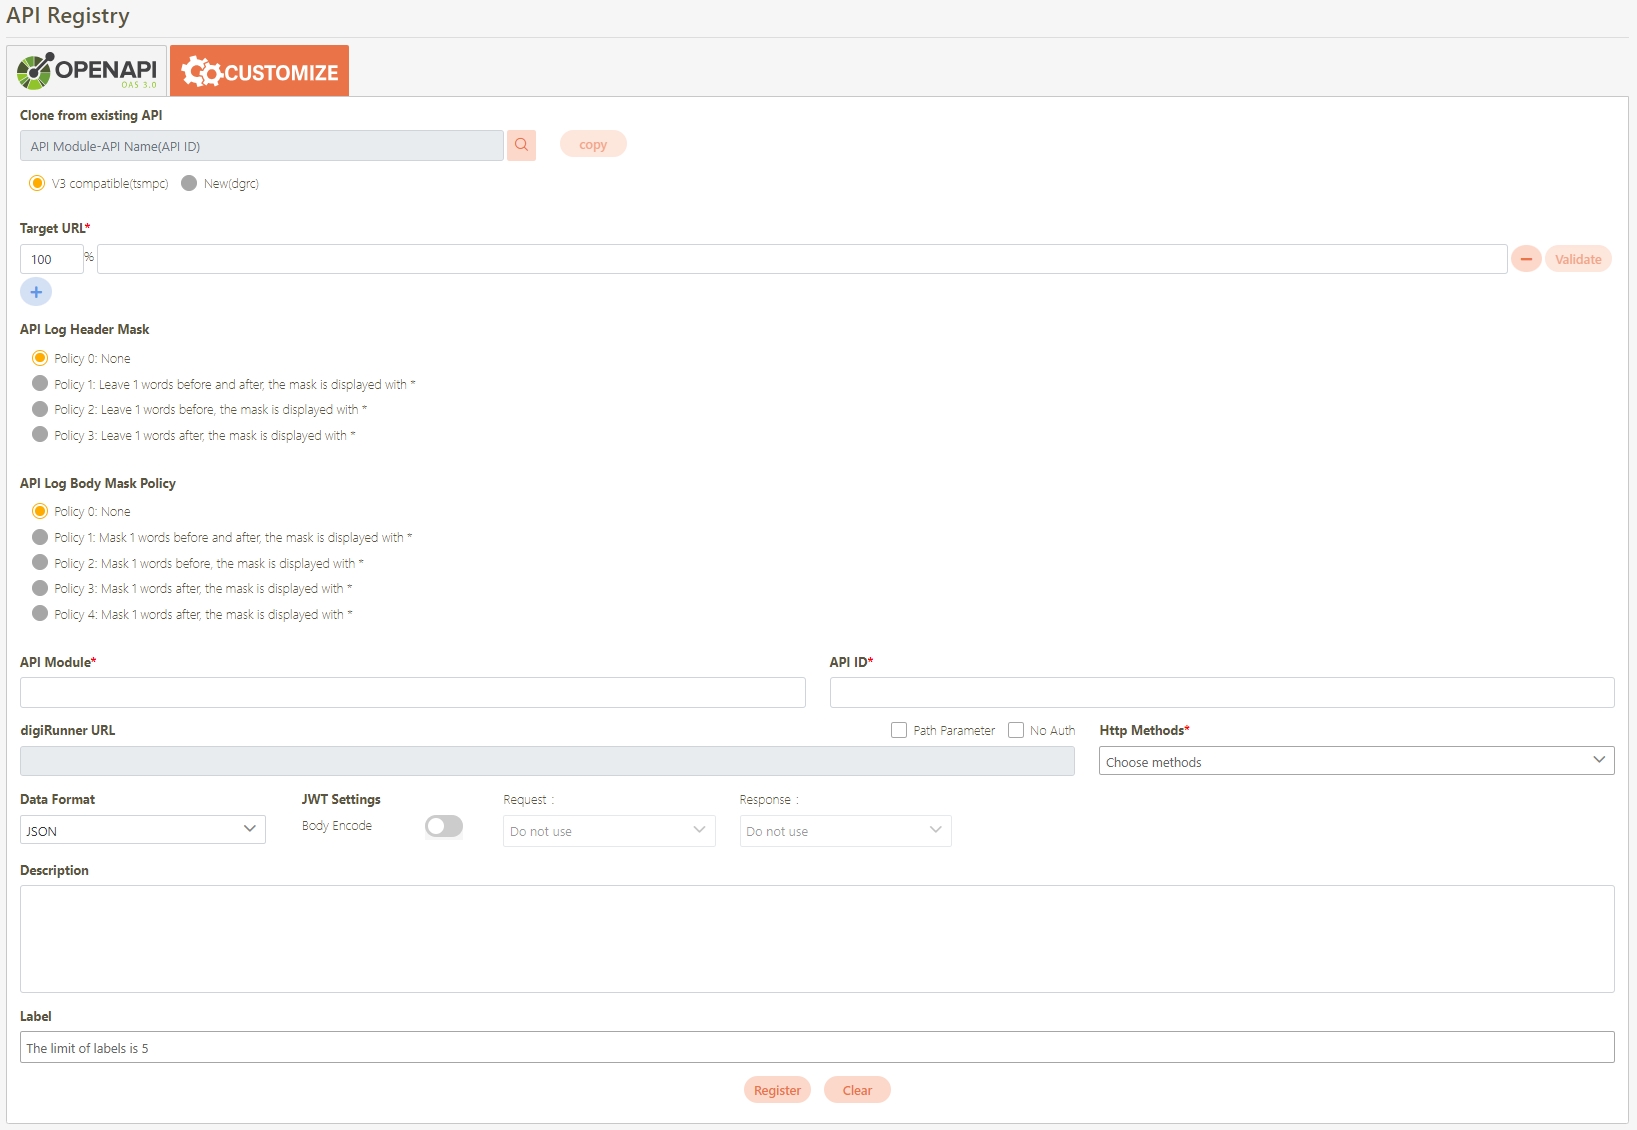
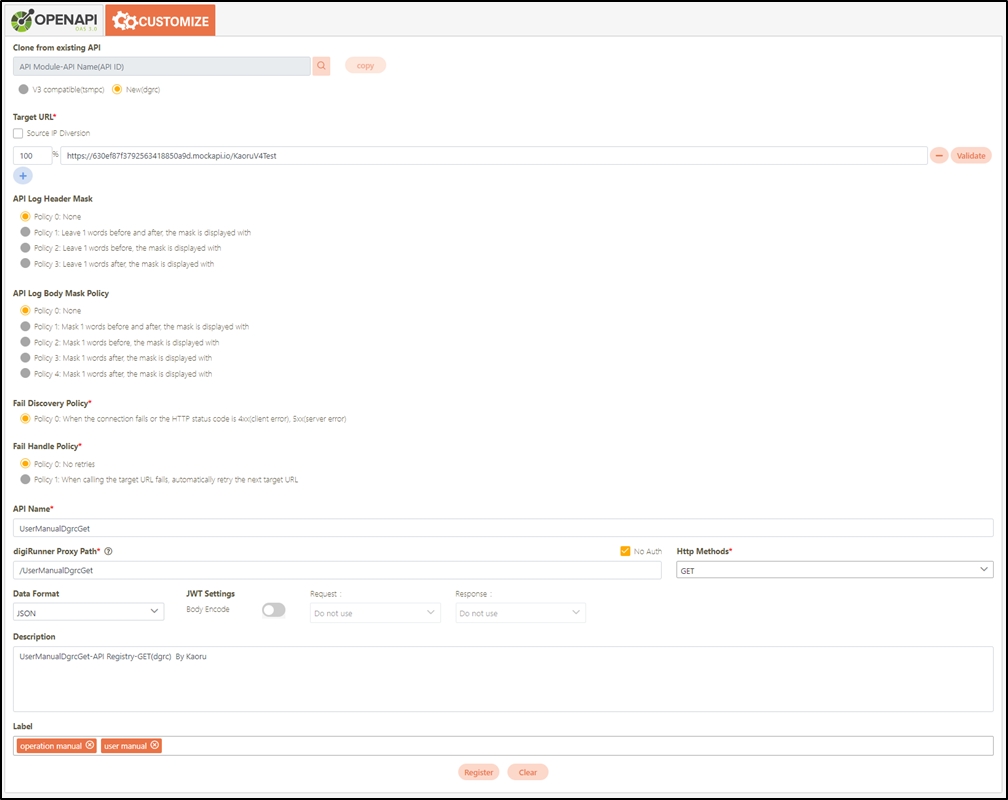
Fill in the data or make selections as instructed below. The fields marked with “*” are required.
[Module ID] API Module*: The API number and name cannot be changed.
API Cache*: Options include None / Auto / Fixed. If enabled, the number of calls made to endpoints can be reduced, and API request delays can be improved.
API ID*: ID of the API; cannot be changed.
API Name*: Able to rename the API
Fixed Cache Time(Minute)*: The duration for which data is retained in the cache. This field is only applicable when the API Cache is set to Fixed. If the fixed time is set to 0, the value from FIXED_CACHE_TIME will be fetched; otherwise, the value specified in the fixed cache time will be used. FIXED_CACHE_TIME can be configured in Setting > FIXED_CACHE_TIME.
API status*: Enables or disables API operations.
JWT Settings: Set whether to use JWE or JWS encryption for Request / Response.
Http Methods*: Set the Http Methods of this API.
Data Format: Specifies the format of this API (SOAP / JSON / XML).
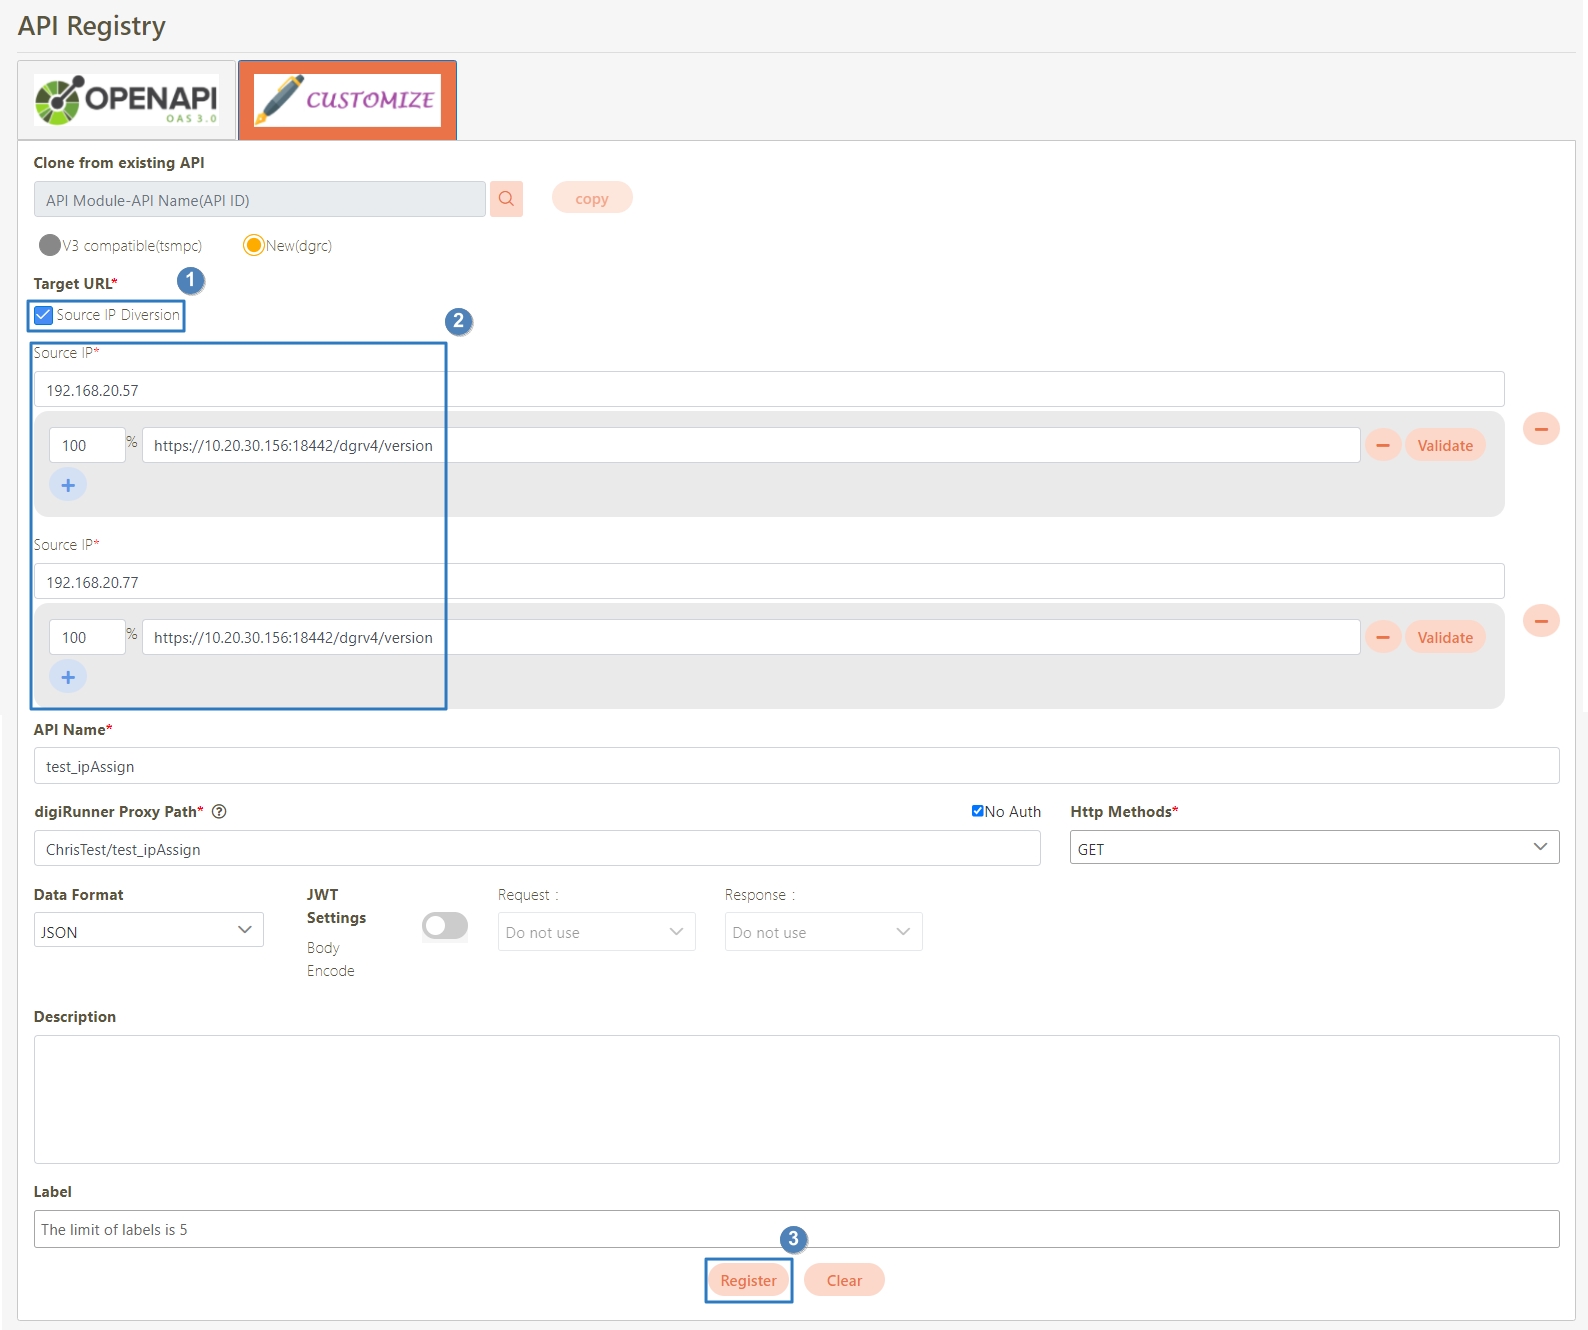
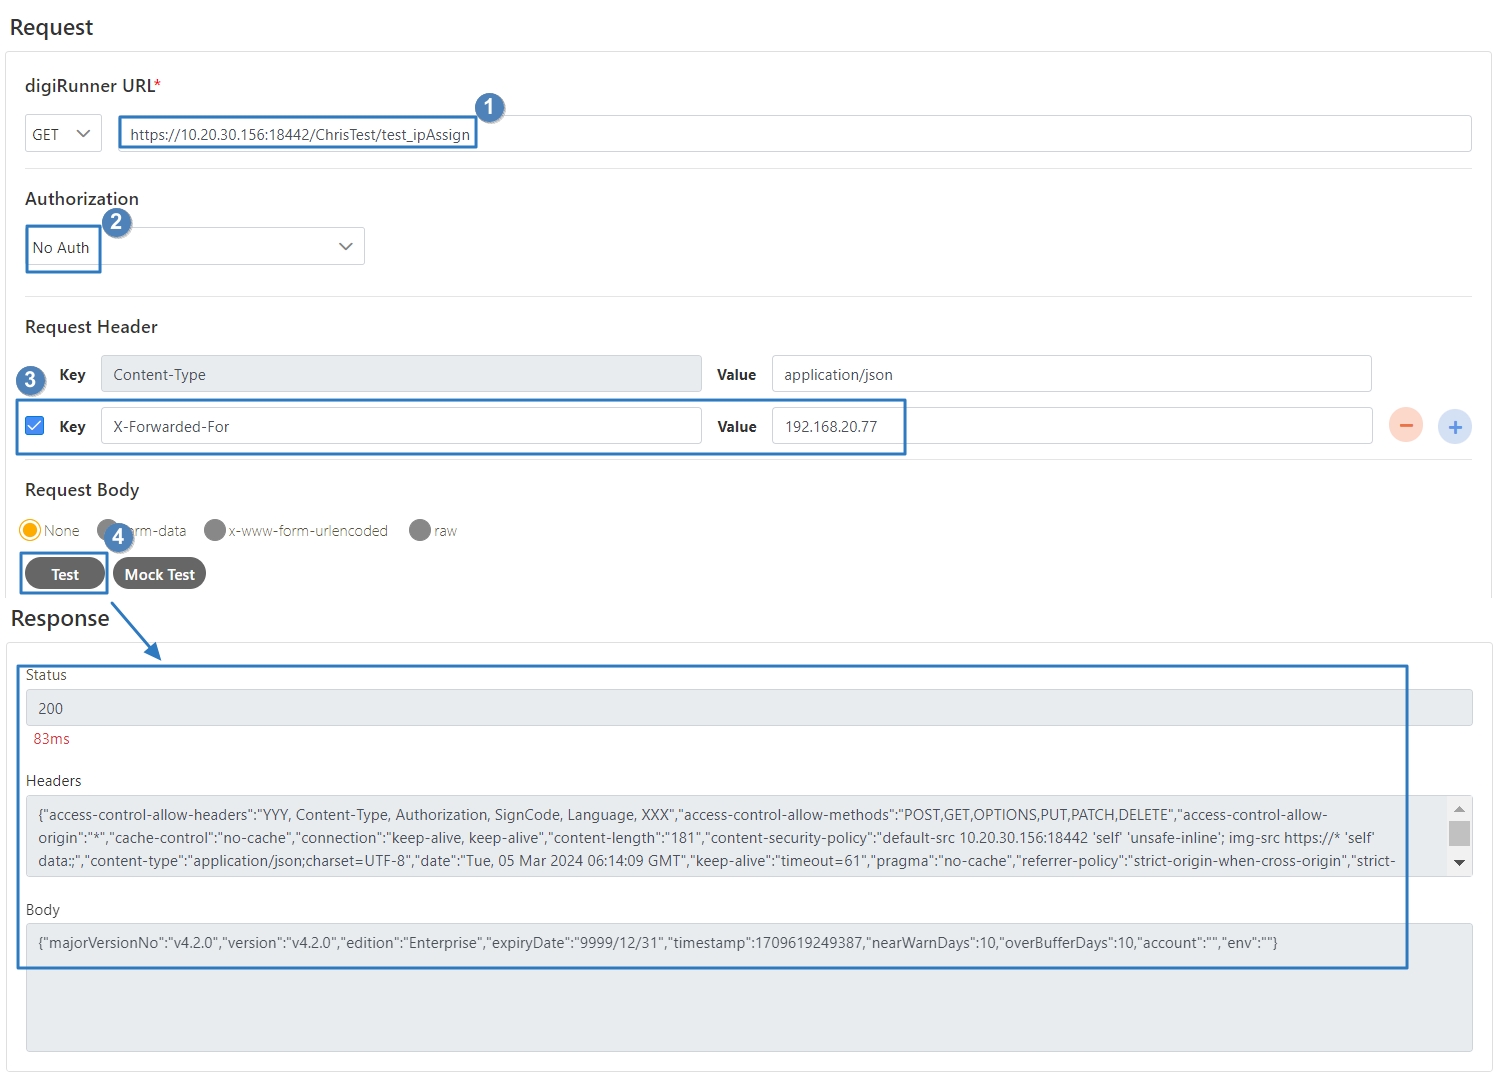
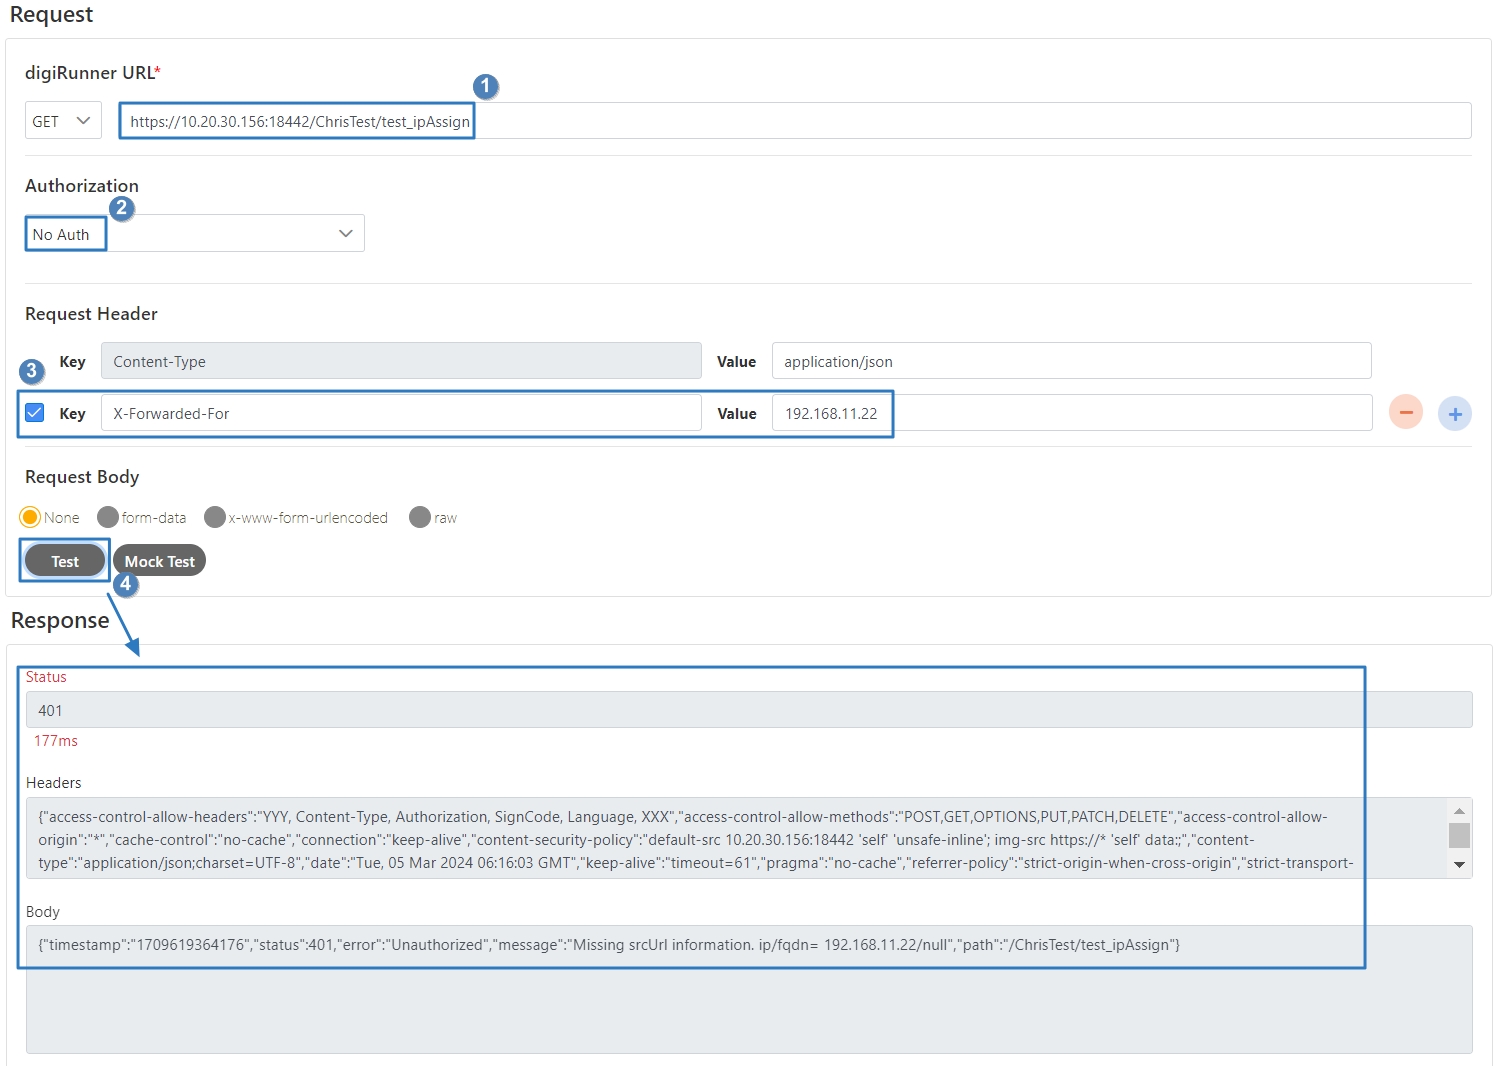
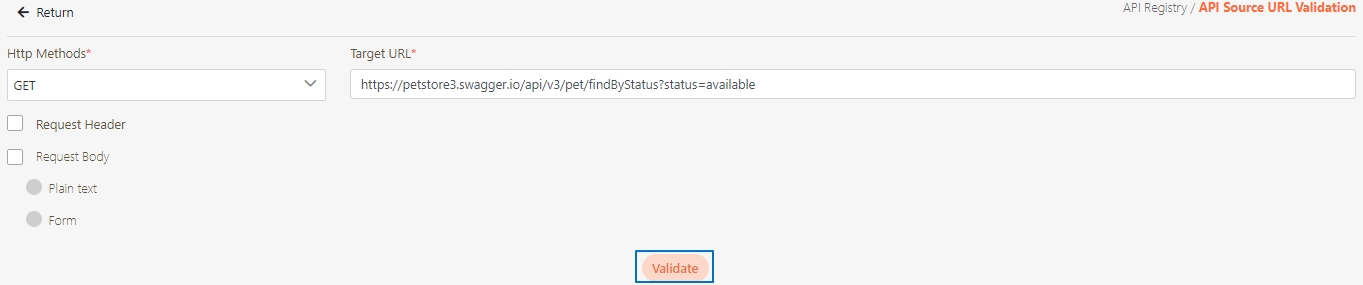
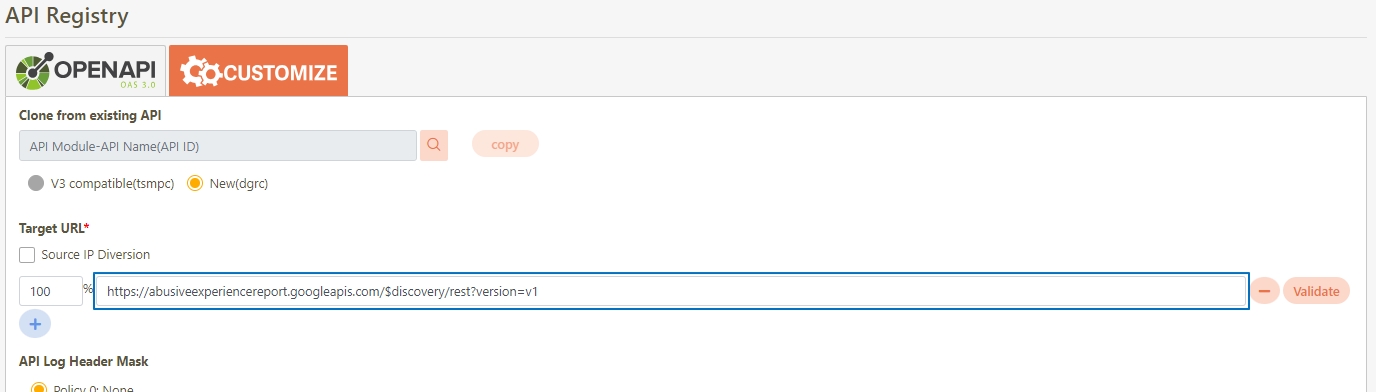
Target URL*: For registered APIs only, if the source URL has been changed, the new URL can be specified here.
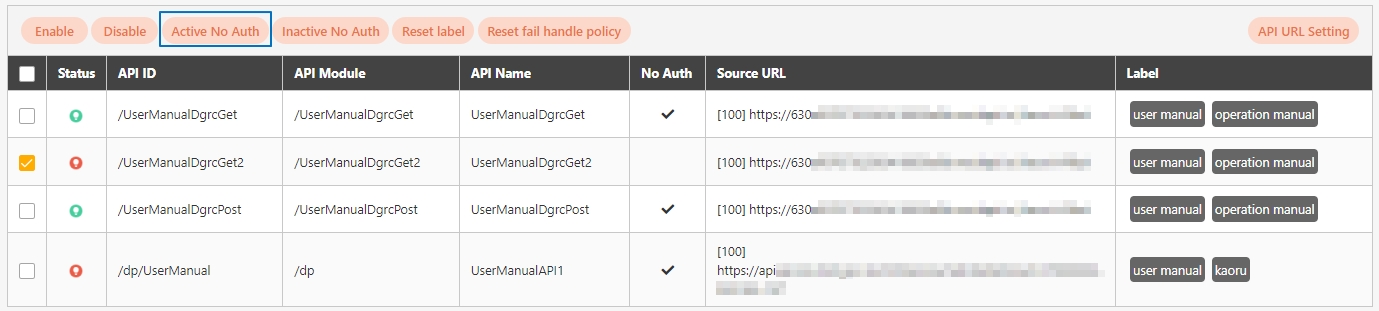
Check Source IP Diversion to configure the source IP for more effective management and control of network traffic. For registered APIs, only No Auth is available, while combination APIs can select either Path Parameter or No Auth.
Path Parameter: Upon checking, carries over the URL Path parameter data when calling APIs.
No Auth: Upon checking, allows calling the API without OAuth authentication, commonly used for Public APIs.
API Log Header Mask: Specifies masking for the Header field, applicable only to registered APIs.
For example, if the value is Hello, with a character count of 1 and masking character #, the following will be displayed:
Policy 0: No masking, displays Hello.
Policy 1: Retains the first and last character, displays H###o.
Policy 2: Retains the first character, displays H####.
Policy 3: Retains the last character, displays ####o.
API Log Body Mask Policy: Specifies different masking strategies for keywords in the Body content, applicable only to registered APIs.
For example, if the original text, "name":"test","id":"1", with a character count of 2, masking character #, and keyword name, the following will be displayed:
Policy 0: No masking, displays "name":"test","id":"1".
Policy 1: Masks the first and last 2 characters, displays "#name##"test","id":"1".
Policy 2: Masks the first 2 characters, displays "#name":"test","id":"1".
Policy 3: Masks the last 2 characters, displays "#name##"test","id":"1".
Policy 4 uses regular expressions for definition. For example, with a character count of 1 and a mask of #, and a regular expression of name\d, the following will be displayed:
"name1":"test","id":"1" will display as "name1#:"test","id":"1".
"name2":"test","id":"1" will display as "name2#:"test","id":"1".
"name-3":"test","id":"1" will display as "name-3:"test","id":"1".
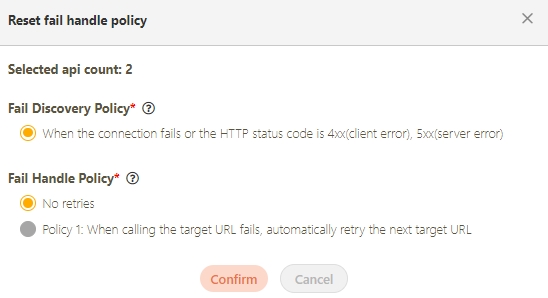
Fail Discovery Policy*: Specifies the action to take when an API connection fails. The system default is set to When the connection fails or the HTTP status code is 4xx (client error) or 5xx (server error).
Fail Discovery Policy is only available on dgrc.
Fail Handle Policy*: Specifies how the system handles API connection failures. Choose between No retries or When calling the target URL fails, automatically retry the next target URL.
Fail Handle Policy is only available on dgrc.
Description: Other descriptions of the API.
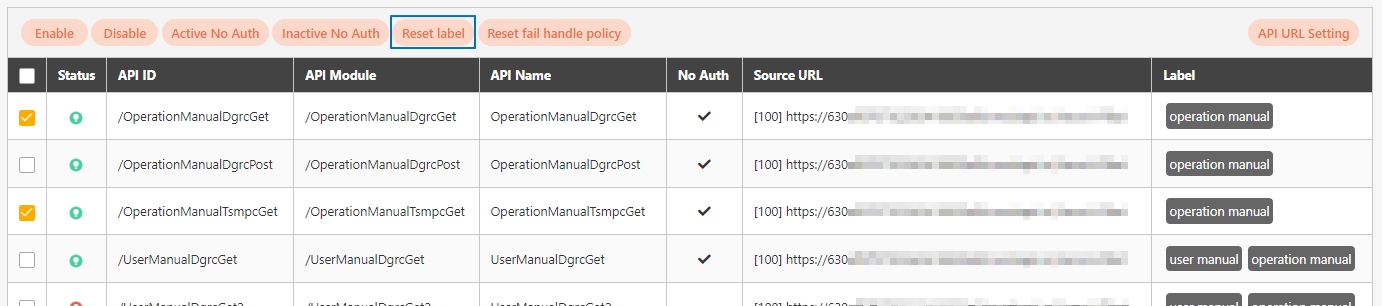
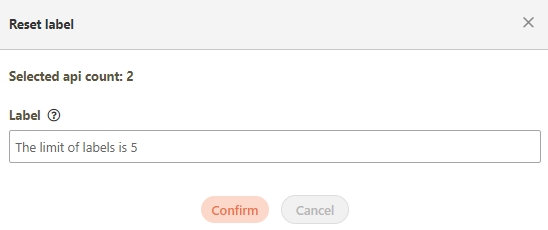
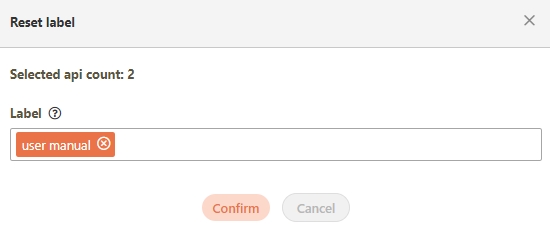
Label: Up to five labels can be used. Labels with capitalized characters will automatically be switched to lower case, and each label can be no more than 20 characters long.
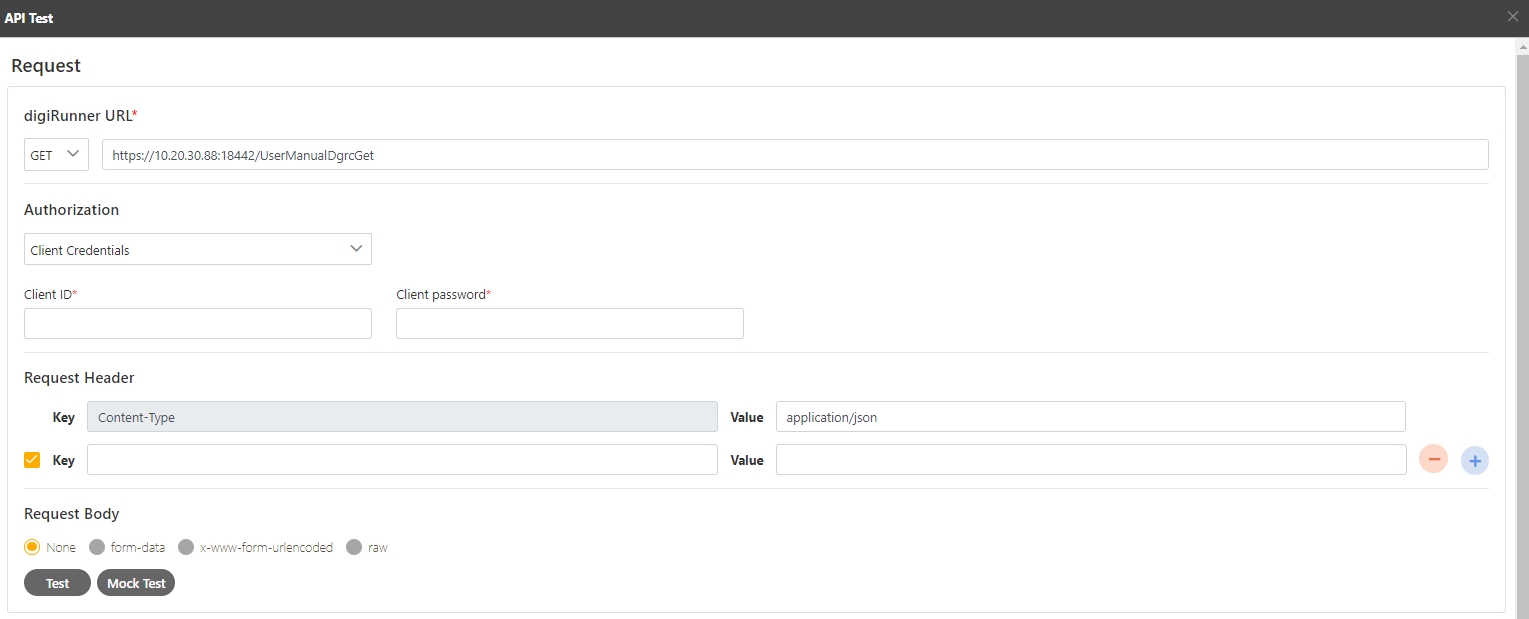
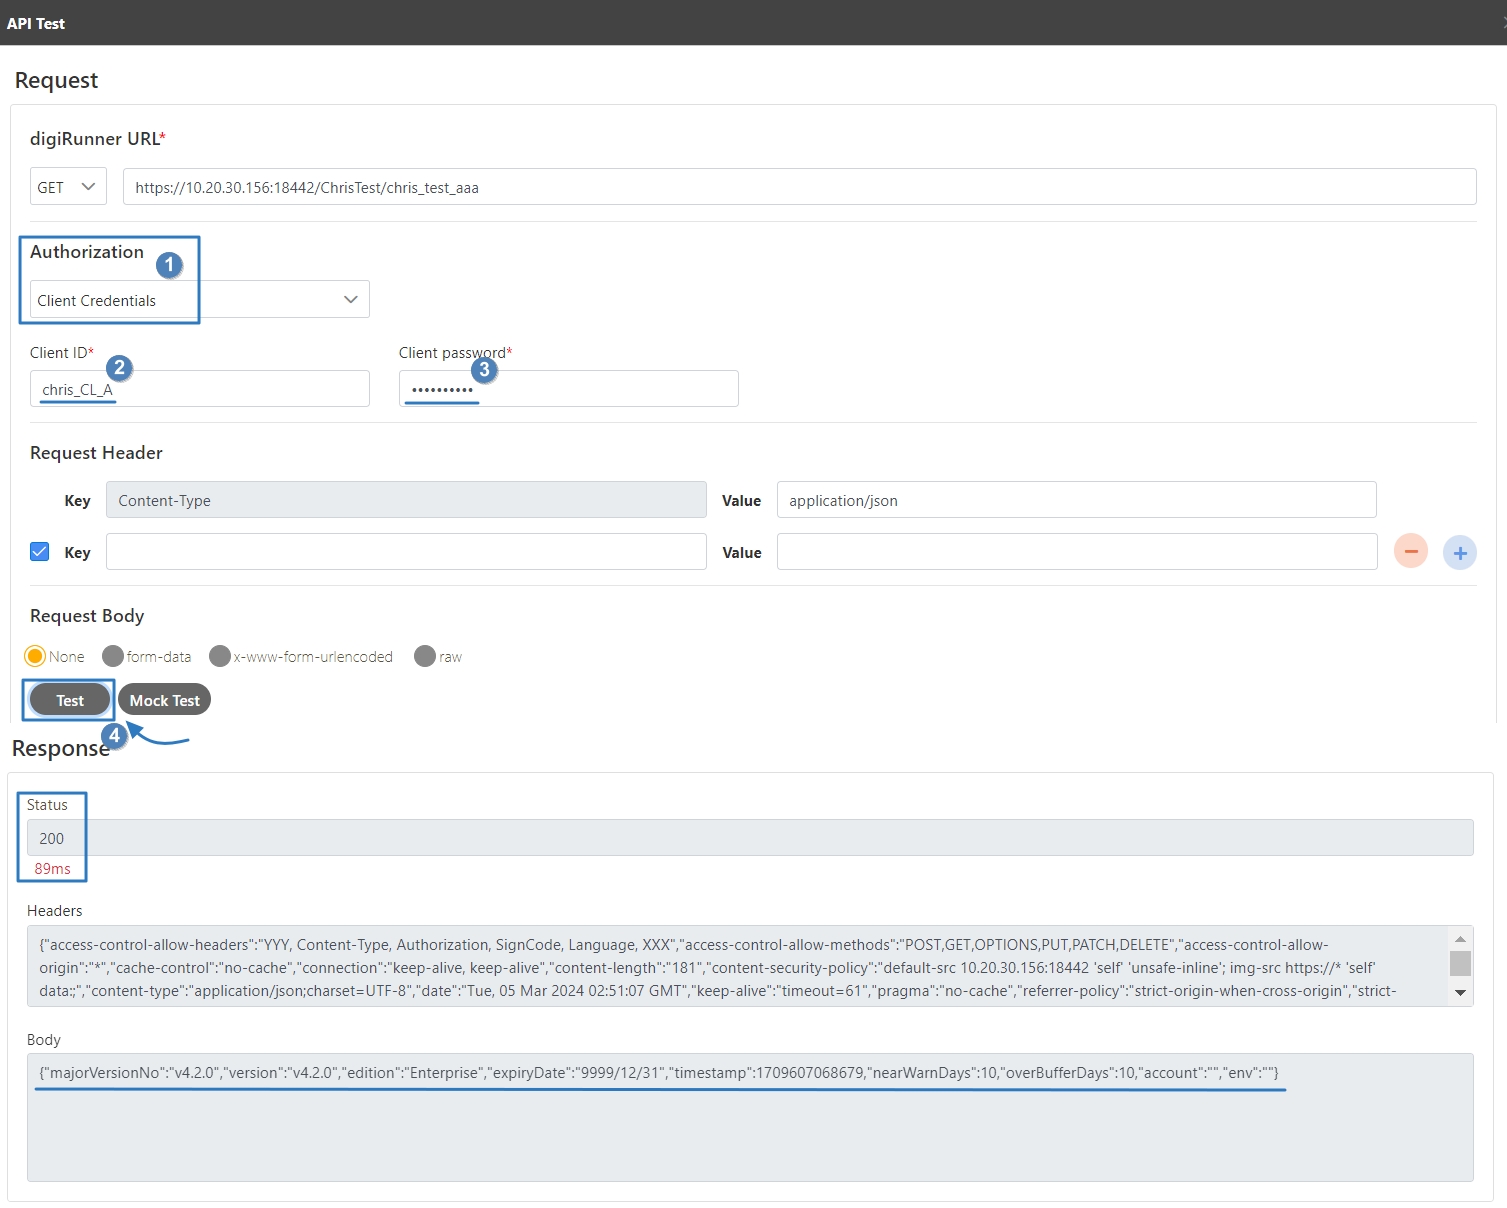
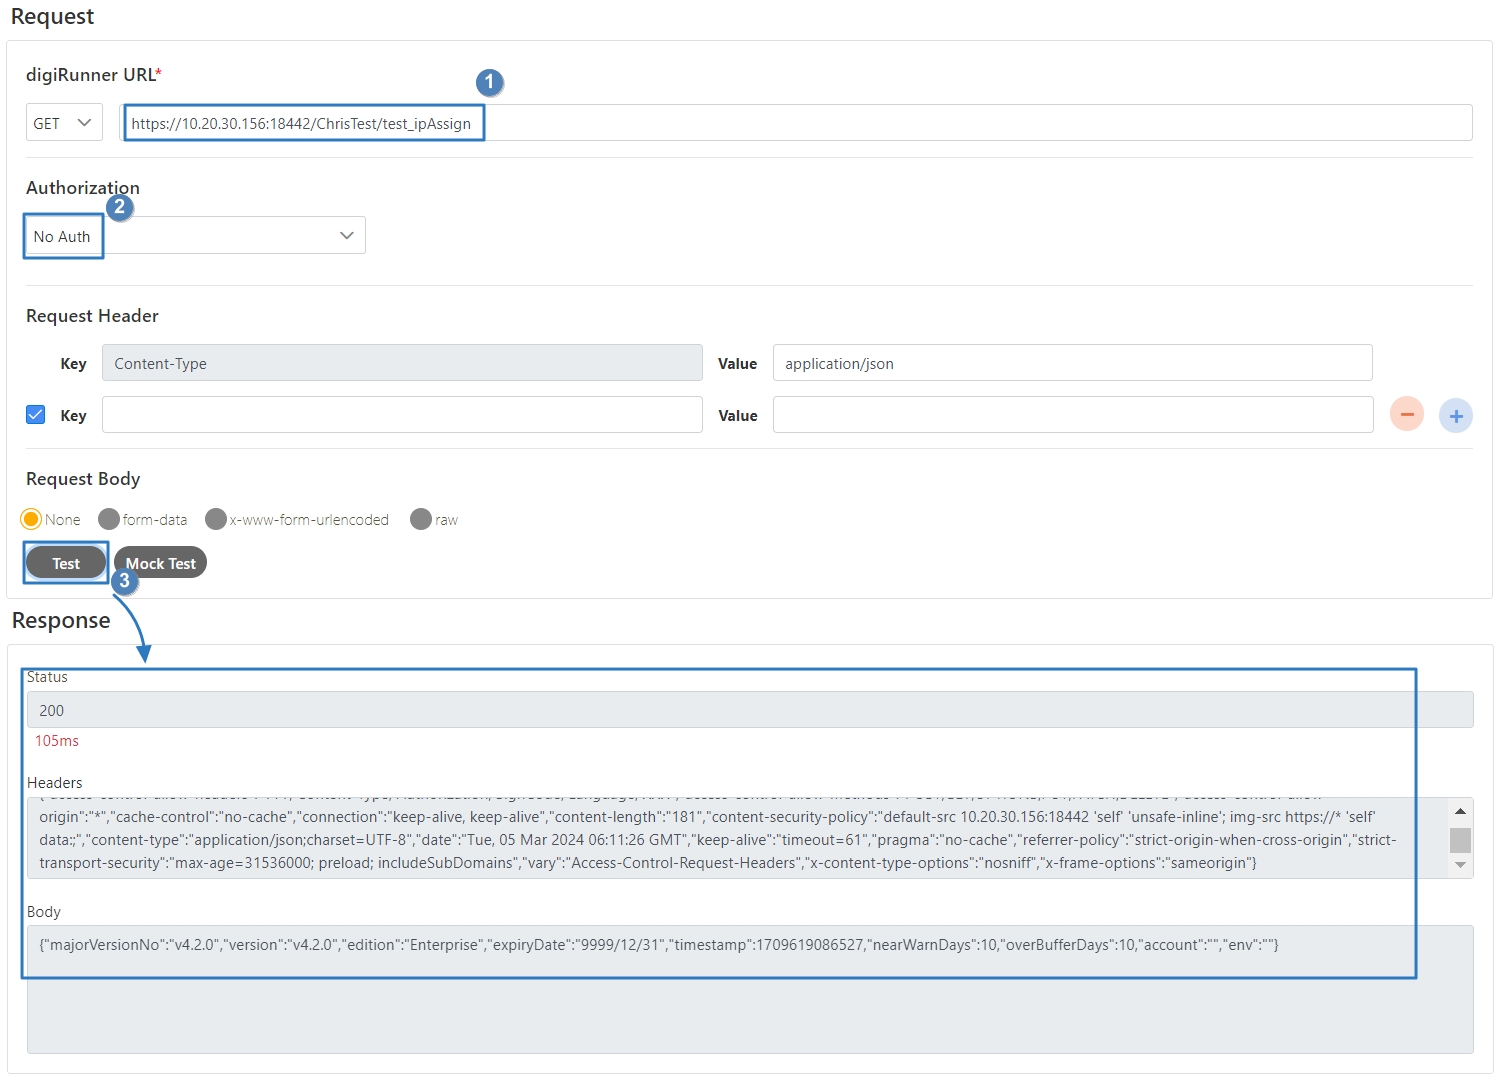
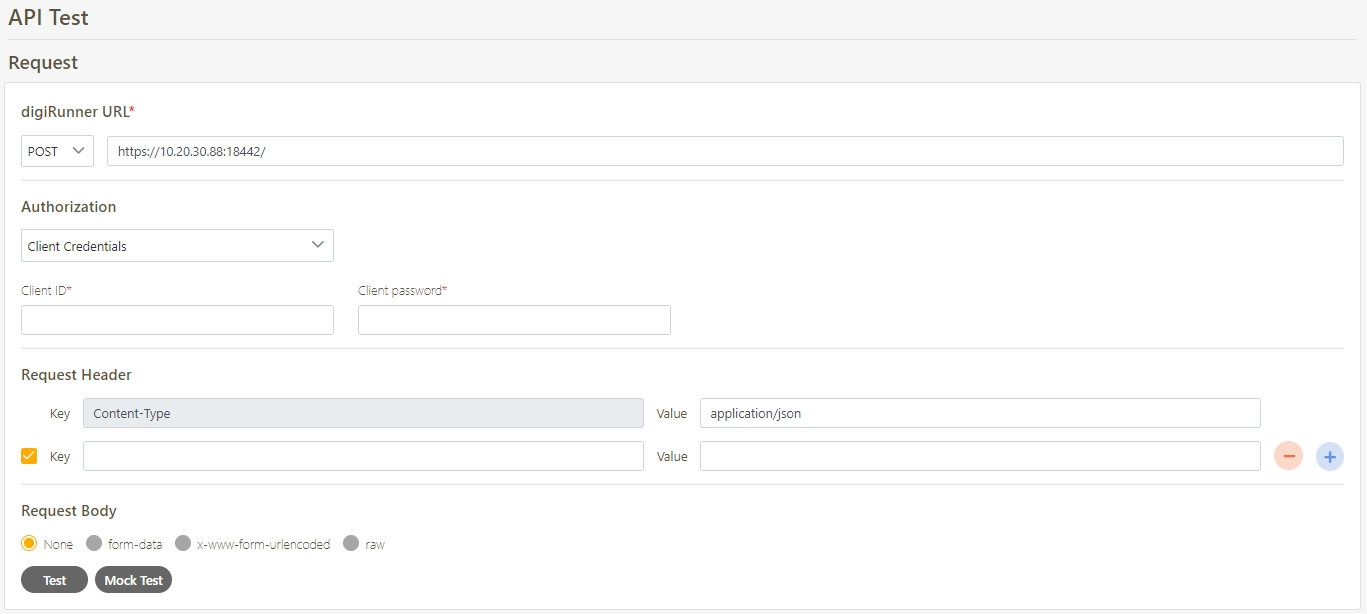
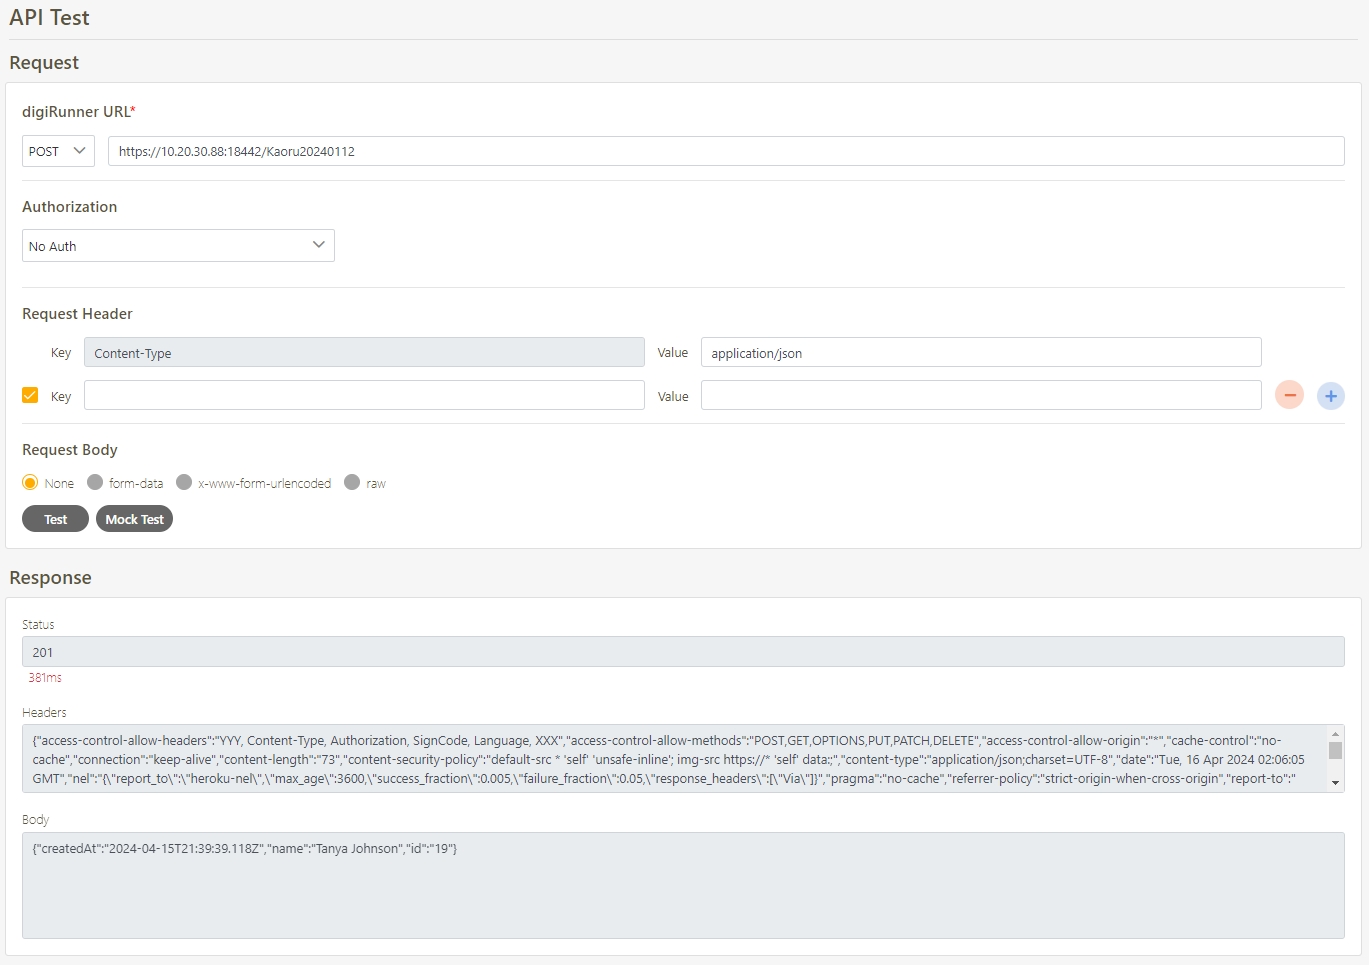
The API status must be enabled.
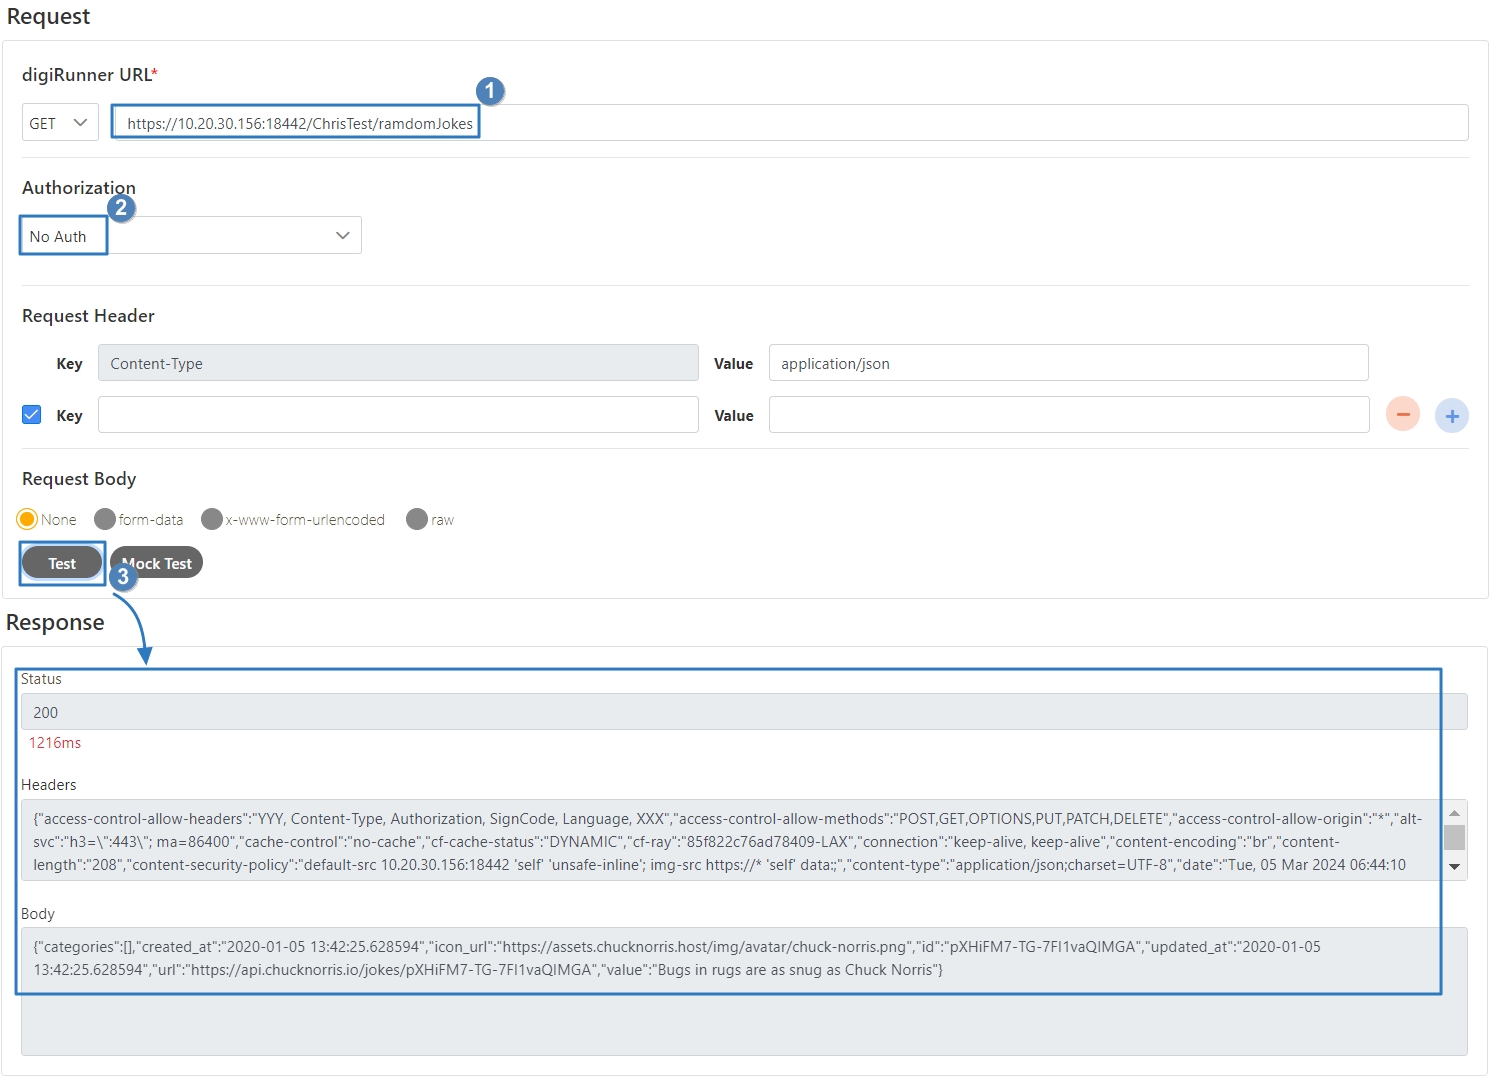
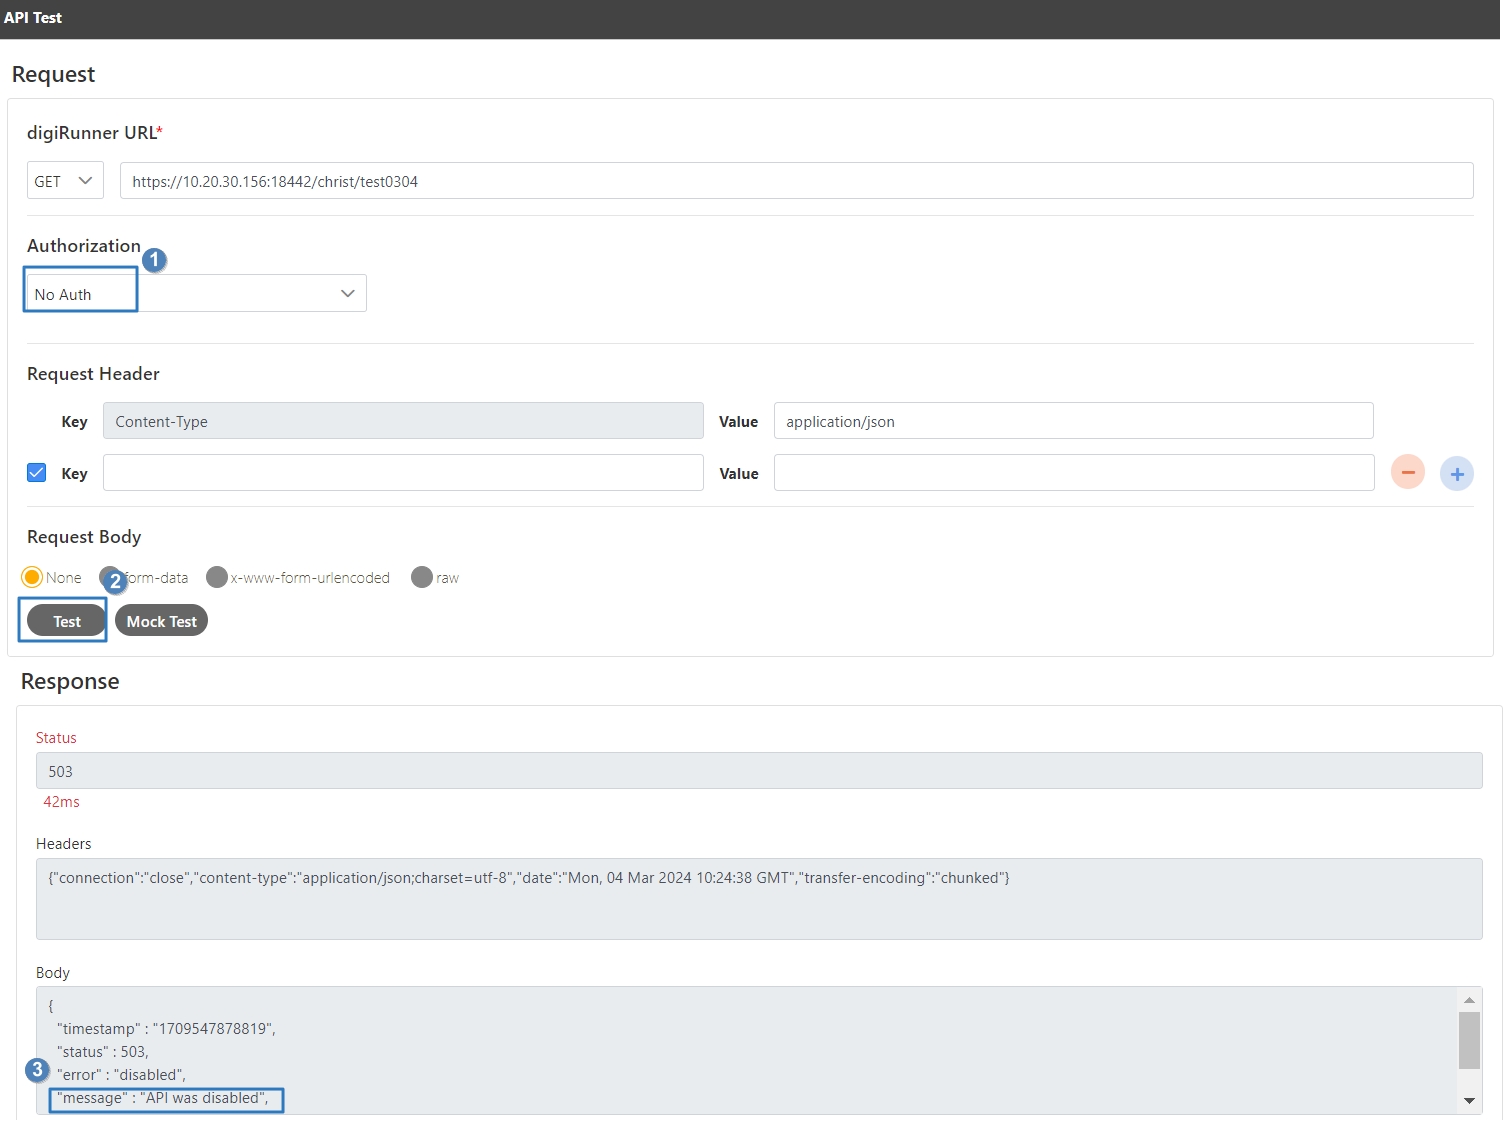
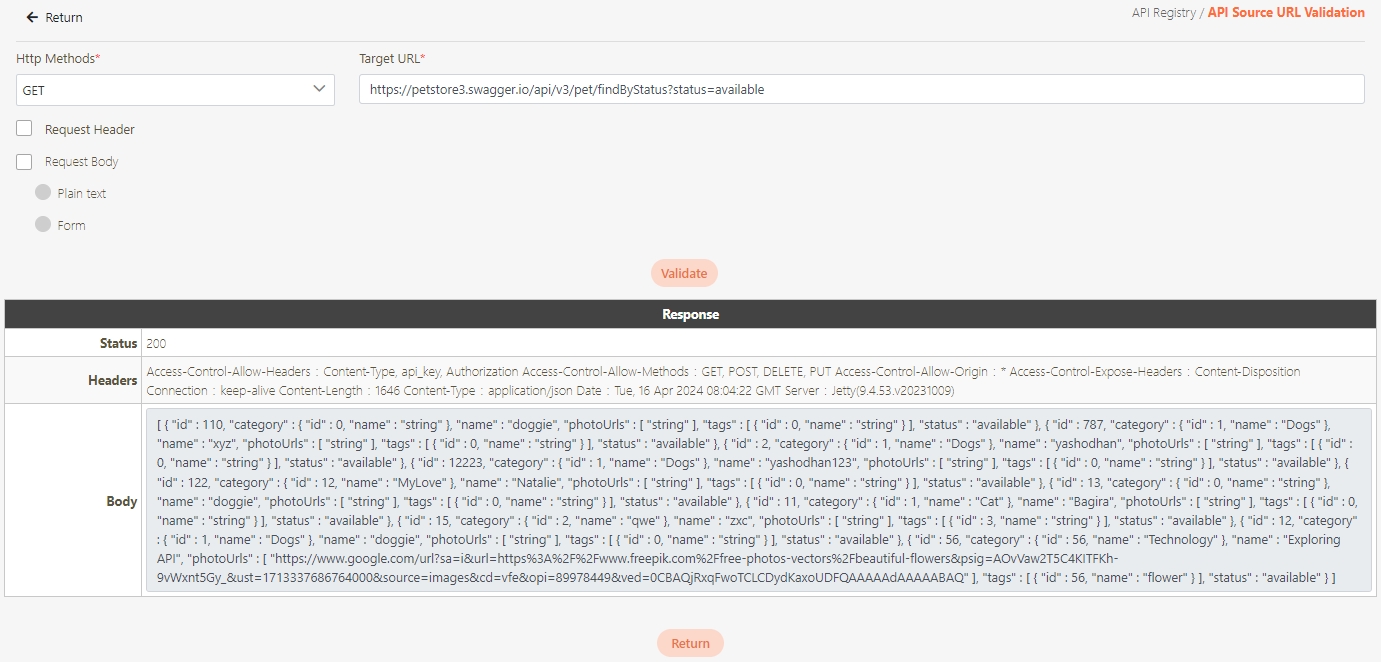
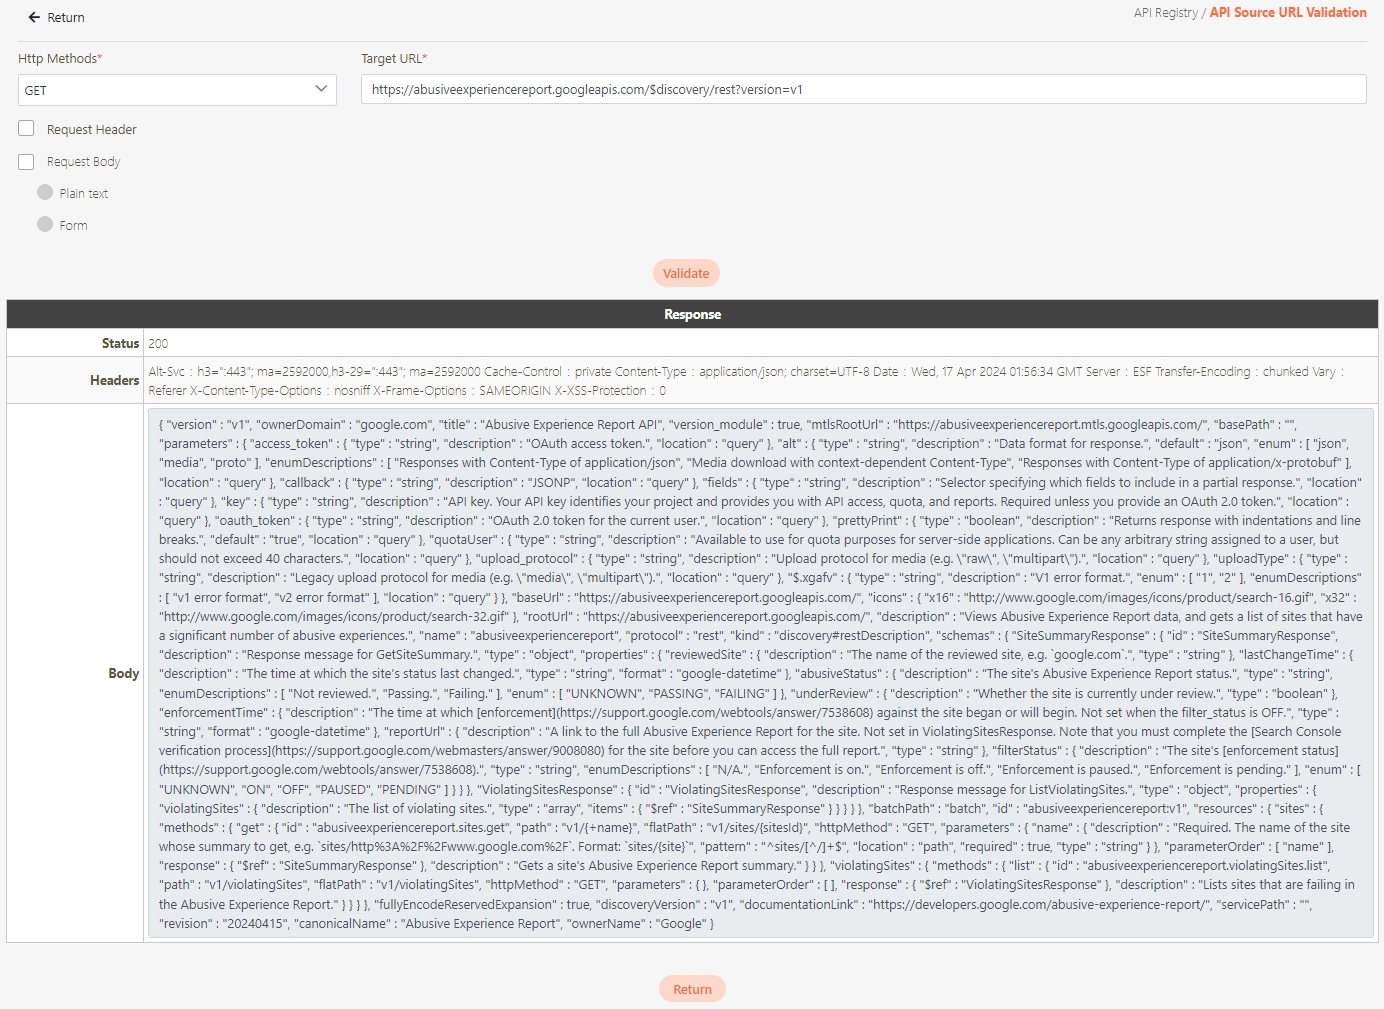
Select the Authorization test method, for example: Client Credentials means the test can only be clicked after entering the client account and password. Confirm the digiRunner URL and Http Methods fields, then click Test to test whether this API can be used.
If the result is Status 201 and there were data in Headers and Body, it means that this API is normal and can be used.
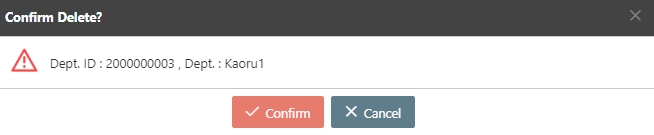
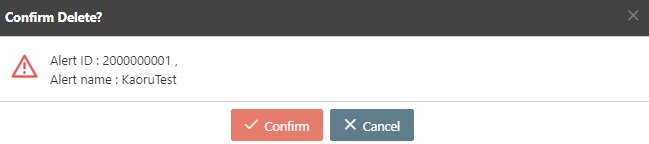
Search for the API to delete, and click Delete to proceed.
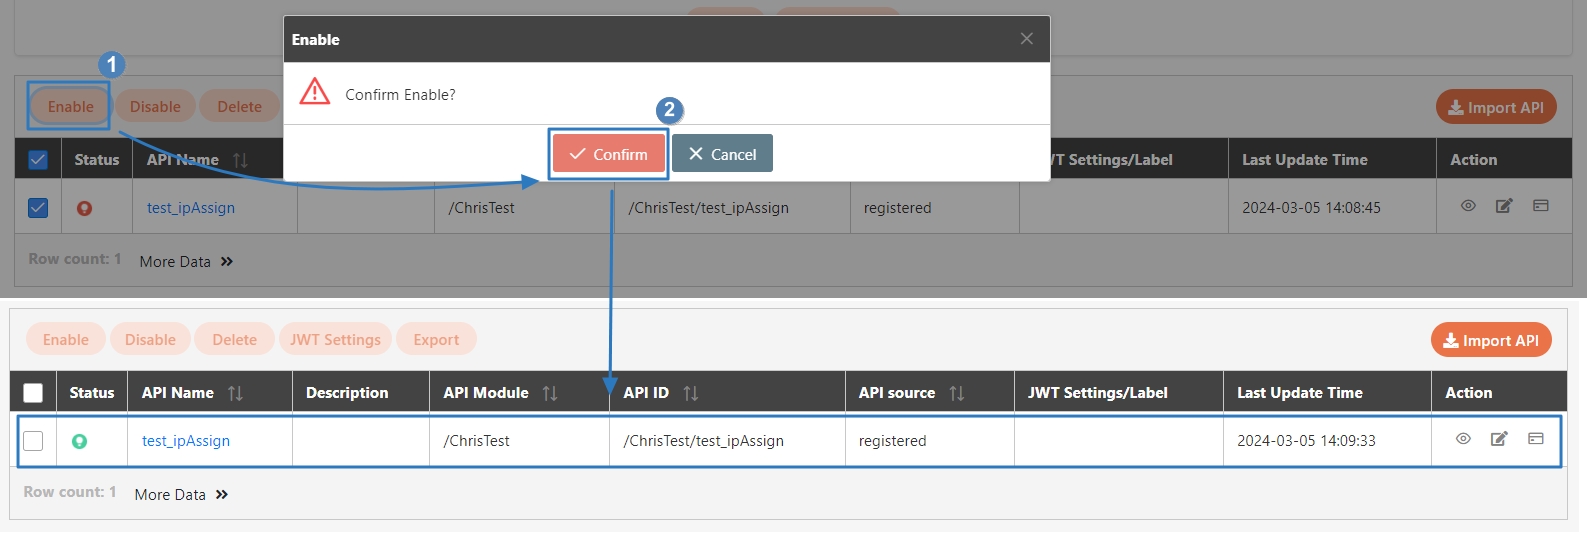
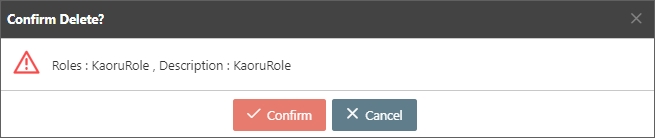
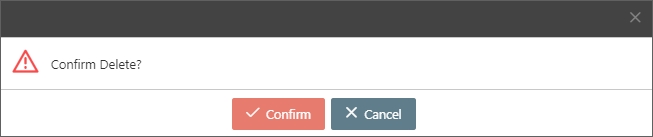
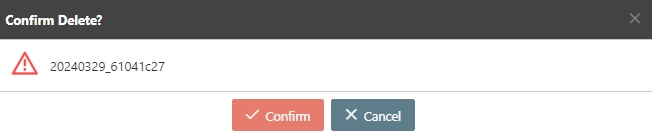
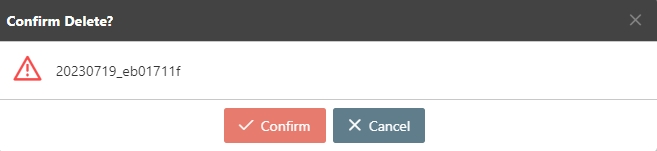
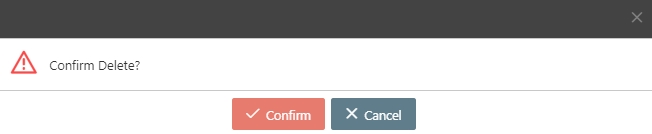
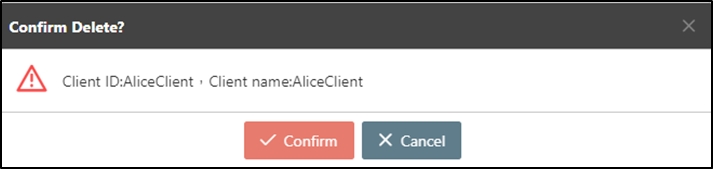
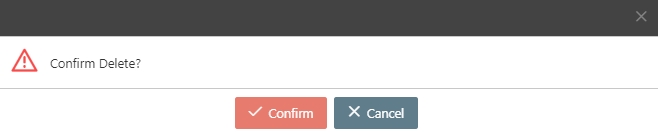
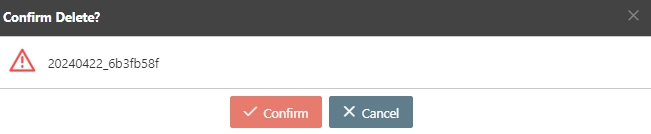
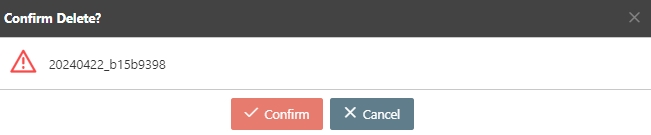
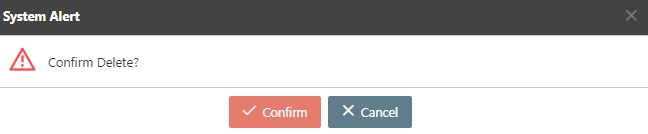
A warning prompt displaying the message “Confirm Delete?” will pop up. Click Confirm to delete this API and exit.
The API you want to delete must be disabled and not applied by groups.
Whether to use JWT (signature) or JWE (encryption) for Request and Response. The system can perform JWT encryption (including JWE & JWS) to APIs.
JWT: JWT and JWS (body) will be called when the API is called.
JWS: Refers to signed JWT.
JWE: Refers to JWT with encrypted payloads.
To export registered and combined APIs, search for the API to export, and click Export to proceed.
A warning prompt displaying the message “Confirm Export?” will pop up. Click Confirm to download the json file.
APIs with JAVA and .NET as sources cannot be exported.
Click Import API first to access the import page, click on the icon and upload the API to import.
Search for the API to view details, and click on theicon to access the API details page.
Search for the API to modify and click on the icon to access the update page to proceed. The API update page will vary according to different API sources.
If the API source is registered, click on theicon to update it, but there will be no Open Composer button.
Search for the API to test, and click on the icon to access the API Test page.
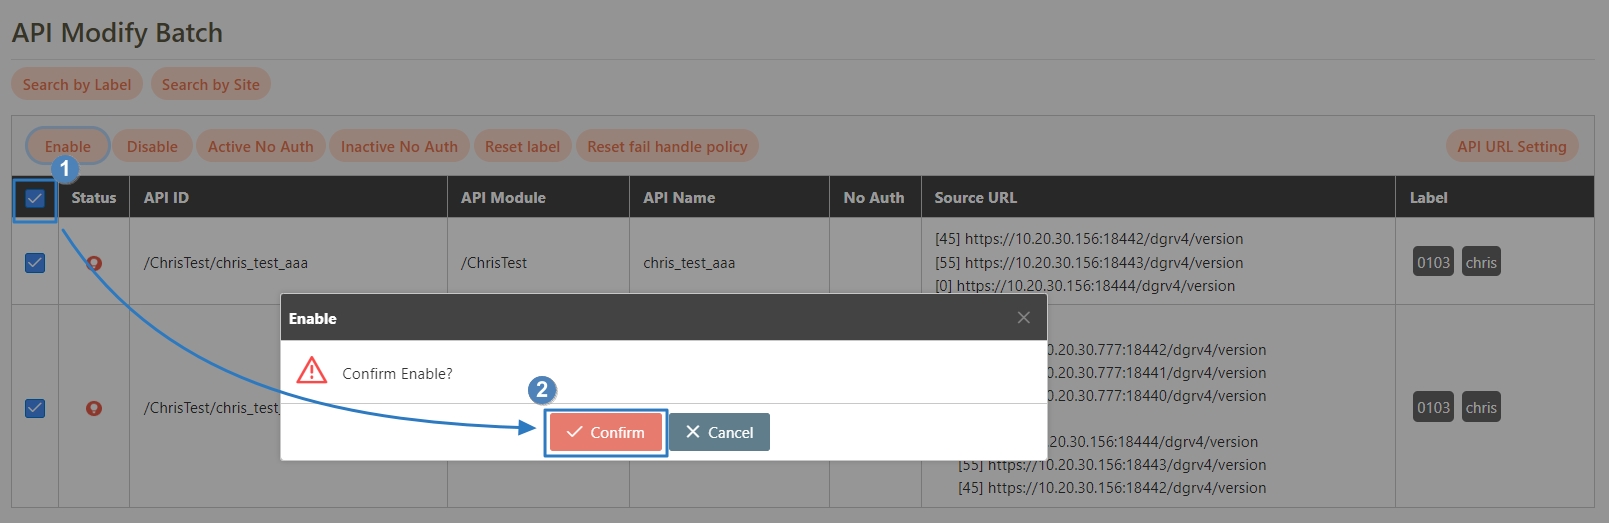
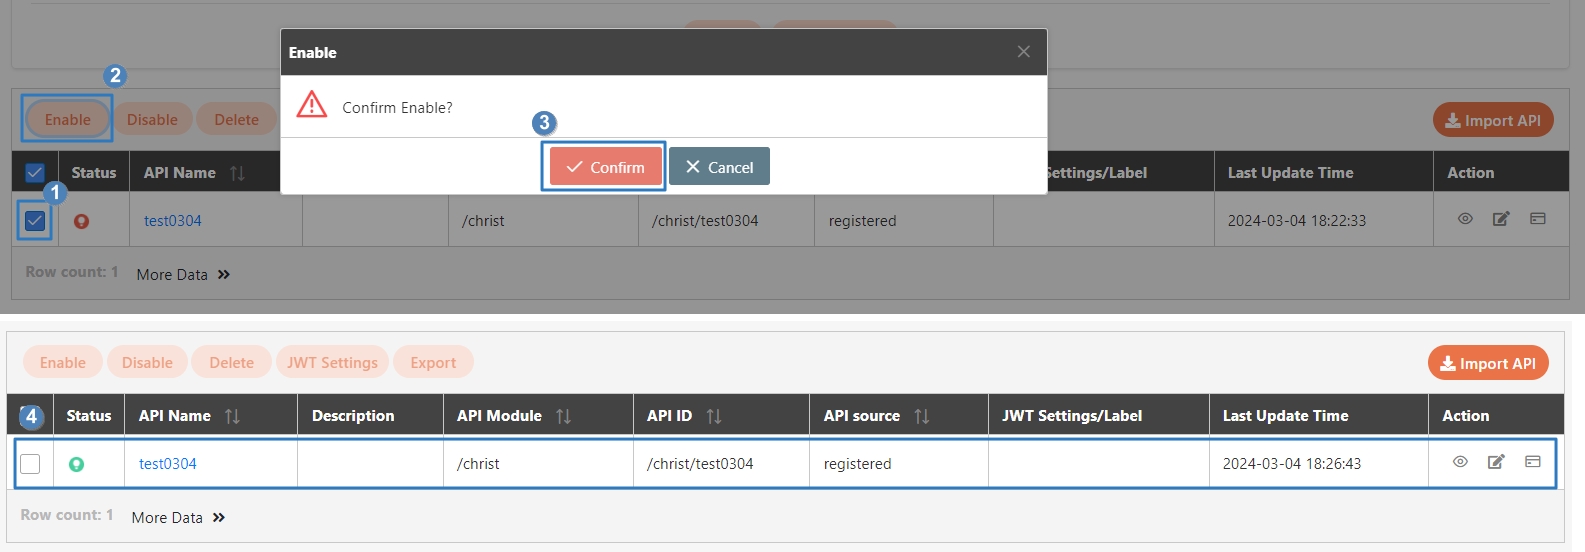
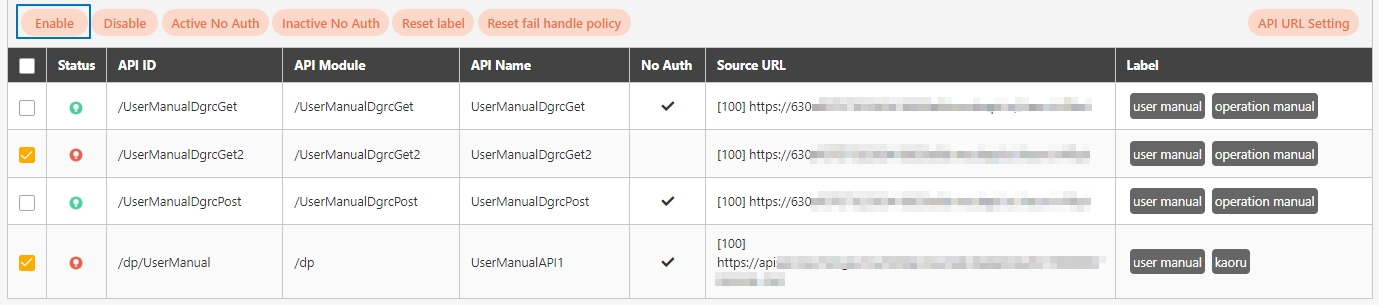
The APIs registered in the system are disabled () by default, and must be manually enabled before they can be used.
Search for and check the APIs to enable, and click Enable to activate the APIs. The status will change to.
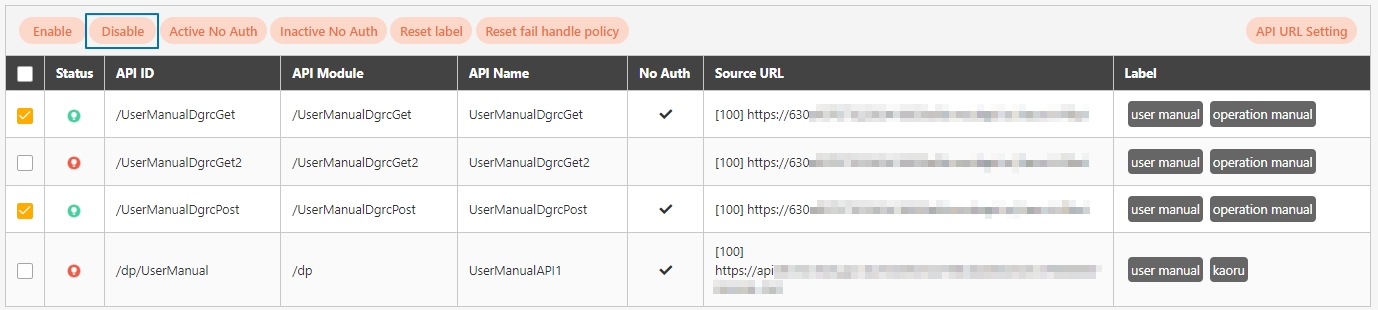
Search for and check the APIs to disable, and click Disable to deactivate the APIs. The status will change to.
Whether JWS or JWE was selected for Request, its background color is orange , and the background color of Response is blue .
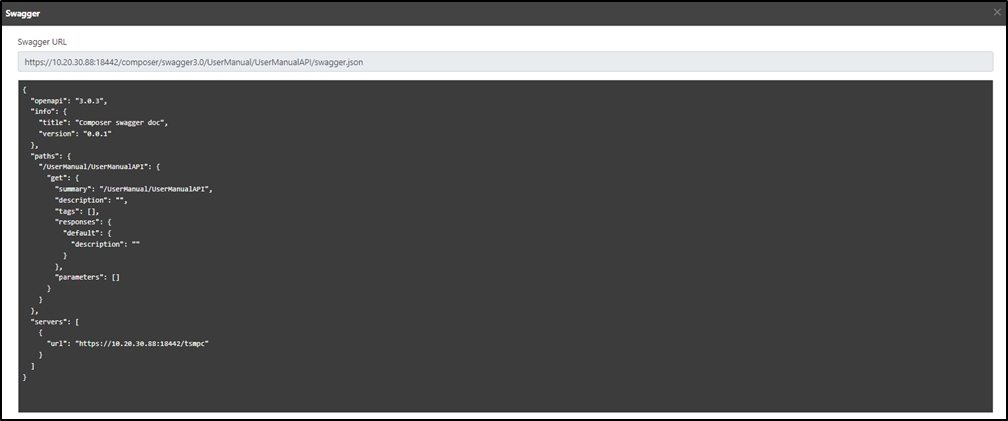
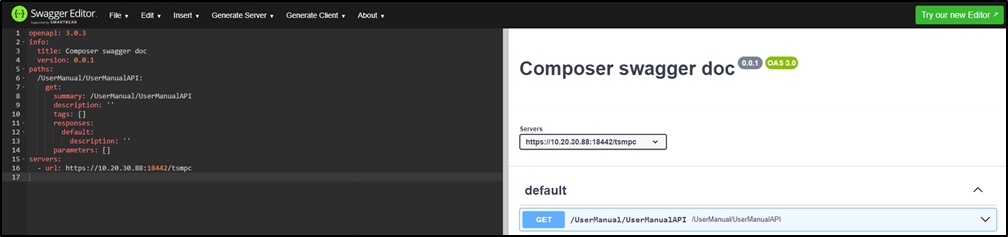
Click on theicon to access the Swagger page.
Copy the text on the Swagger page to to display its information.
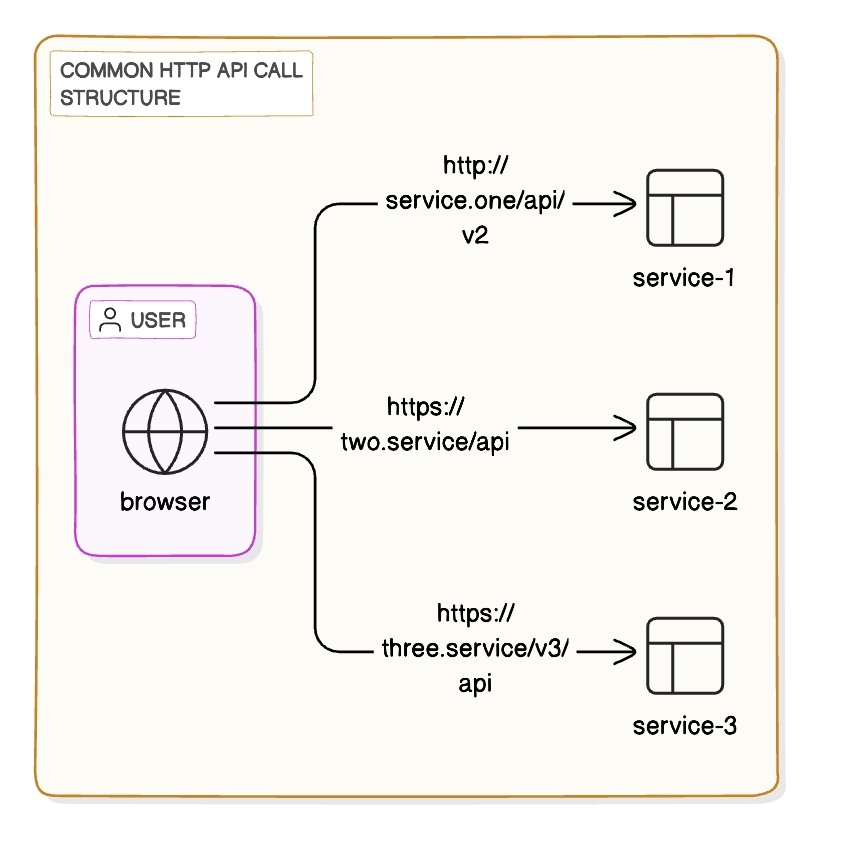
Self-hosted architecture refers a scheme where all digiRunner API Management components are hosted by the user on-prem and/or in a private cloud.
In this structure, the user accesses various services directly via the browser using HTTP or HTTPS protocols. Each service is exposed directly to the browser, meaning any changes to the API paths or services require modifications on the client side.
Without a centralized API management tool, limiting and monitoring client traffic becomes challenging, potentially leading to service overload. Additionally, since APIs are exposed without a centralized gateway or proxy to manage access, the risk of security vulnerabilities increases, including threats like DDoS attacks or unauthorized access.
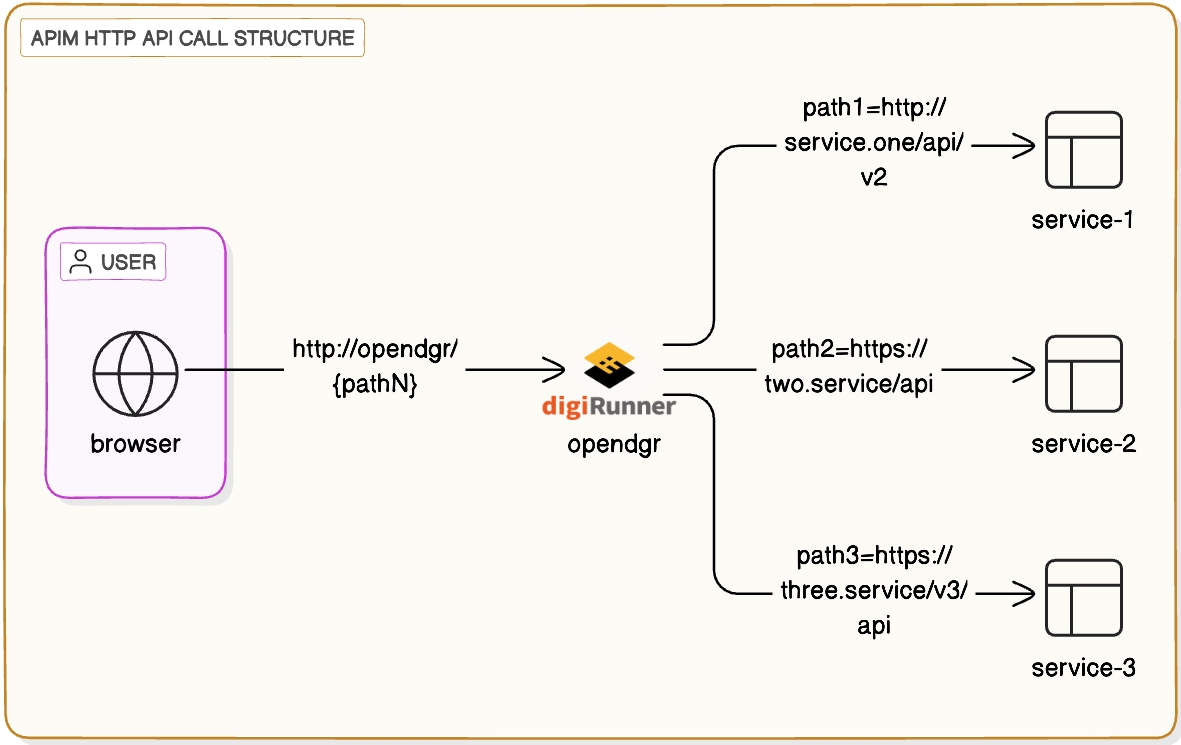
Unlike the previous structure, this setup introduces an API Management layer (APIM), represented by digiRunner, which acts as a proxy between the browser and the backend services. This approach abstracts the direct connection between the browser and the services, providing centralized control and easier API management.
When backend APIs change, only the gateway (APIM) requires adjustment, eliminating the need for changes on the client side and improving flexibility. Furthermore, the API management layer functions as a firewall, offering security features such as authentication, authorization, and rate-limiting, which help prevent unauthorized access and protect against malicious attacks.
Since all API requests are routed through the APIM, it allows for unified traffic management, setting request limits and priorities, preventing individual services from being overloaded. When new services or features need to be added, routing or services can be configured within the APIM without altering the client logic, making scaling significantly more convenient.
API Scope is a configuration for defining the range of permissions or access levels that users or applications have when using APIs. Often integrated with OAuth 2.0, it restricts client access to specific resources or functions.
Fine-grained Control: Restricts users to specific resources or operations.
Enhanced Security: Reduces the risk of unauthorized users operating on sensitive data or functions.
Simplified Authorization Logic: Manages authorization needs using labels, reducing code complexity.
Restricting Functions: Example: A "read-only" scope allows clients to only read resources, while a "read-write" scope allows modifications.
Resource-based Authorization:
Example: A client may access /user/profile but not /user/settings.
Dynamic Authorization: Allows API authorization to be determined dynamically based on Scope, suitable for scenarios requiring temporary expansion or reduction of permissions.
Design the Scope Structure:
Design Scope labels based on resources and operations, such as read, write, admin.
Map Scope labels to API functions (e.g., /users resource mapped to read-users, write-users).
Define Scope Rules:
Specify which Scopes correspond to which API operations.
Establish inheritance or hierarchy logic for Scopes (e.g., admin includes read and write permissions).
Authorize and Verify:
Issue Tokens containing Scopes when a client requests access.
Validate the requested Scope through the API Gateway or backend.
Runtime Control:
When APIs are invoked, check if the request Token contains the matching Scope.
Execute requests or return a rejection response based on the Scope configuration.
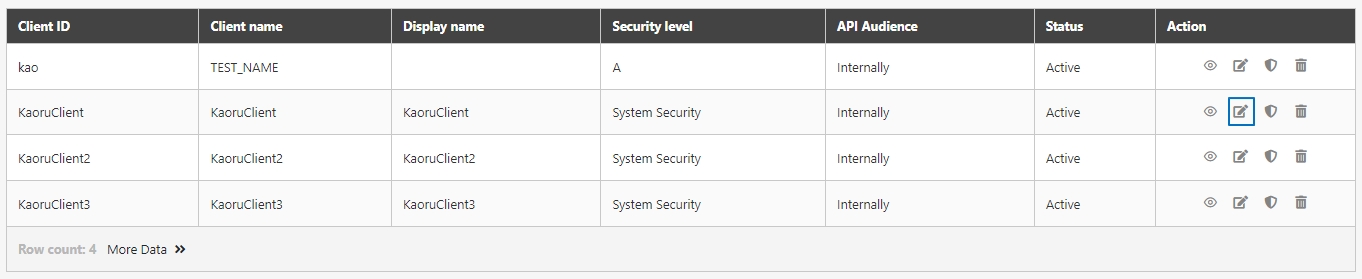
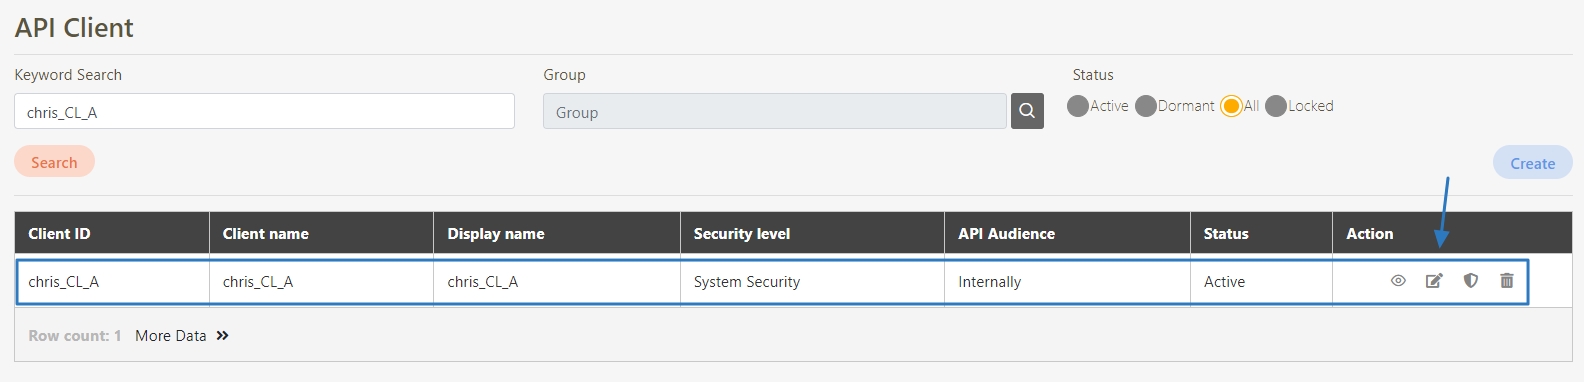
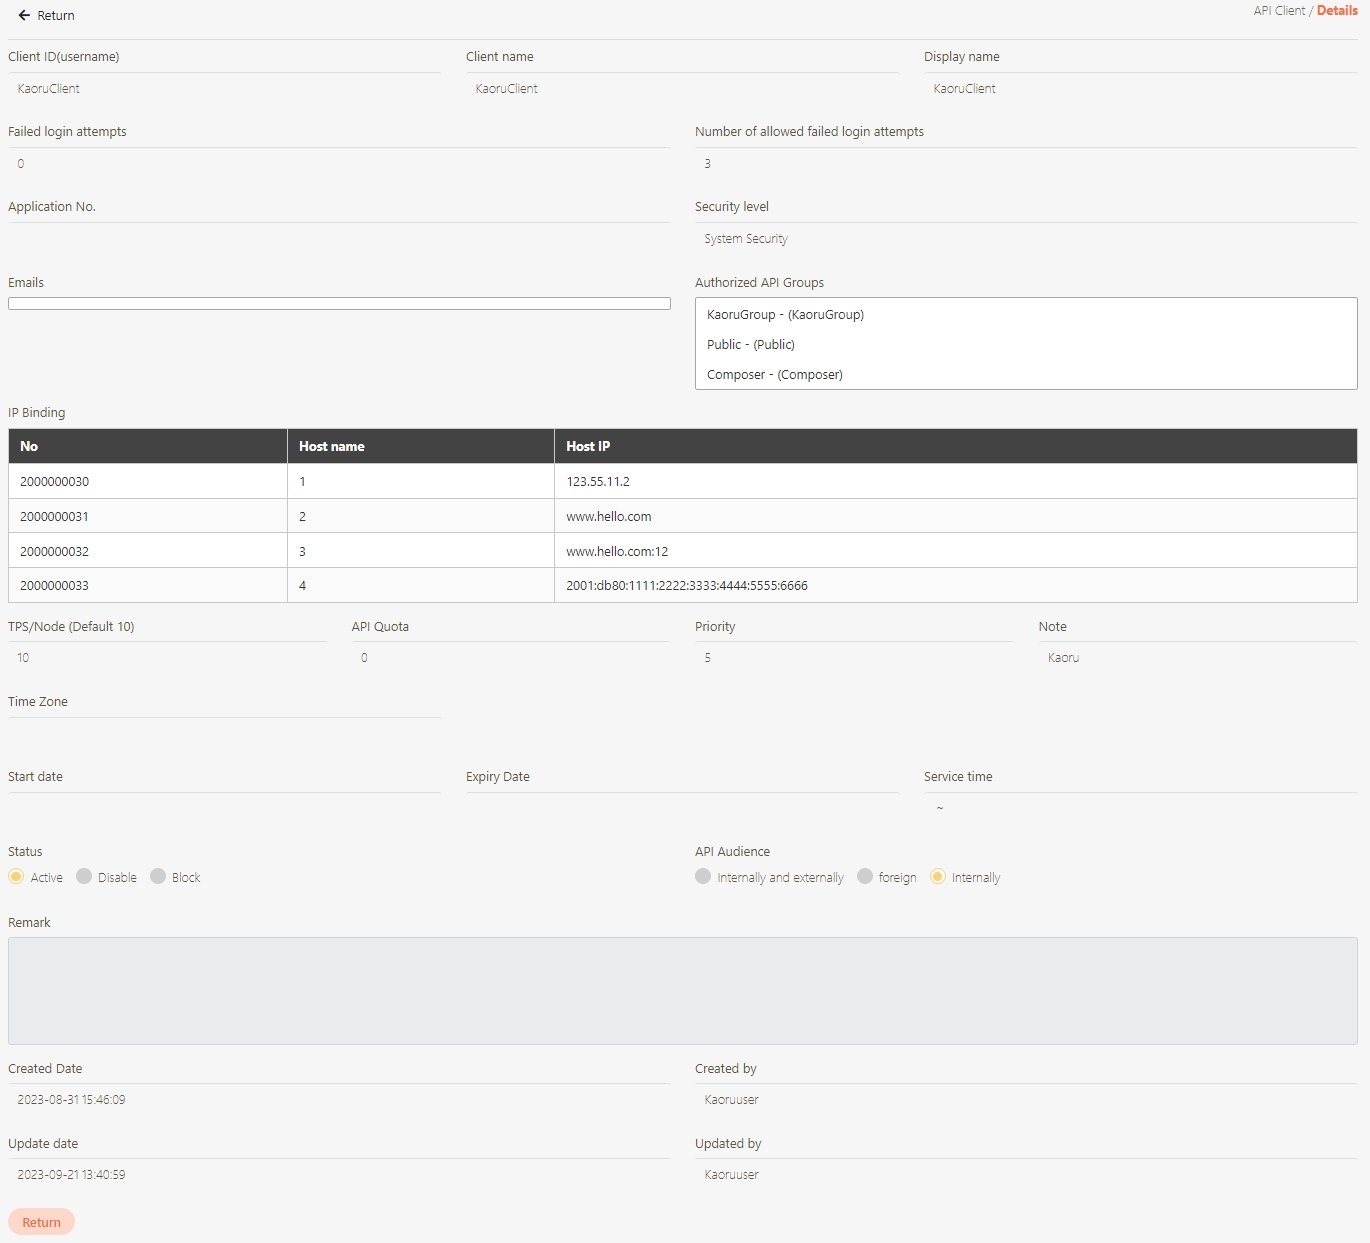
An API Client refers to the application or service invoking the APIs. The identity of the API Client must be registered and authenticated in the API management system. Each API Client is assigned a unique identifier (e.g., Client ID and API Key) for access control and monitoring.
Authentication and Tracking: Each API Client has a unique identifier, allowing precise tracking of usage and authorization.
Custom Configuration: Enables setting exclusive quotas, rate-limits, or permission strategies for different API Clients.
Enhanced Security: Access is controlled via API Client authorization mechanisms (e.g., API Key or OAuth Token).
Application Separation: Internal and external applications are treated as different API Clients with distinct security strategies.
Third-party Integration: Provides a registration process for third-party developers, allowing their applications to become API Clients and access APIs.
Multi-layer Tracking: Assigns a unique API Key to each application to precisely track traffic sources and usage.
Register the API Client:
Clients register with the API Management system, providing application names and descriptions.
The system assigns a unique Client ID and secret (e.g., API Key or Client Secret).
Authorize and Configure:
Assign Scopes and quotas (e.g., number of requests per second).
Configure specific security strategies (e.g., IP restrictions or JWT Token validation).
Authentication and Requesting:
Clients use API Key or Token to send requests to the APIs.
The API Gateway validates the identity and checks authorization Scopes.
Traffic Monitoring and Management:
Monitor API Client traffic data, error rates, and performance.
Dynamically adjust rate-limiting strategies or revoke authorization if needed.
API Service Management
Manages APIs by registering, viewing, editing, enabling, disabling, or deleting them. Supports importing/exporting API lists and querying via Swagger URL.
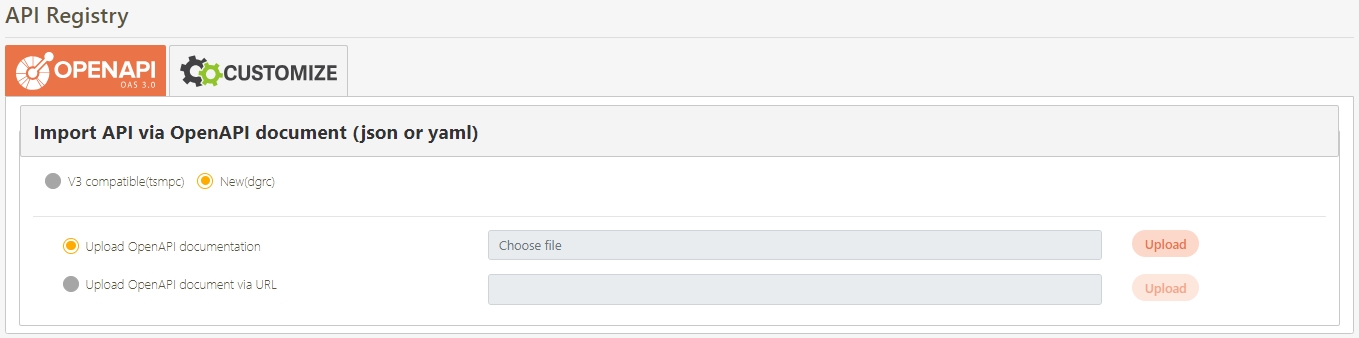
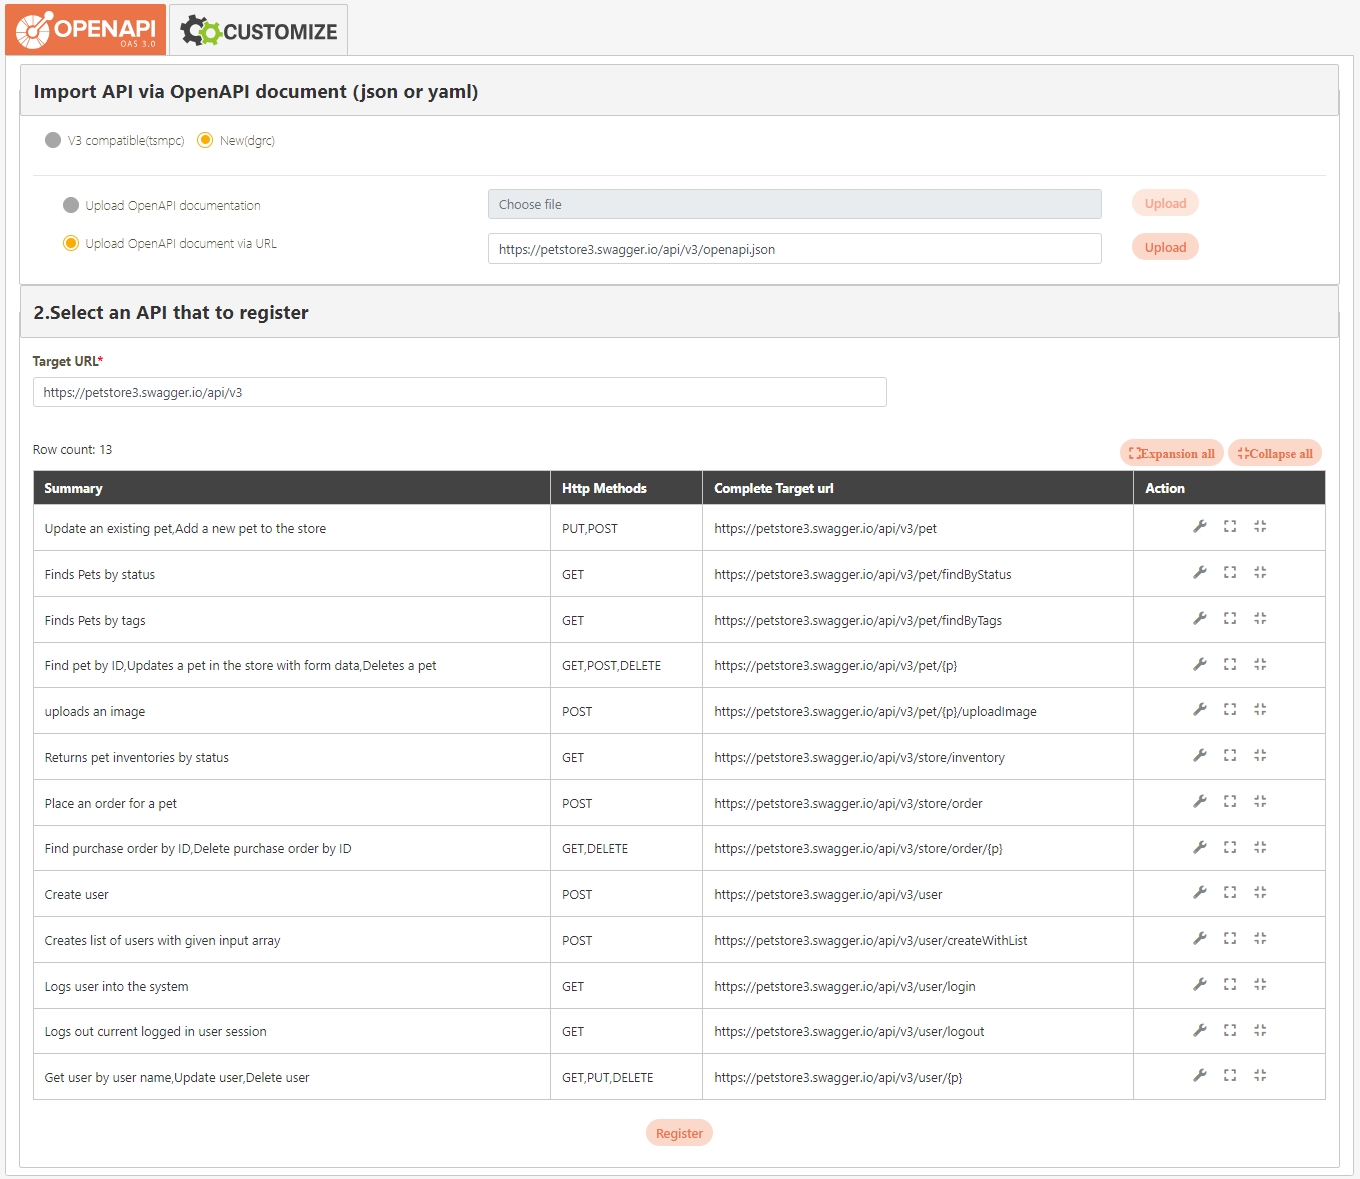
RESTful API Integration
Integrates APIs compliant with the OpenAPI specification and supporting formats such as JSON, SOAP, XML, YAML, and Swagger. Also supports HTTP methods.
Dynamic API Proxy Path
Host registered APIs through dynamic routing without the need to register every individual endpoint.
Online Console
Monitors API services in real-time, with detailed views of debugging, errors, and logs.
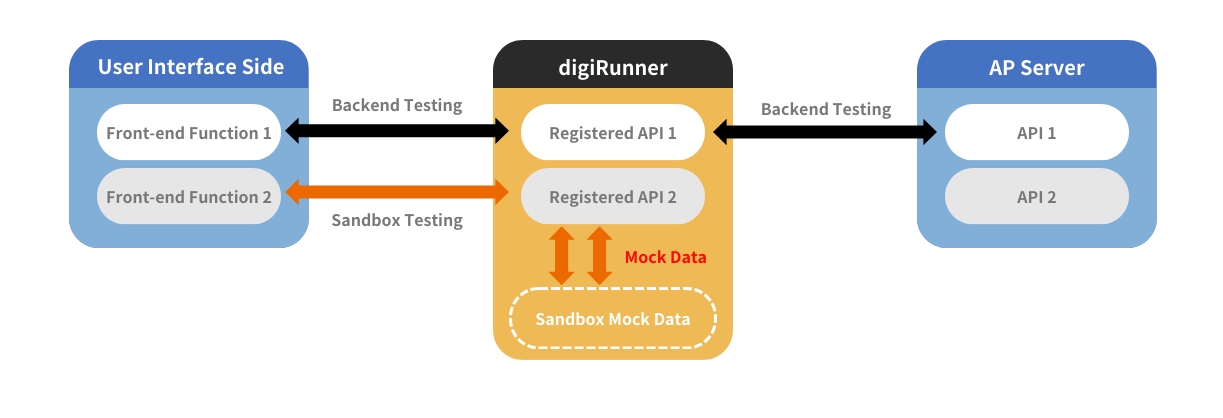
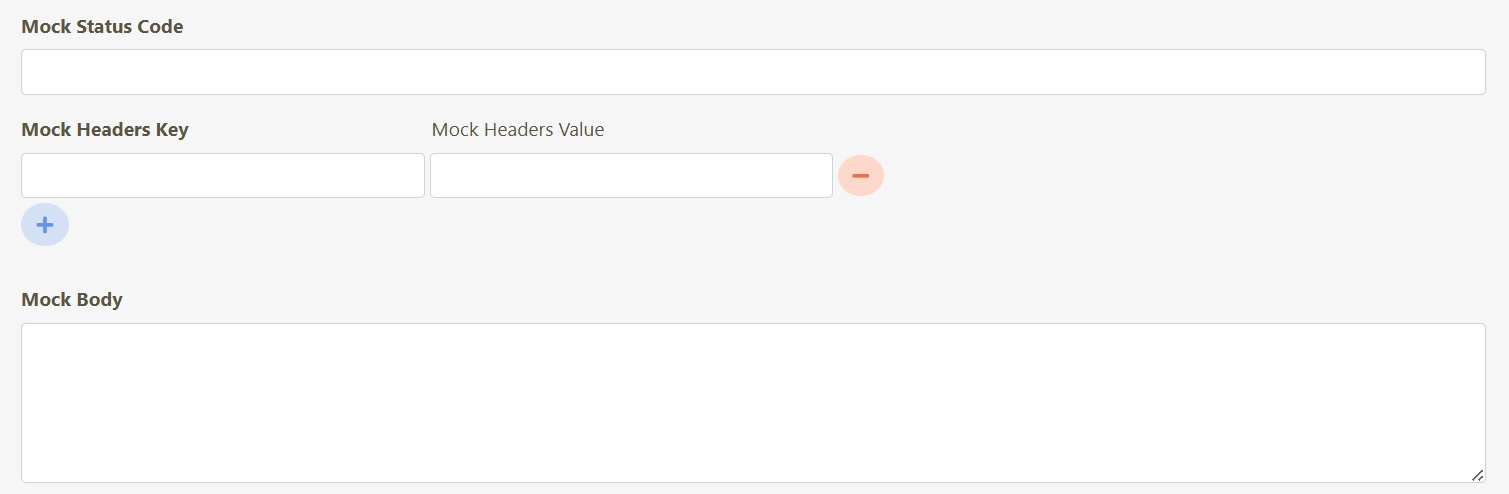
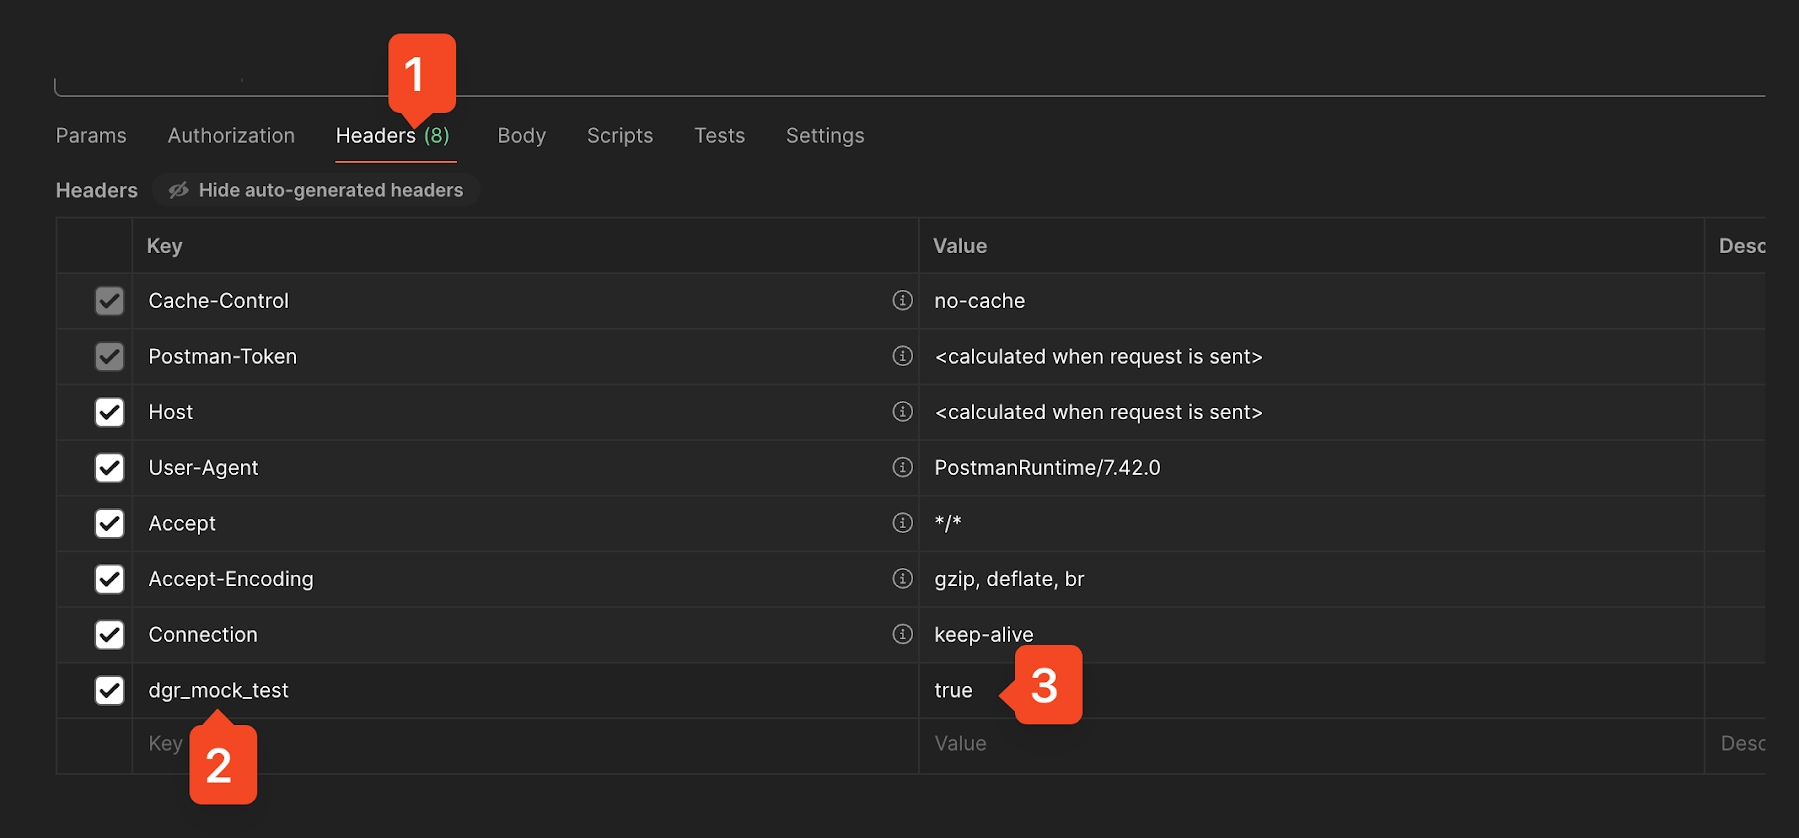
Sandbox Simulation Test
Simulates backend responses with mock tests, setting API parameters to speed up development.
Dynamic Traffic Distribution (Gateway Load Balancing)
Ensures zero downtime during API updates or version changes with red-and-black deployments.
API Non-Blocking Process
Enhances API proxy efficiency by implementing a non-blocking processing mechanism.
API List Management
Manages APIs, including viewing, editing, enabling, disabling, or deleting via the GUI.
API Consumer Management
Creates and manages API consumers, including adding/updating API Client IDs, display names, passwords, and access controls for internal/external use.
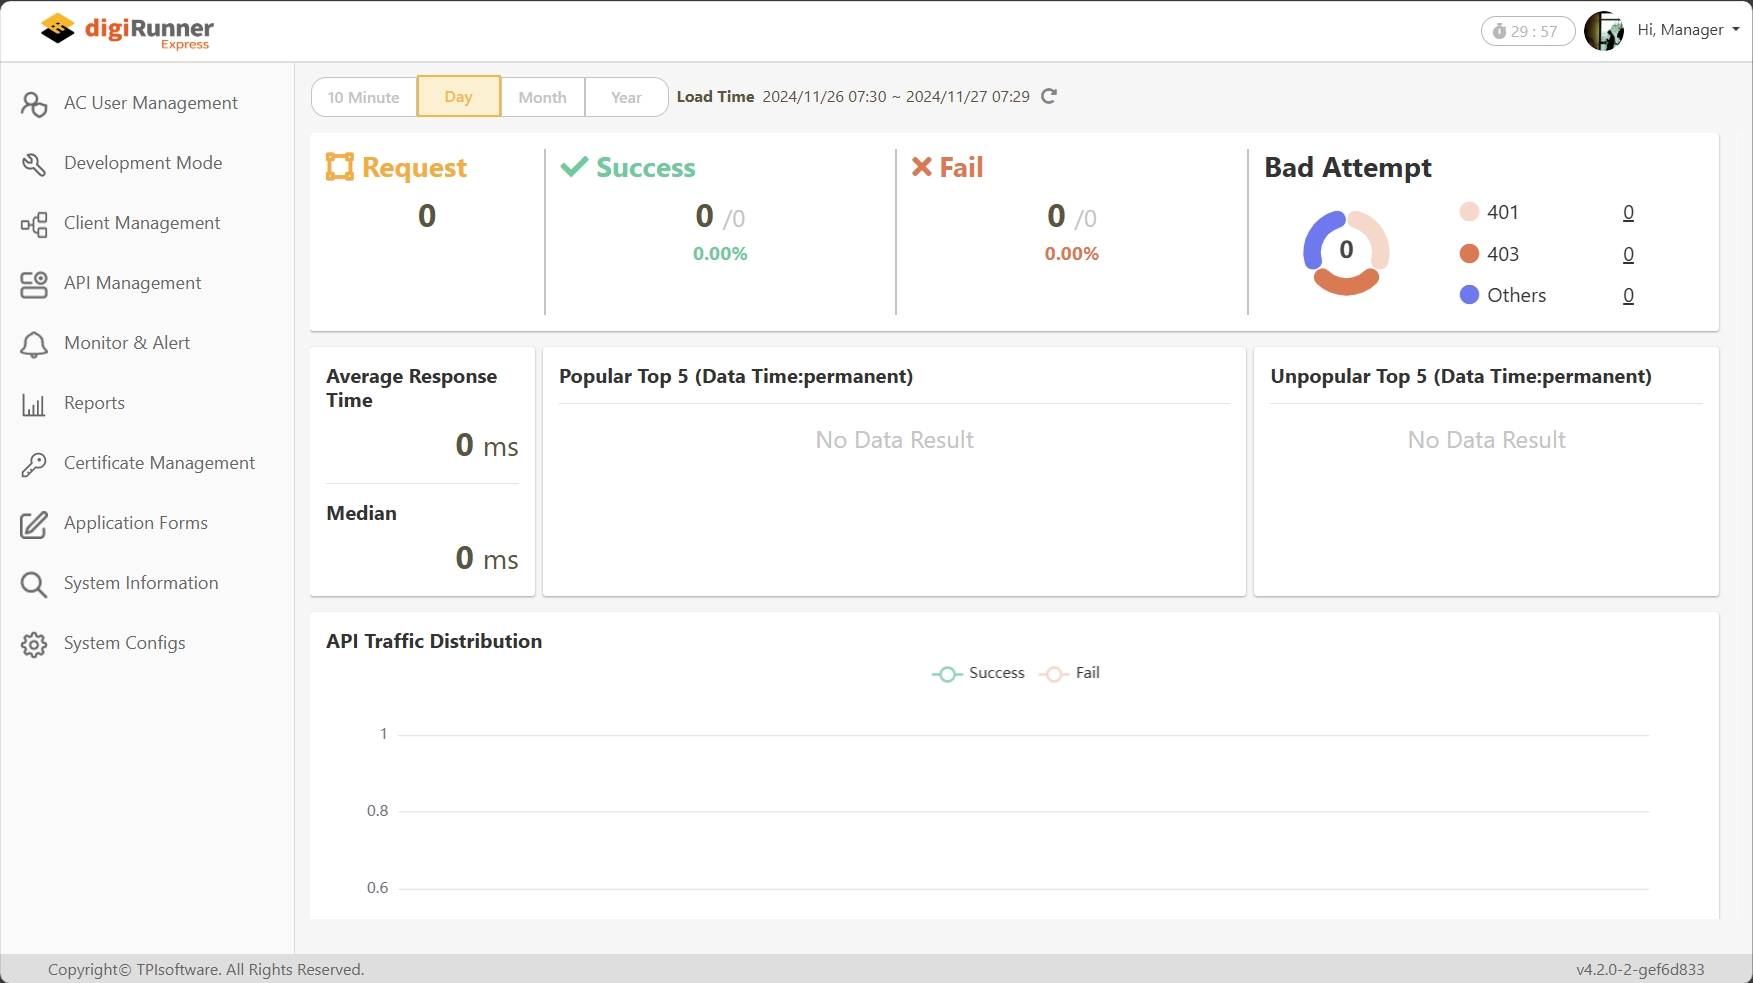
API Management Dashboard
Provides a graphical overview of API usage, with key metrics such as success/failure rates and the most commonly used APIs.
System Reports
Provides detailed API usage statistics, including API calls over time, average request/response times, traffic analysis, and success/failure rate reports.
Service Diversion
Dynamically adjusts traffic distribution using IP-based routing to reduce backend load.
Service Quota
Manages user service quotas by setting API usage limits for individual users or groups to ensure fair distribution of resources.
VIP Channel
Prioritizes VIP clients to ensure their API requests are processed first during high traffic periods or limited system resources.
TPS Limit Traffic
Monitors and enforces limits on the number of transactions per second (TPS) per client.
Real-Time Monitoring and Alerting
Configures custom alerts and notifications for system anomalies, such as high CPU usage or disk overload.
API Smart Cache (Adaptive Cache)
Implements intelligent caching policies based on API responses, updating the cache adaptively when backend systems are underutilized.
End-to-End Information Security Control
Ensures secure API communication using OAuth 2.0, JWT, and Mutual TLS for authentication and authorization.
API Access Whitelist
Restricts API access to authorized IP addresses by enforcing an IP whitelist.
Admin Console User Management
Enables administrators to manage Admin Console users, including adding and configuring permissions for individual users.
Multiple Login Methods
Supports the configuration of multiple login methods for users, including OAuth2.0, LDAP, and other authentication protocols for Admin Console access.
Organizational Role Access Control Settings
Allows organizations to define and manage role-specific access to API resources.
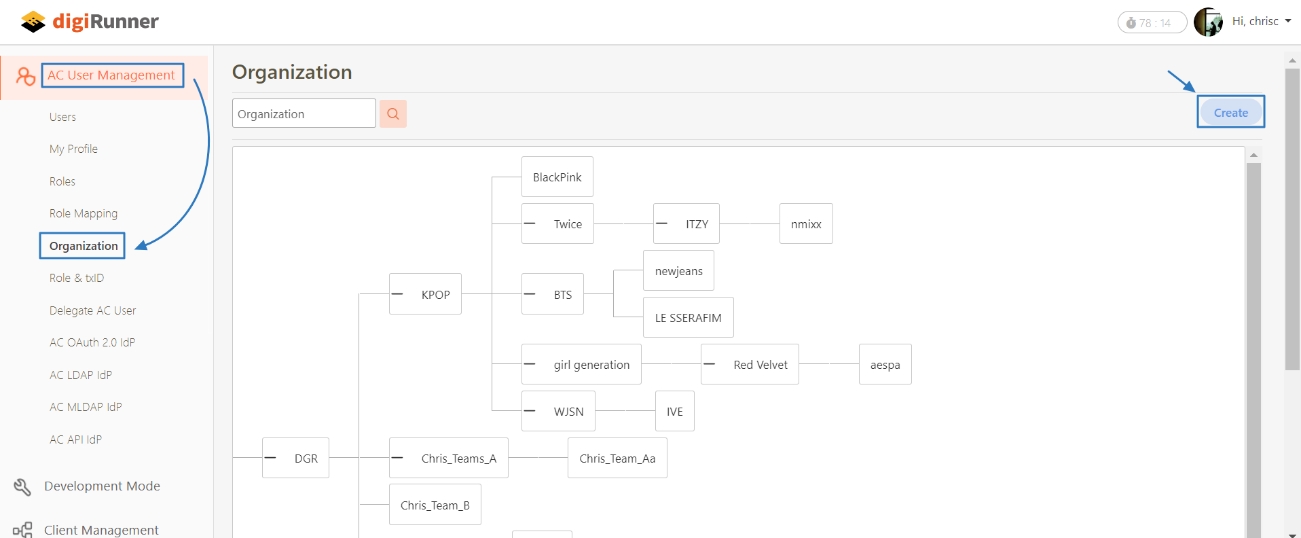
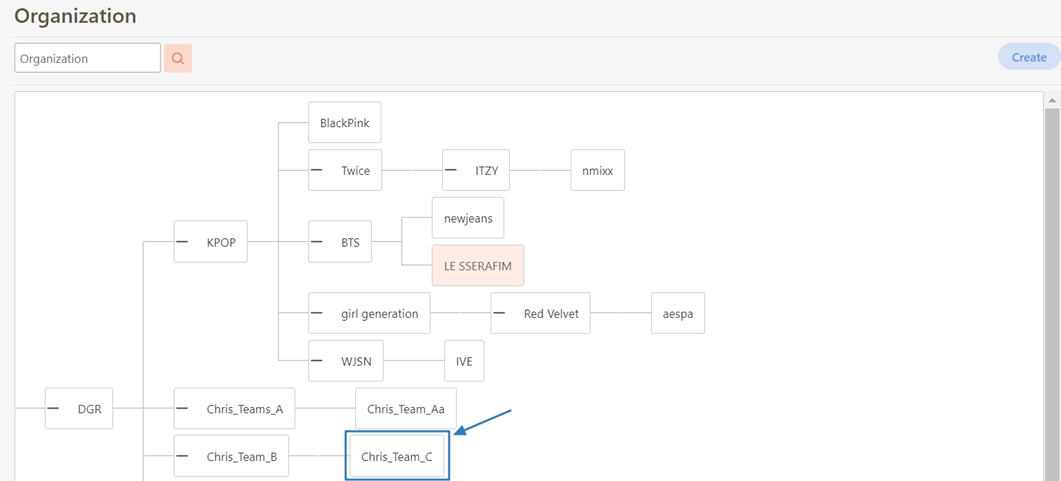
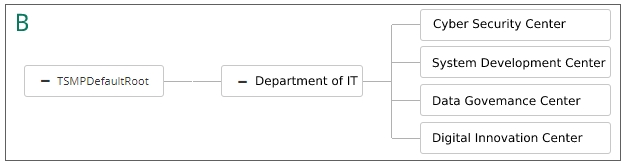
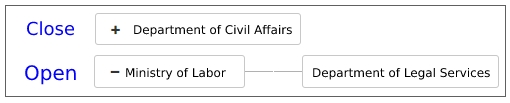
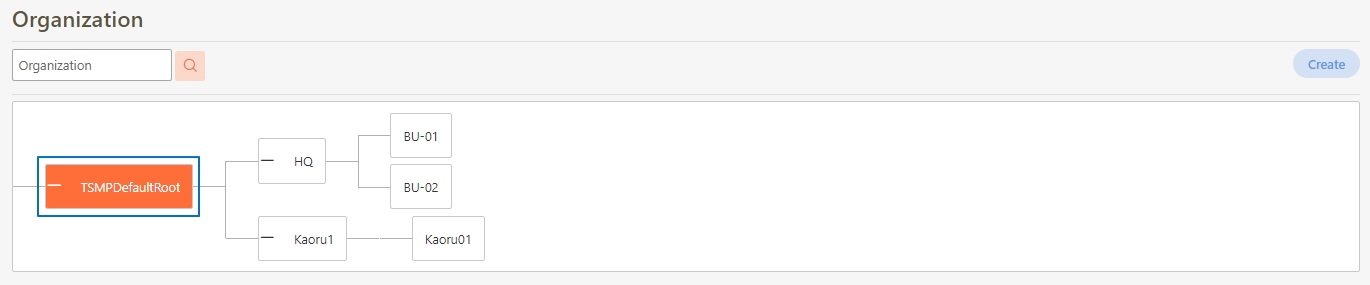
Visual Hierarchy Management
Provides a graphical interface for managing organizational roles, permissions, and group memberships.
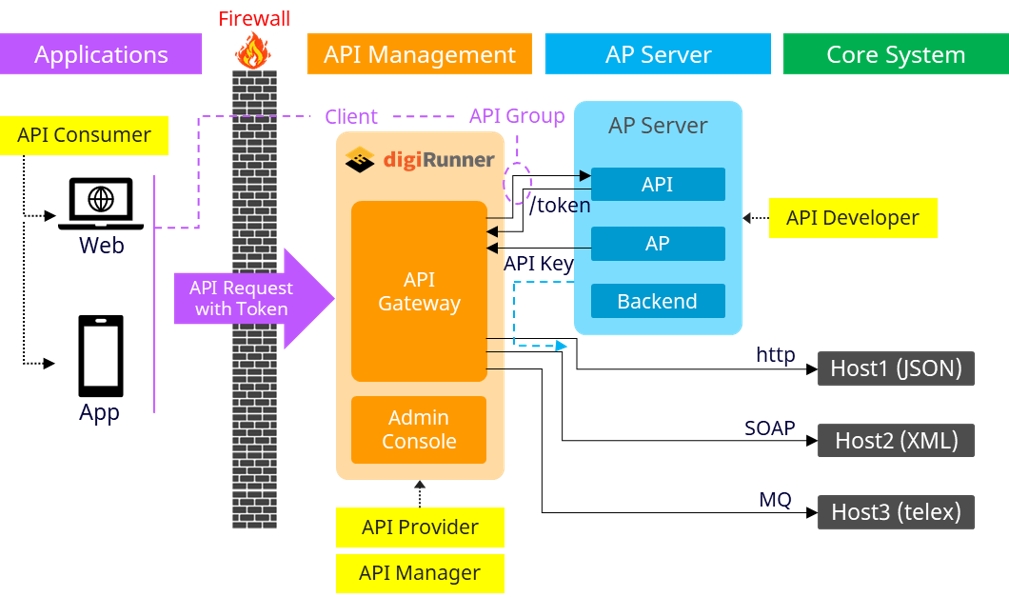
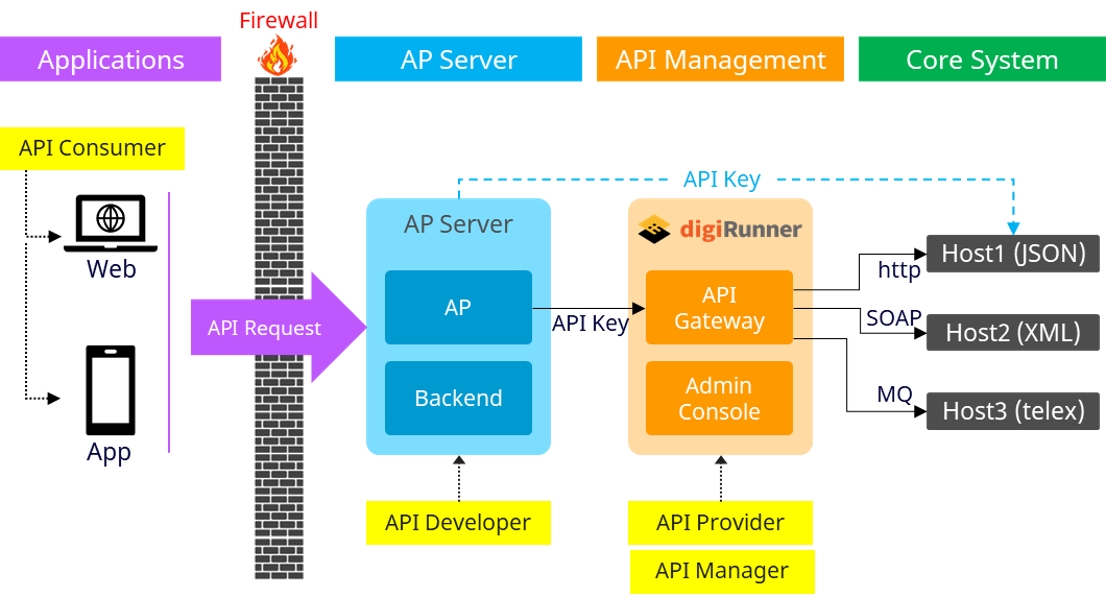
The digiRunner platform provides robust integration capabilities, enabling it to function as a proxy or router for API requests. This integration architecture allows seamless connections between API consumers (such as applications and web clients) and backend servers, as well as core systems. The architecture supports secure data transfer, access control, and load balancing, offering flexible options for data formats and protocols.
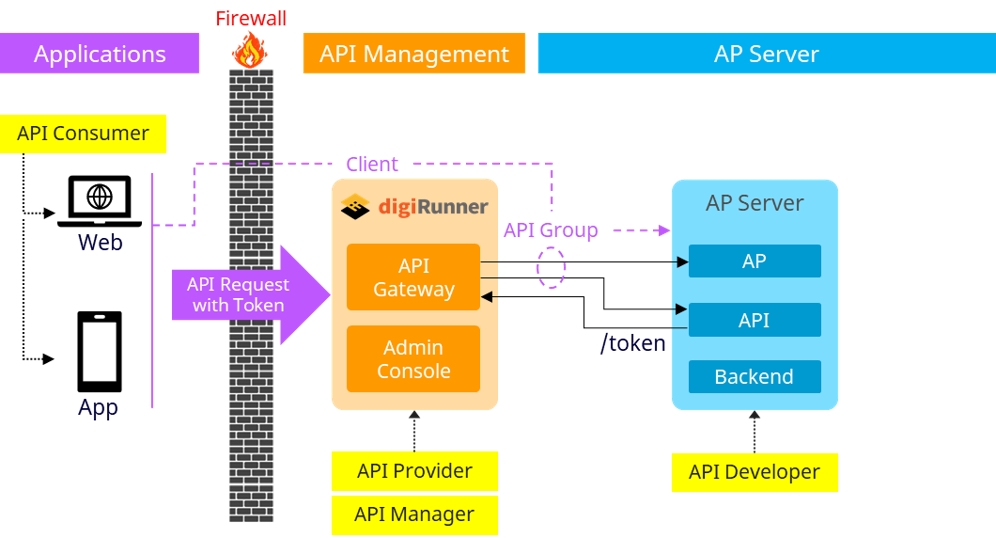
In this mode, digiRunner acts as a proxy for API consumers, such as web or mobile applications, to connect to backend services securely.
Register Target APIs: The backend server APIs are registered on digiRunner to make them accessible to the applications.
Client Account Creation: Set up a client account on digiRunner to represent applications that will be consuming these APIs.
API Grouping: Organize registered APIs into API groups to streamline management and authorization.
Authorization: The API groups are authorized for the client accounts, allowing specific applications or API consumers to access designated APIs on the backend server.
API consumers (web or mobile apps) initiate requests with tokens, which pass through the firewall to the API Gateway in digiRunner.
The API Gateway processes and routes these requests to the correct backend APIs, as per the defined API group and client permissions.
In this mode, digiRunner acts as a router, facilitating secure communication between servers, including communication with core systems using various protocols.
Server-to-Server API Communication: The platform enables direct server-to-server API requests, providing an API key for secure access.
Protocol Support: digiRunner supports multiple protocols (e.g., HTTP, SOAP, MQ) for compatibility with diverse core systems and legacy environments.
API requests from the client (API consumer) are forwarded through digiRunner to different core system hosts.
Depending on the host and data requirements, the requests are routed with the appropriate protocol (e.g., JSON over HTTP, XML over SOAP, or Telex over MQ).
The API Gateway securely routes data across different systems, ensuring data reaches the correct endpoint in a compatible format.
In the dAAPR configuration, digiRunner can simultaneously serve as both a proxy and a router, allowing it to handle a variety of integration patterns between clients, servers, and core systems.
Client to Server: As a proxy, digiRunner manages token-based API requests from applications and routes them to the appropriate backend API.
Server to Server: As a router, digiRunner manages API key-based communication between servers and core systems, supporting multiple protocols for interoperability.
API requests with tokens are processed by the API Gateway for client-to-server interactions, while API key-based requests manage server-to-server interactions.
Requests can be routed to different hosts based on protocol requirements, facilitating flexible data exchange across various systems.
This dual configuration is ideal for environments requiring both client-server and server-server data communication, offering comprehensive integration capabilities.
API Group is used to logically or functionally group APIs to improve management efficiency and support batch operations and strategy application for APIs. Grouping is typically based on functionality, user needs, version control, or deployment environments.
Unified Management: Grouping similar or related APIs allows for bulk configuration (e.g., permissions or rate-limiting strategies).
Improved Visibility: Clearly delineates API functional domains, helping teams understand system architecture.
Simplified Version Control: Each API Group can have independent version management strategies.
Grouping by Function: Examples: "User Management API," "Order Management API," "Payment API."
Grouping by Business Line: Examples: "Retail Business API Group," "Financial Business API Group."
Grouping by Deployment Environment: Examples: "Development Environment API," "Testing Environment API," "Production Environment API."
Plan the Grouping:
Analyze the usage scenarios, functional logic, and business requirements of the APIs.
Determine grouping criteria, such as functionality, business domain, or environment.
Configure API Group:
Create an API Group in the API Management platform.
Add related APIs to the corresponding group.
Apply Global Strategies:
Set group-level security policies (e.g., authentication, IP whitelisting).
Configure rate-limiting policies (e.g., API access quotas).
Manage and Monitor:
Continuously monitor the traffic, performance, and error rates of the API Group.
Dynamically adjust the group as needed, such as adding or removing APIs.
API Group:
"Product Management API" (list products, add products)
"Order Management API" (create orders, cancel orders)
"User Management API" (register, login, view user data)
API Scope:
Scope for Client A: read-products, create-order
Scope for Client B: read-products, read-order
Scope for Administrator: admin-access (full access)
API Client:
Client A: API Client for the frontend customer shopping application.
Client B: API Client for the backend operation management application.
Client C: Partner application (access restricted to specific resources).
By combining API Group, API Scope, and API Client, the platform can flexibly meet diverse business needs while ensuring system security and efficient management.
Requirement Analysis and Design:
Divide APIs into logical or functional API Groups.
Design API Scopes to determine access permissions for each resource and operation.
Identify the API Clients to support (e.g., internal or third-party applications).
Configuration and Authorization:
Configure API Groups and Scopes in the platform, applying security strategies.
Set access permissions and quotas for API Clients.
Runtime Control:
The API Gateway validates the client identity (e.g., API Key or OAuth Token).
Requests are executed or denied based on the Scope and Group configurations.
Monitoring and Optimization:
Continuously monitor usage for each API Group and Client.
Adjust Scopes or strategies as needed to respond to business changes.
Periodically optimize API performance and security.
Explore the scenarios digiRunner applied in the financial industry:
In an era of digital transformation, a leading financial services provider faced the critical challenge of modernizing its operations. With an ambitious mission to streamline data migration and strengthen API management, the company sought to overcome legacy inefficiencies while ensuring secure and seamless service delivery. Their objectives were to:
Ensure Seamless Data Migration: Transition critical banking data from legacy systems to modern platforms without service interruptions.
Modernize API Management: Implement an efficient, centralized framework for managing APIs across various operations.
Enhance Security and Compliance: Safeguard sensitive customer data while adhering to regulatory requirements like GDPR and PCI DSS.
Enable Scalability and Operational Efficiency: Support increasing transaction volumes with a scalable and robust infrastructure.
Legacy systems, such as AS400, posed integration challenges with modern cloud platforms.
Data inconsistencies increased the risk of errors during migration.
Ensuring uninterrupted service during data migration was critical to maintaining customer trust and SLA compliance.
Securing sensitive data transfers during migration required advanced encryption and stringent access controls.
Handling high traffic volumes during migration lacked robust monitoring tools and adaptive scaling capabilities.
Unified Traffic Management: Streamlines API communication between legacy and modern platforms, ensuring smooth data flow.
Protocol Translation: Enables seamless integration of diverse protocols, such as REST and SOAP, to efficiently connect legacy and modern systems.
Dynamic Load Balancing: Distributes API traffic to optimize performance during peak demands, particularly during migration surges.
End-to-End Encryption: Protects data during transmission and storage, ensuring compliance with financial security standards.
Advanced Authentication: Uses OAuth 2.0 and OpenID Connect for secure, role-based API access.
Comprehensive Dashboards: Provides real-time insights into API performance and migration status, allowing for proactive issue resolution.
Custom Alerting System: Flags anomalies, such as unexpected API traffic spikes, to maintain operational stability.
Role-Based Permissions: Controls API access to specific personnel, ensuring secure data handling during migration.
Audit Trails: Maintains detailed logs of all API interactions to support regulatory compliance and forensic analysis.
Red/Black Deployment Strategy: Enables seamless updates to API systems, ensuring uninterrupted services during migration.
Integrity Checks: Verifies data consistency throughout migration to avoid corruption and errors.
Pre-Migration Simulations: Identifies potential risks by testing scenarios before live migrations.
Elastic Infrastructure: Adapts dynamically to handle varying workloads during migration without compromising performance.
Performance Optimization: Minimizes latency and enhances throughput for real-time API requests.
Critical banking data migrated securely and efficiently, avoiding service disruptions.
Centralized API management improved integration between legacy and modern platforms.
Advanced encryption and access controls safeguarded sensitive customer data and ensured compliance.
The system efficiently managed peak migration traffic while maintaining continuous service availability.
Real-time monitoring empowered IT teams to proactively manage migrations, minimizing downtime risks.
By leveraging digiRunner’s comprehensive API management platform, the financial services provider achieved its objectives, enabling secure, scalable operations and positioning itself for innovation in the rapidly evolving financial sector.
Discover more about digiRunner’s open-source innovations and advanced capabilities by visiting .
digiRunner support multiple data stores during normal operation. The following stores have been tested by digiRunner:
MariaDB 10.6.x
MSSQL 2017 or above
Oracle 11g or above
PostgreSQL 9.6 or above
H2DB(default)
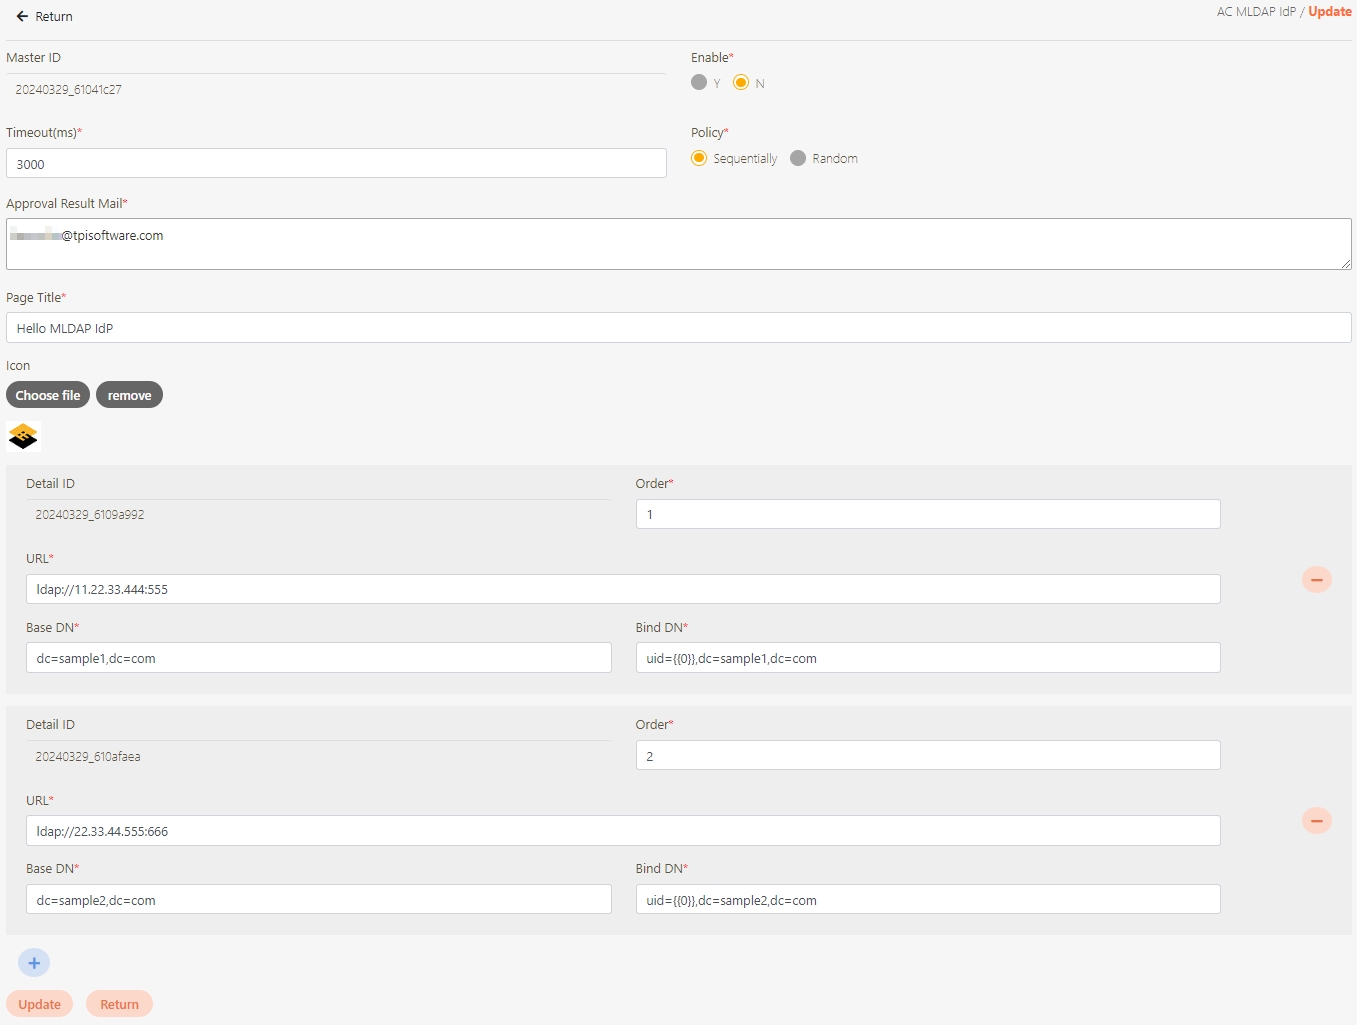
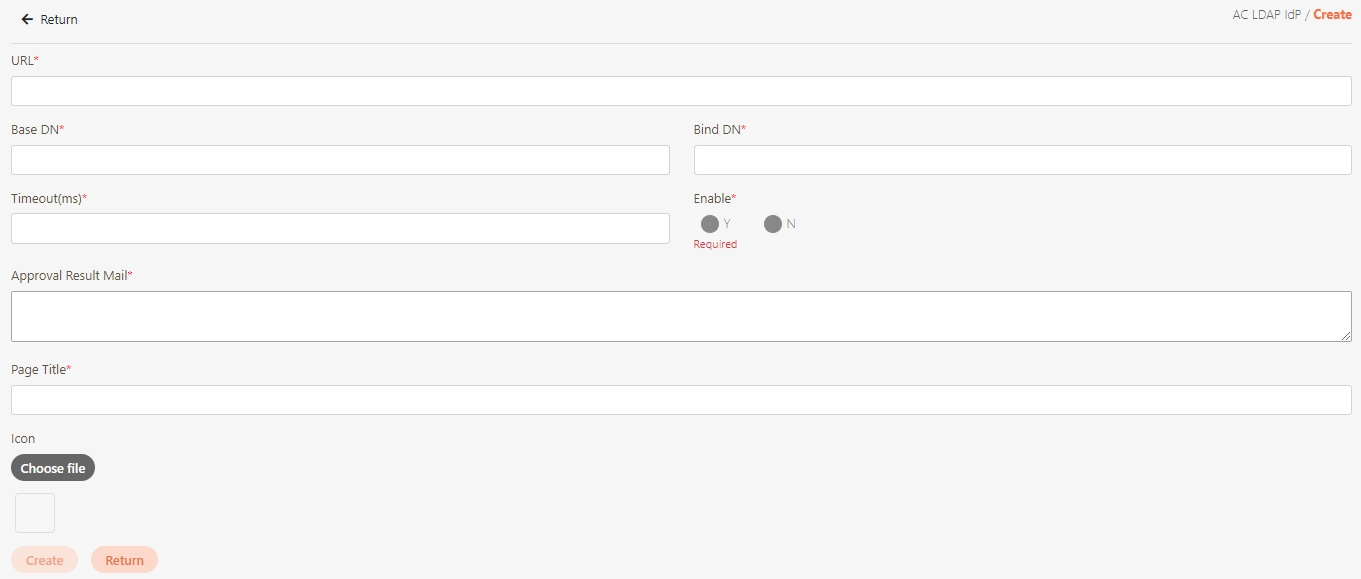
digiRunner is expected to work with third party identity providers (IDP) when using the OpenID Connect (OIDC) :
OAuth 2.0 IdP
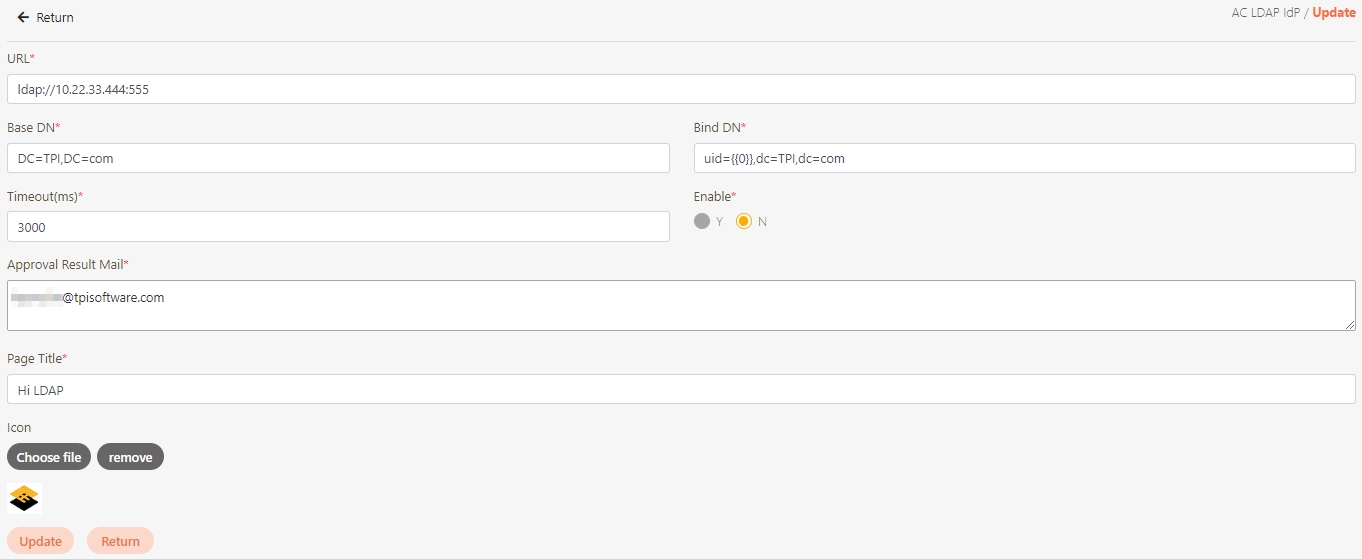
LDAP IdP
MLDAP IdP
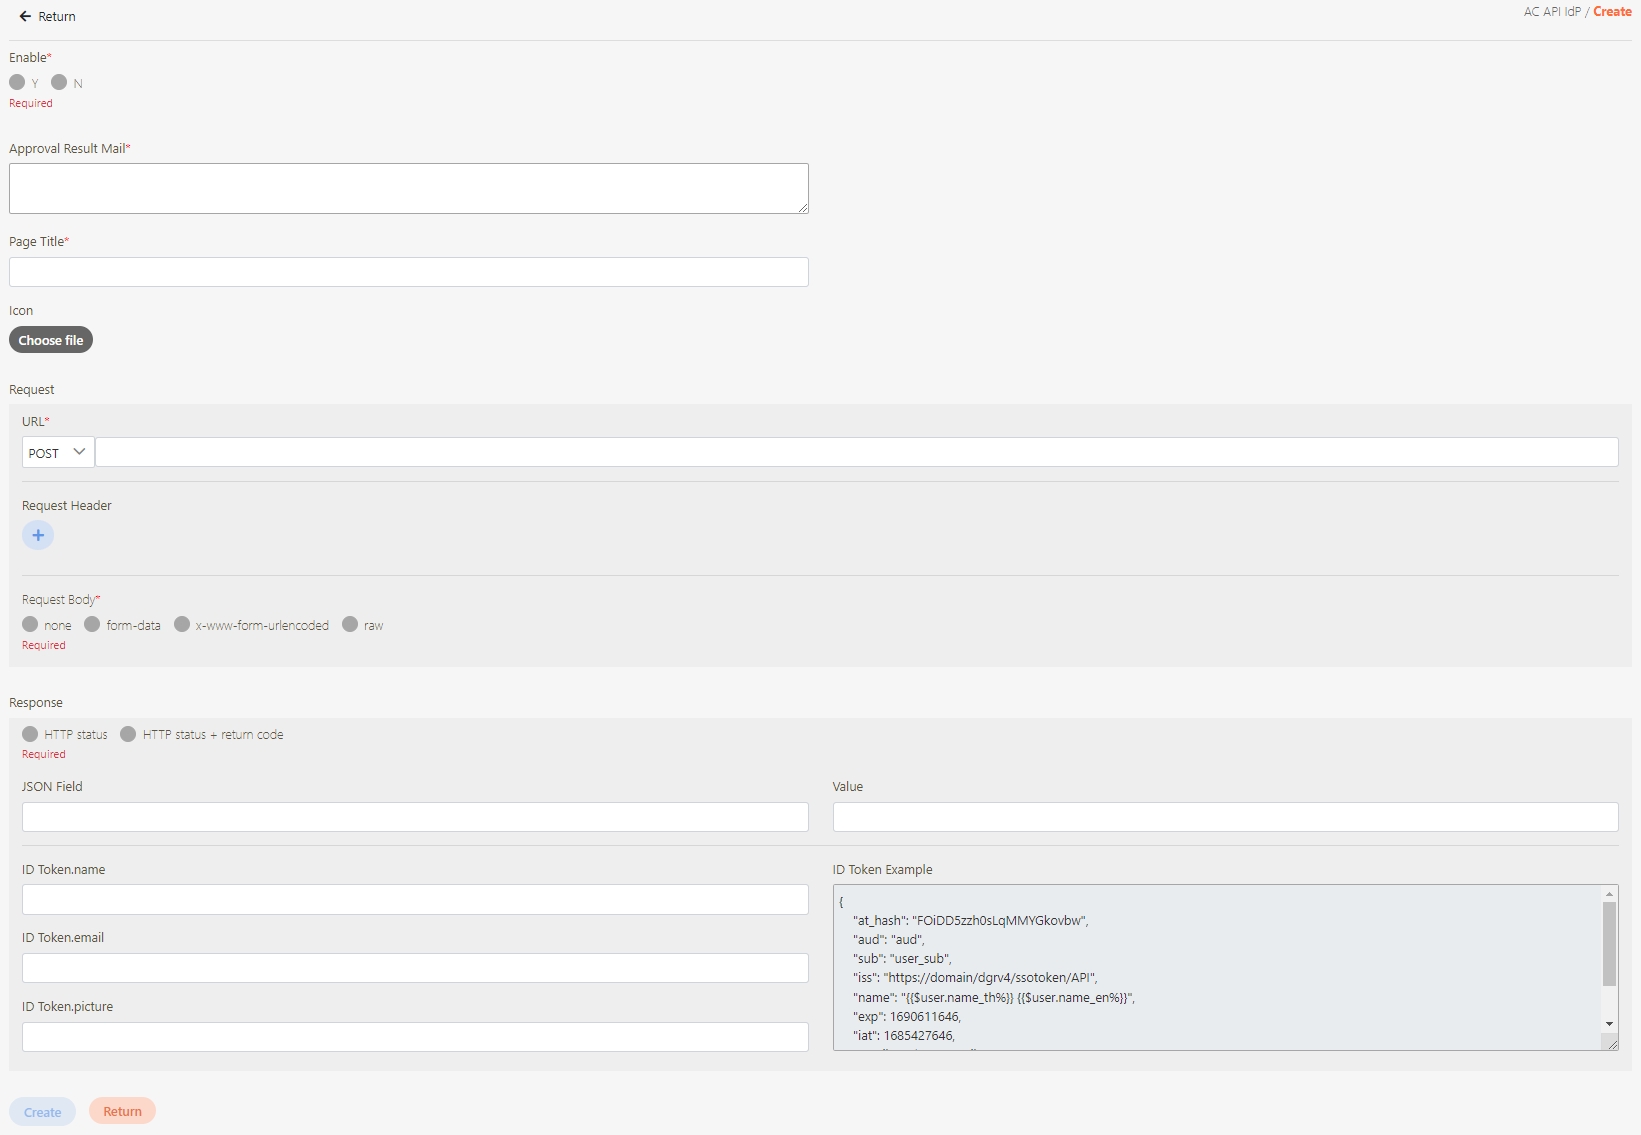
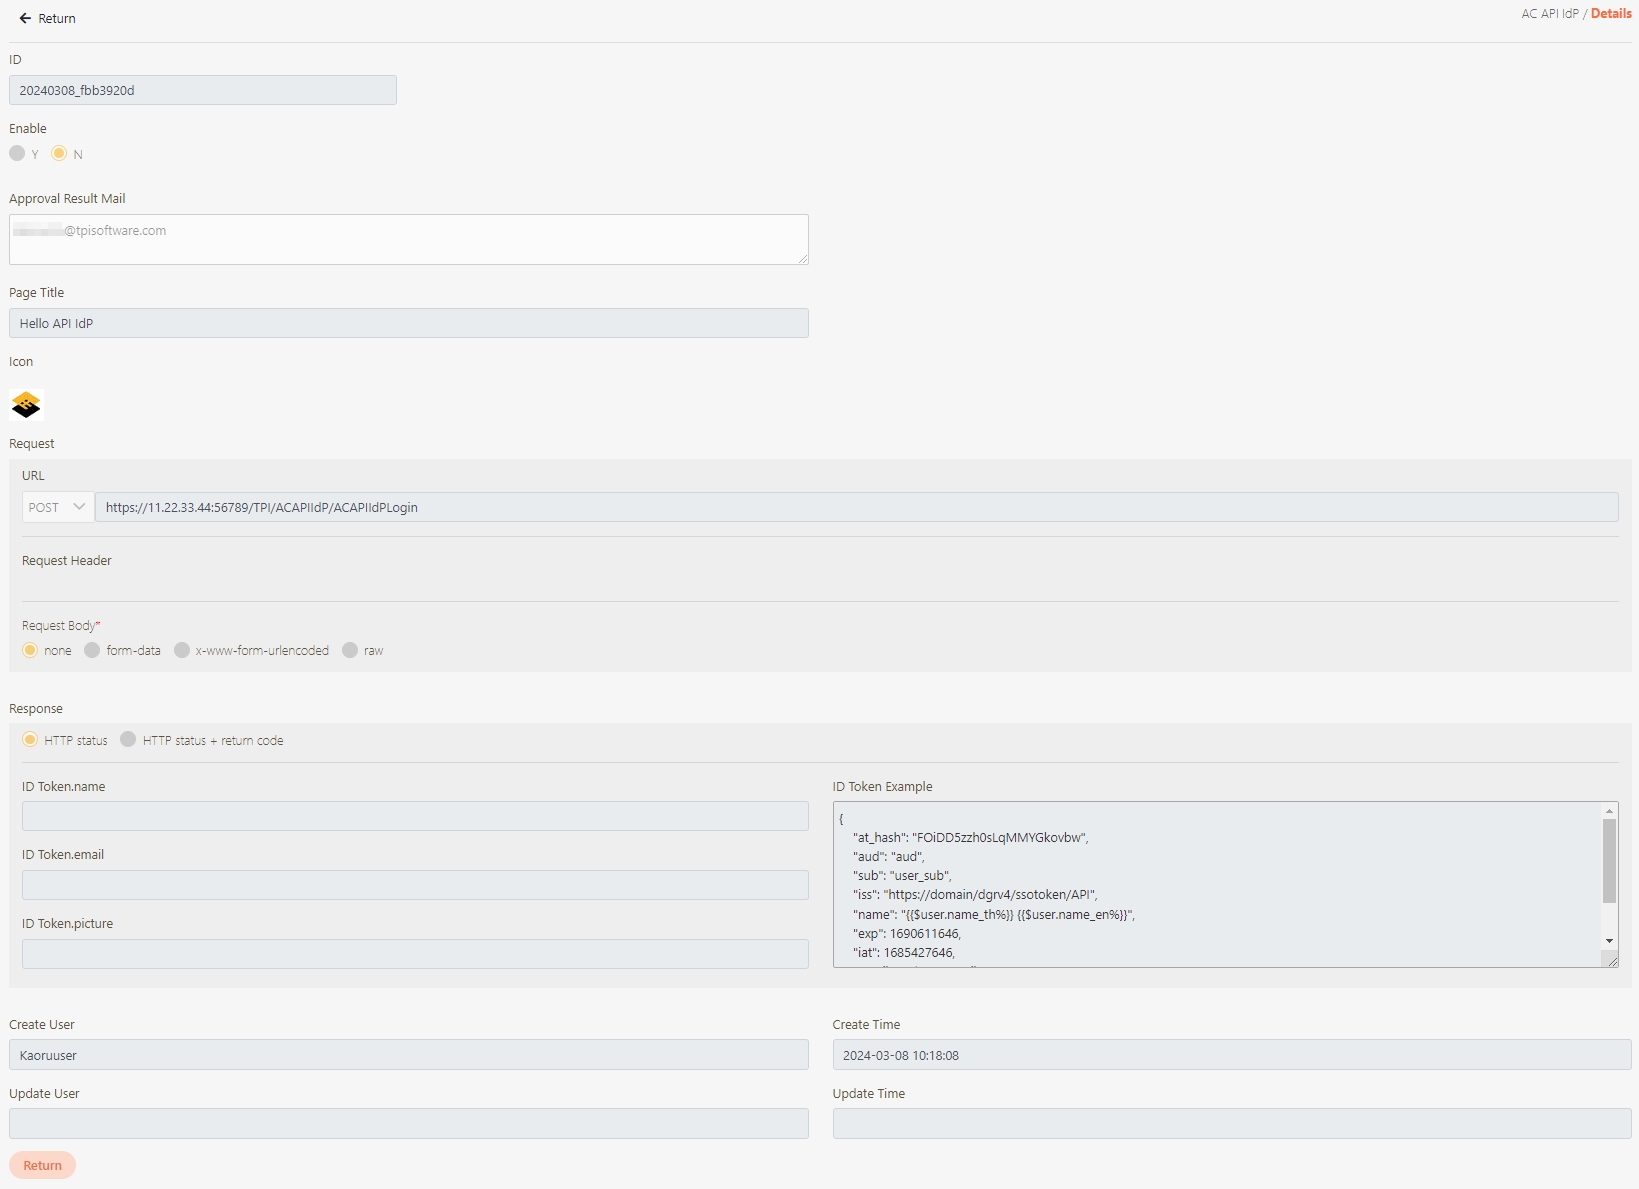
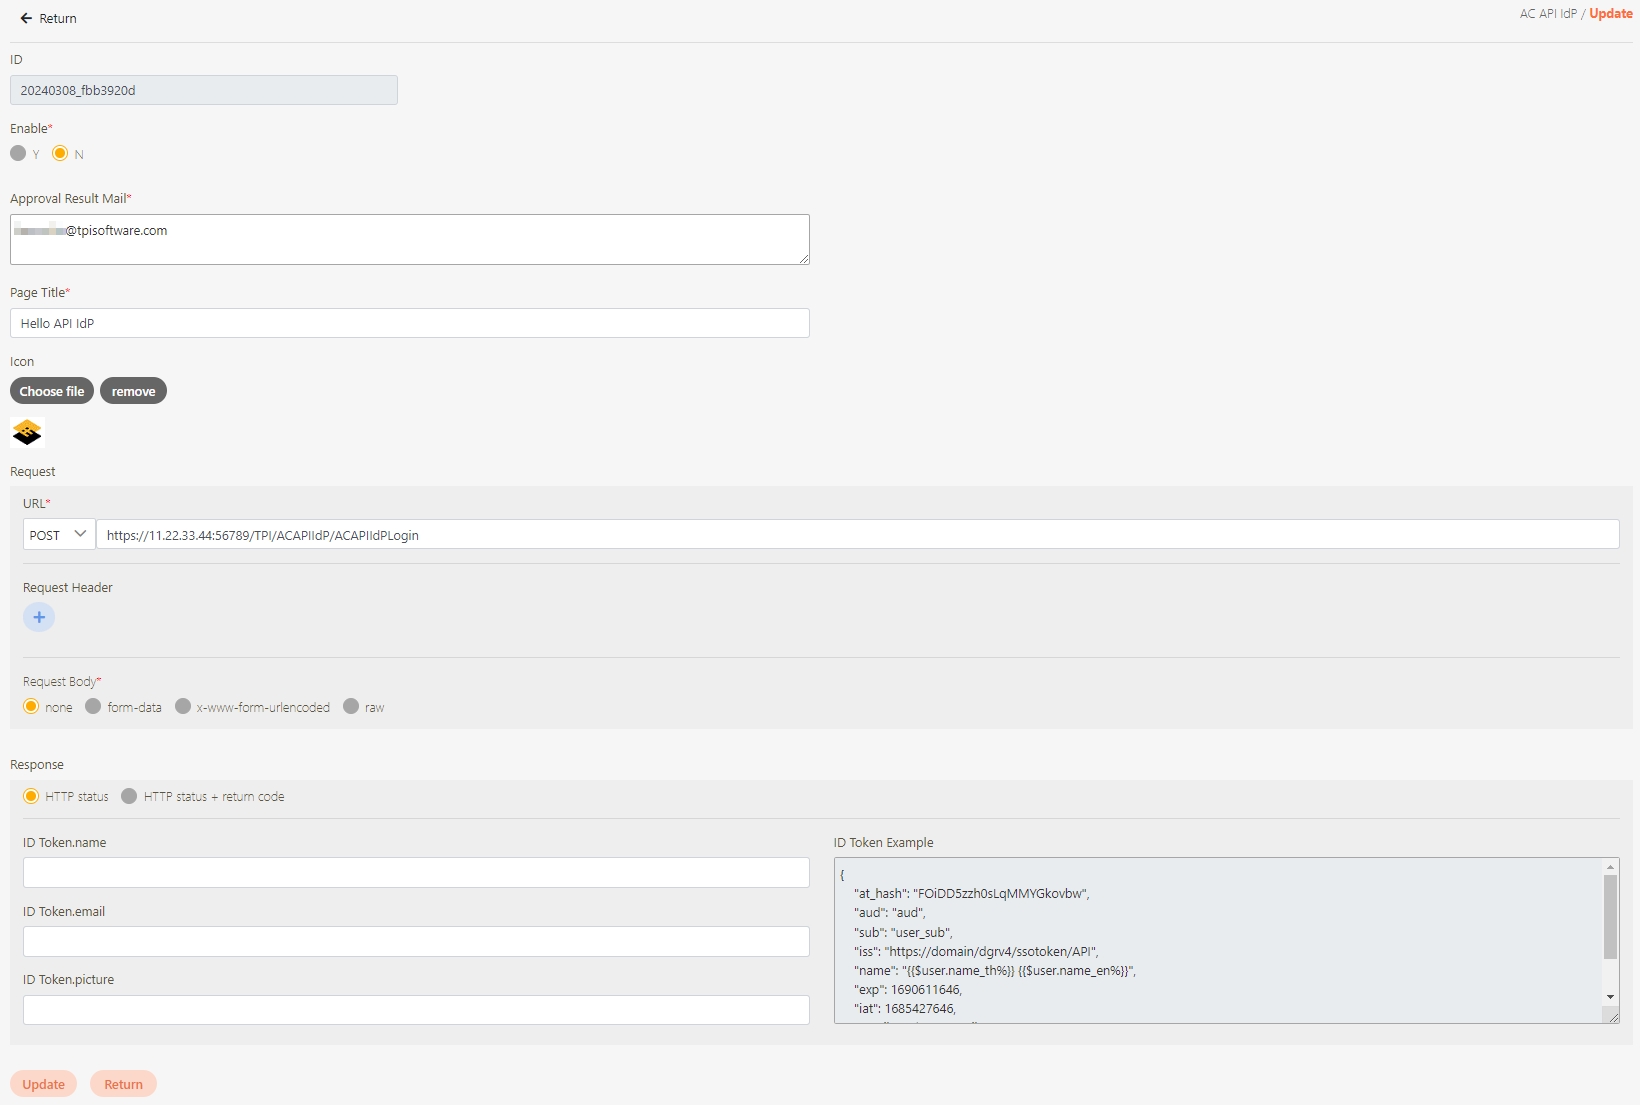
API IdP
digiRunner supports the latest stable versions of the “chromium” desktop browsers.
AC (Admin Console)
The Admin Console (AC) is the primary interface in digiRunner where administrators manage API configurations, monitor system performance, set access control policies, and oversee user roles and permissions.
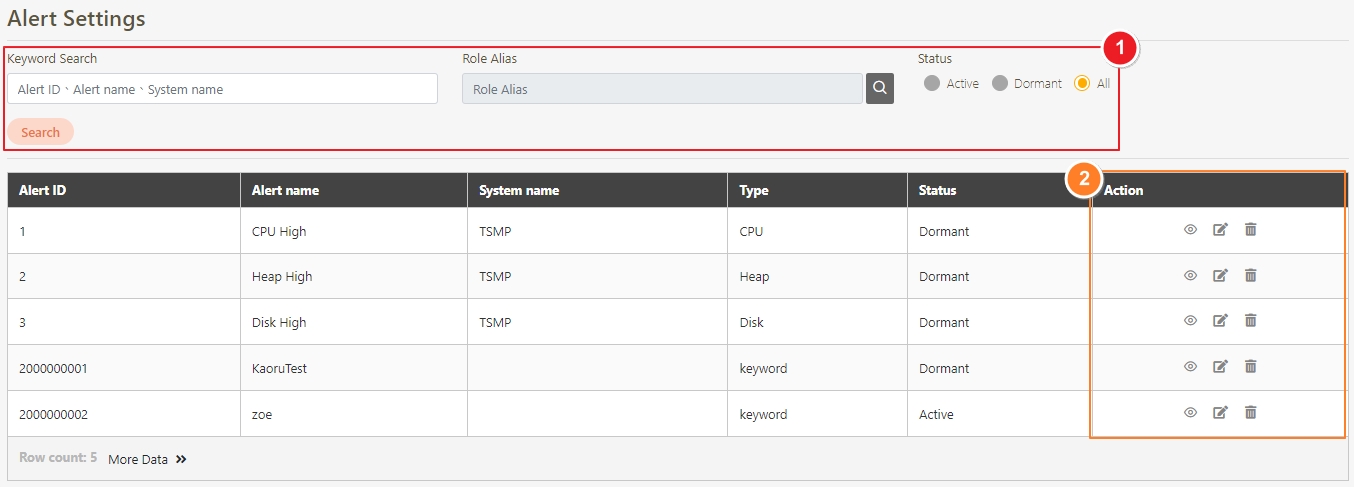
Alert Settings
A configuration feature that allows administrators to set up custom alerts for monitoring API performance and system health. Alerts can be triggered based on predefined thresholds, such as CPU usage, response time, or error rates, and can be delivered via various channels like email or messaging platforms.
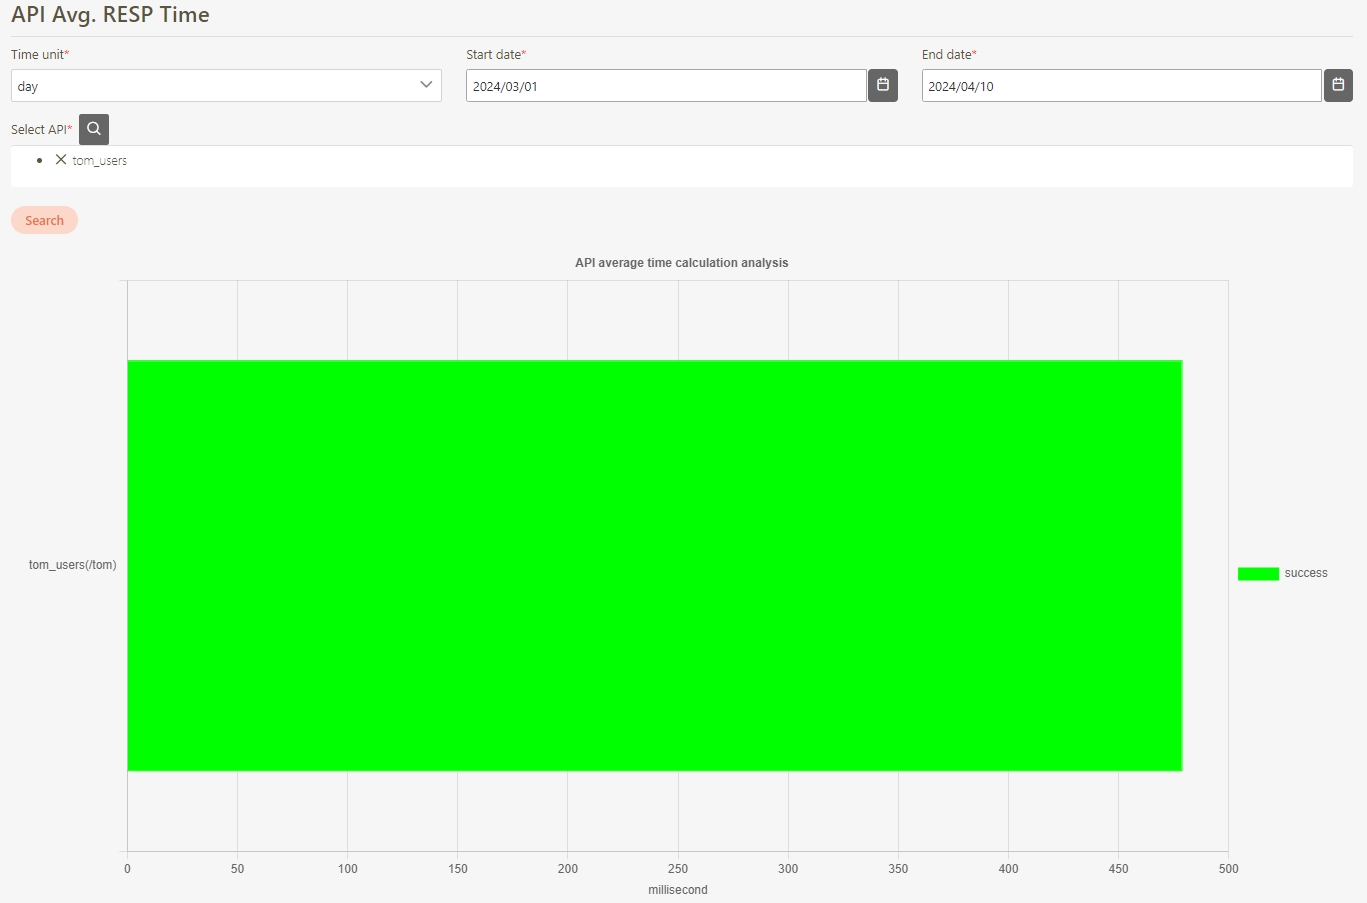
API Avg. RESP Time
The average time taken for an API to process a request and deliver a response. .
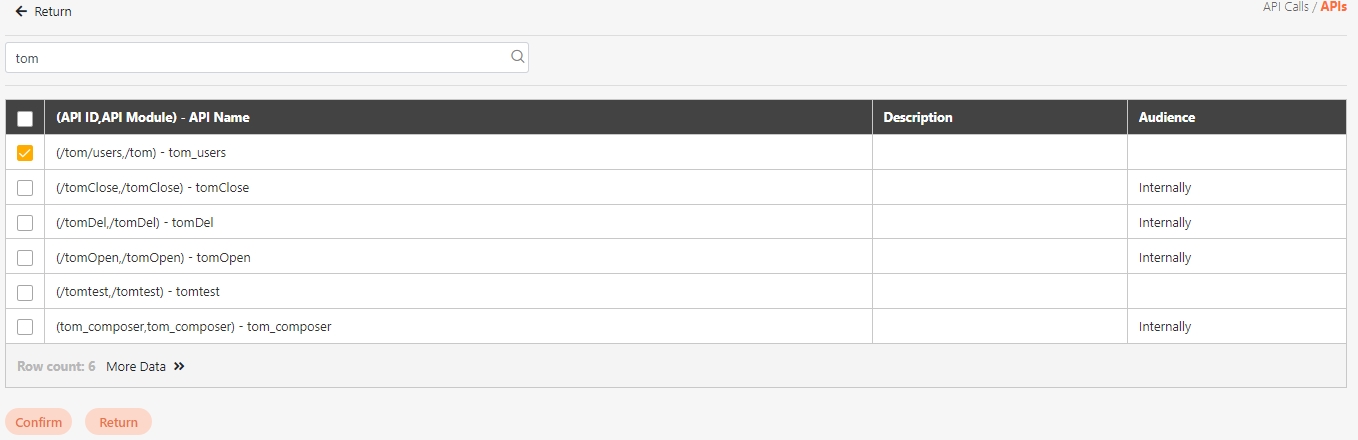
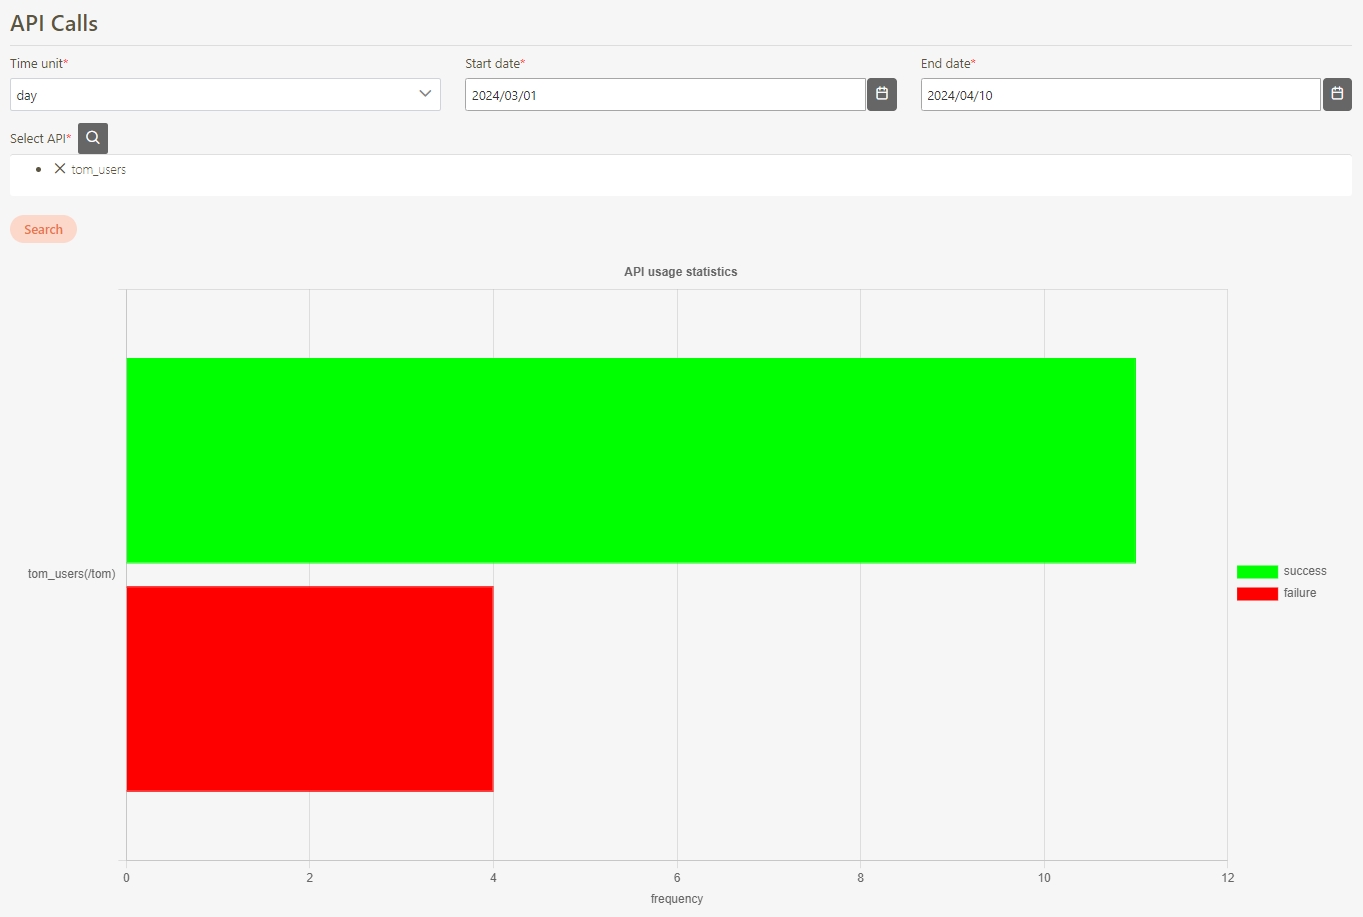
API Calls
The requests made by API Clients to access or interact with APIs. API Calls include sending data to, retrieving data from, or invoking actions on the backend systems through defined endpoints.
API Client
An entity that consumes APIs registered in digiRunner. API Clients are managed through unique credentials (Client ID, display name, tokens), enabling secure access and integration with specific APIs.
API Group
A collection of APIs grouped together to streamline management and access control. API Groups allow administrators to define permissions and security levels for a set of APIs, enabling easier assignment to API Clients.
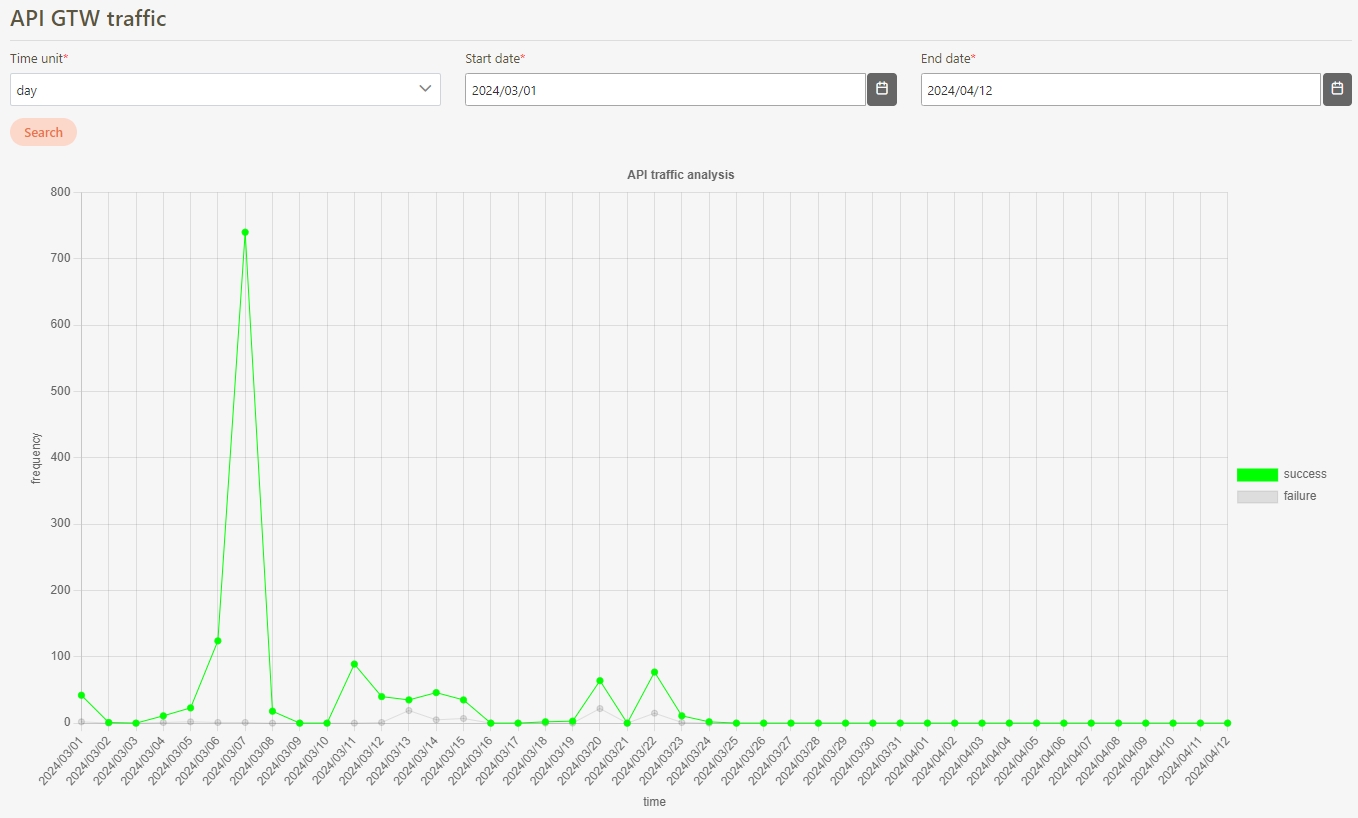
API GTW traffic
The volume and pattern of data requests and responses passing through the API Gateway.
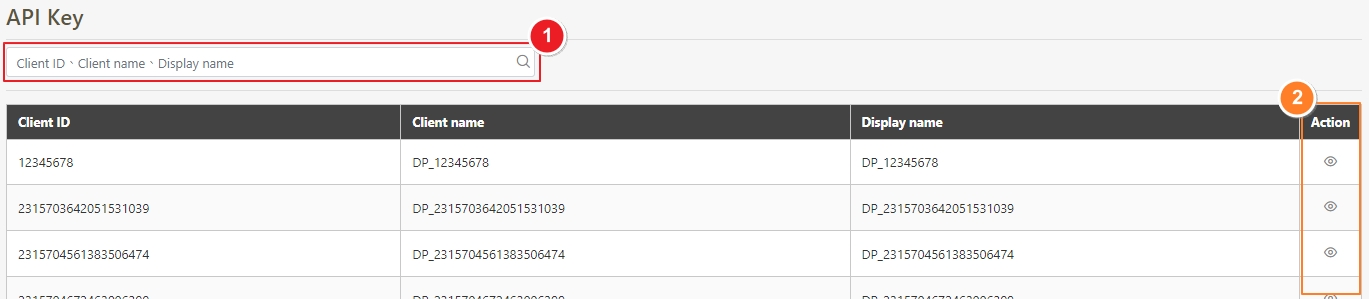
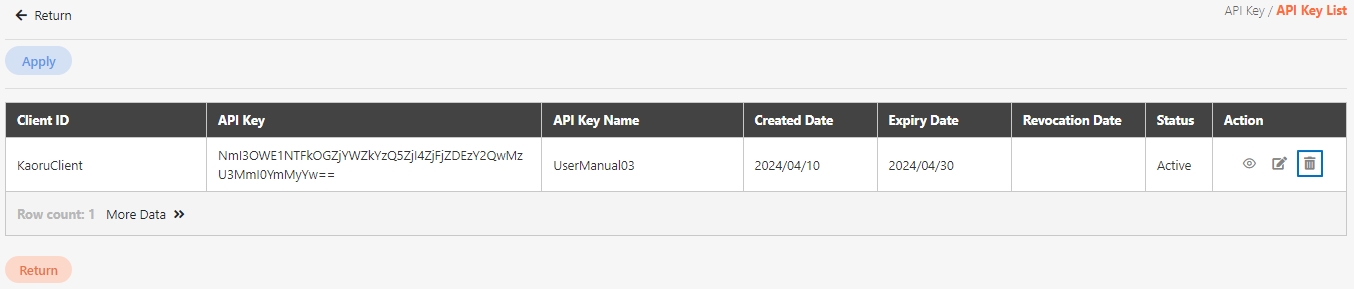
API Key
A unique identifier issued to API Clients for authentication and access control. API Keys are used to track and authorize requests, ensuring that only permitted clients can interact with the APIs.
API Key Approval History
A record of all approval actions related to API Key requests.
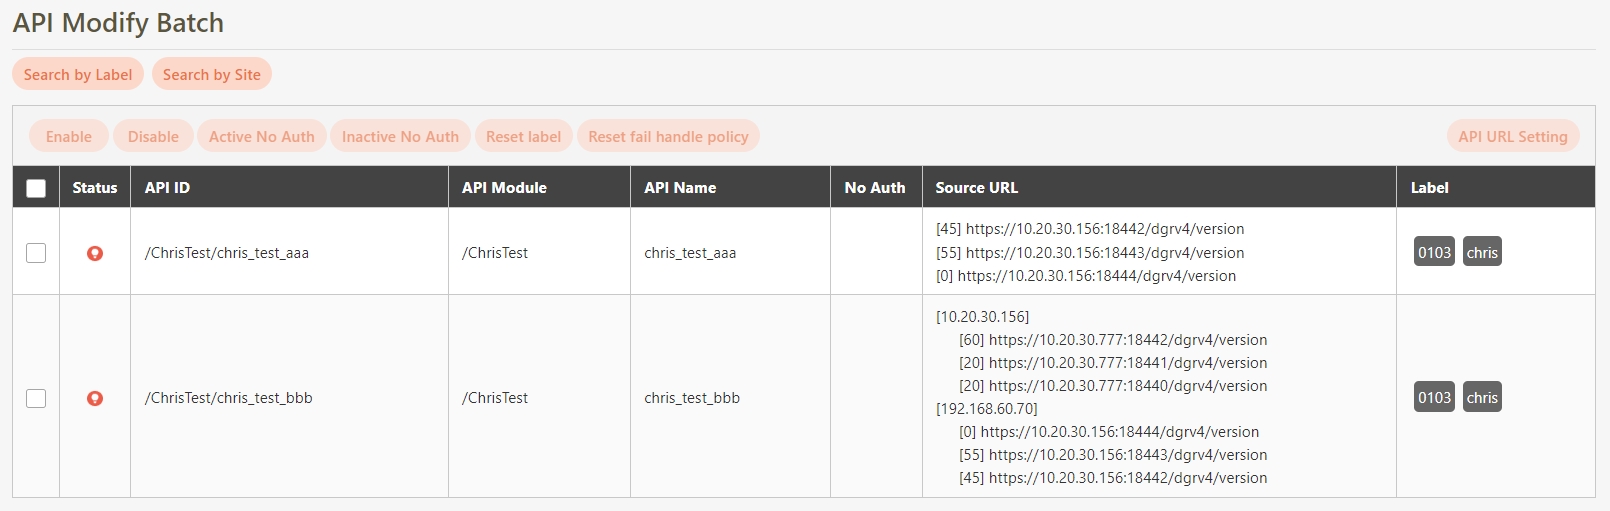
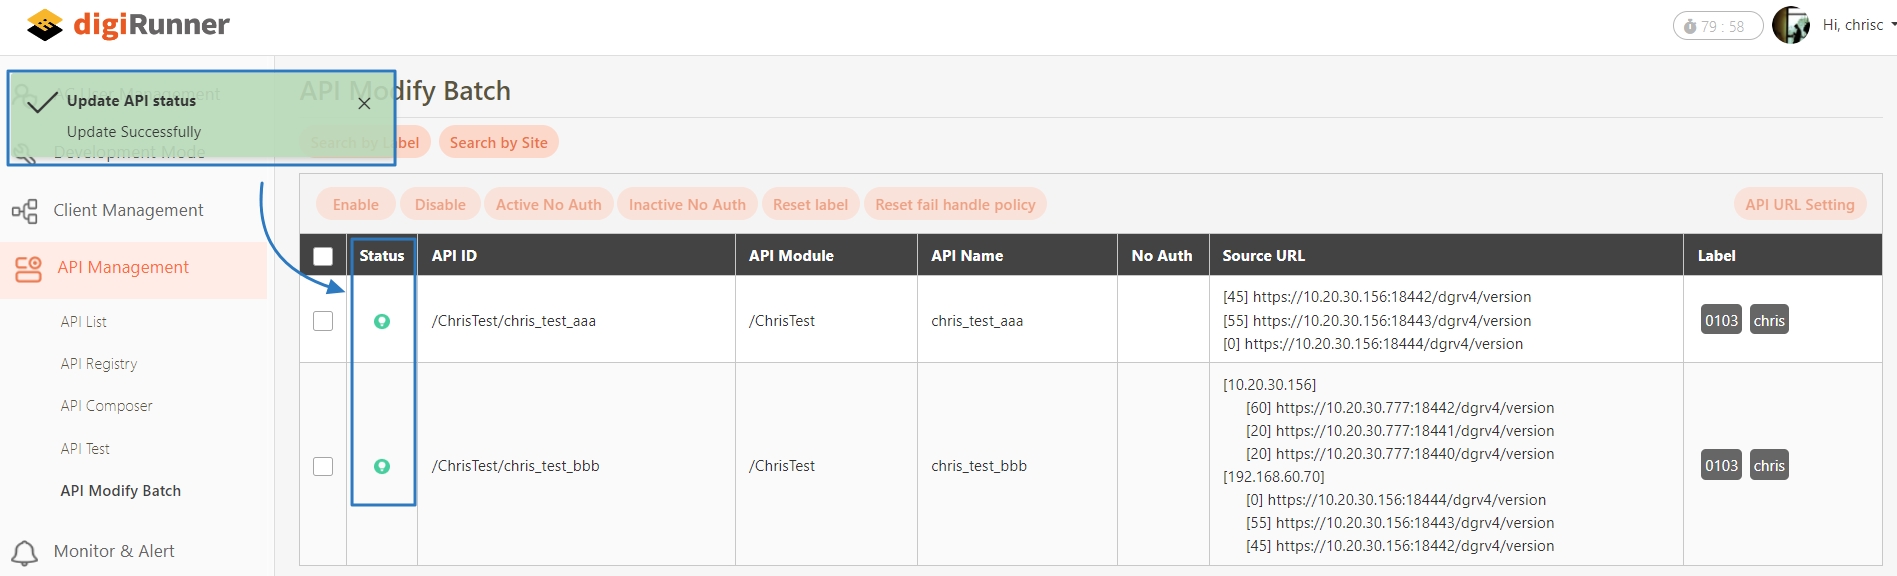
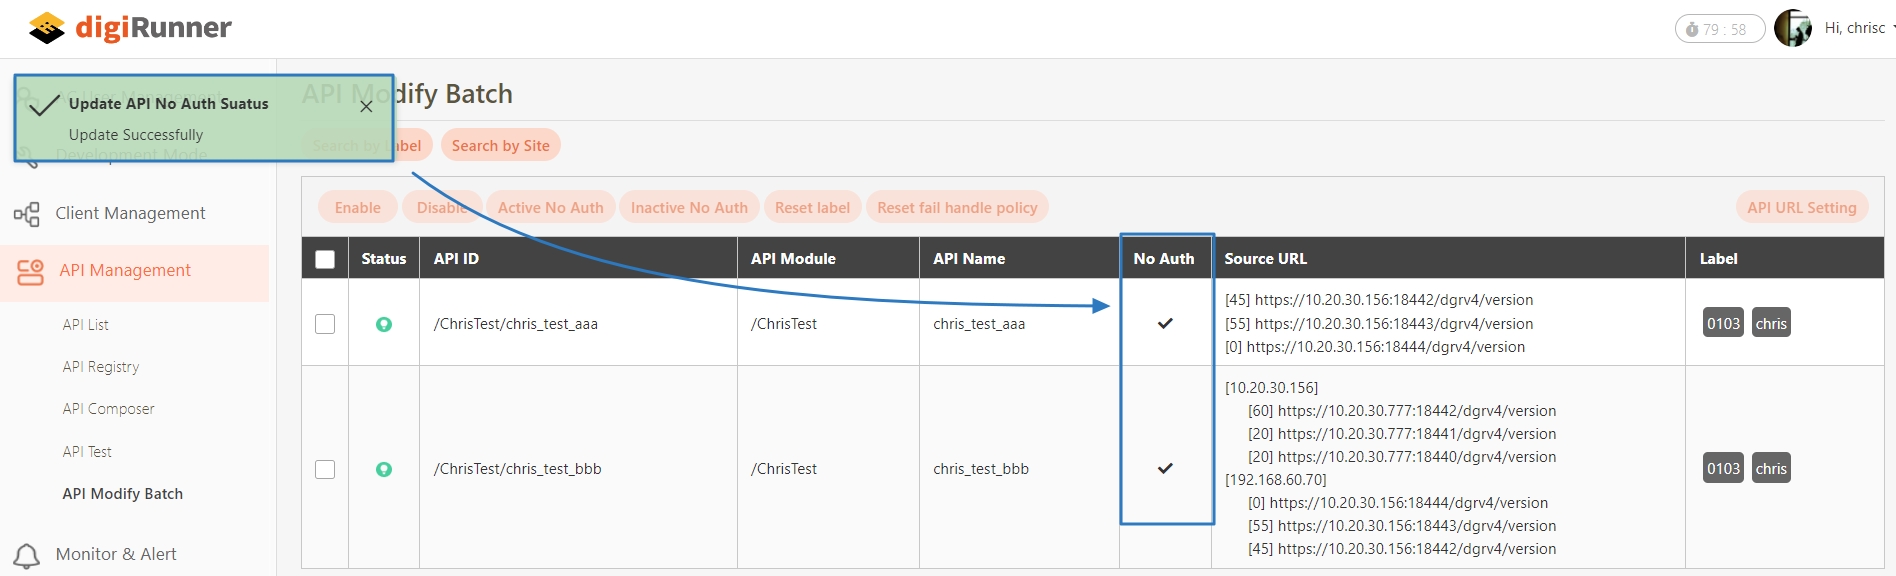
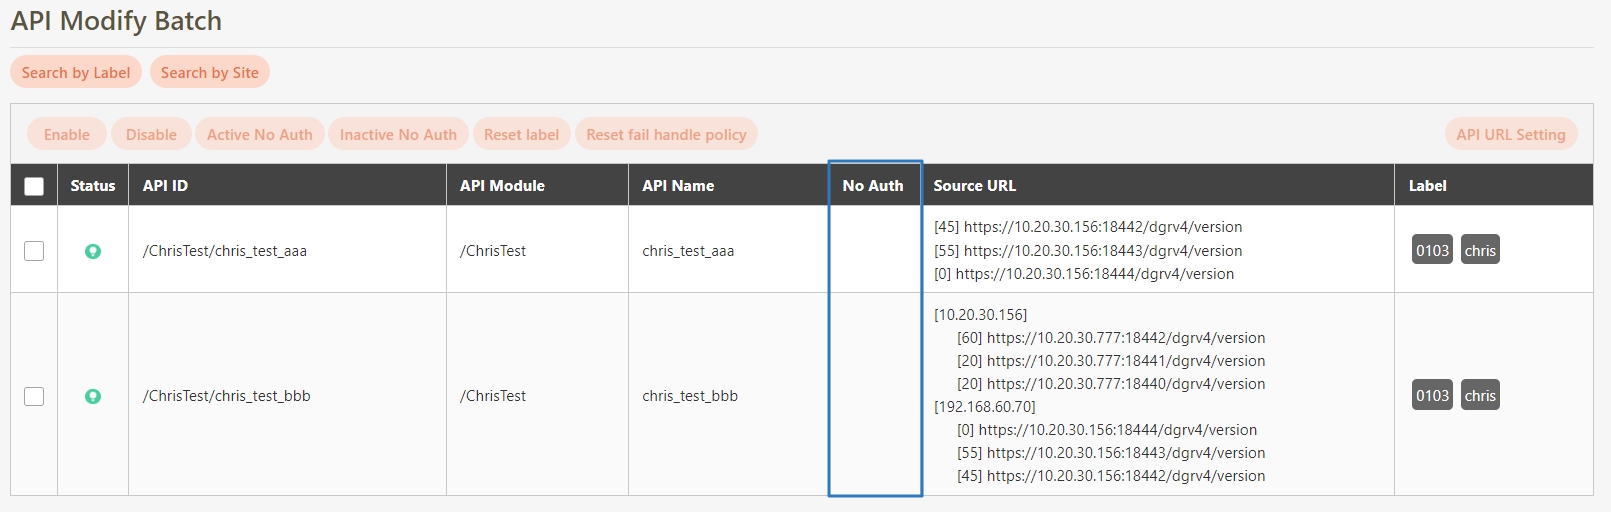
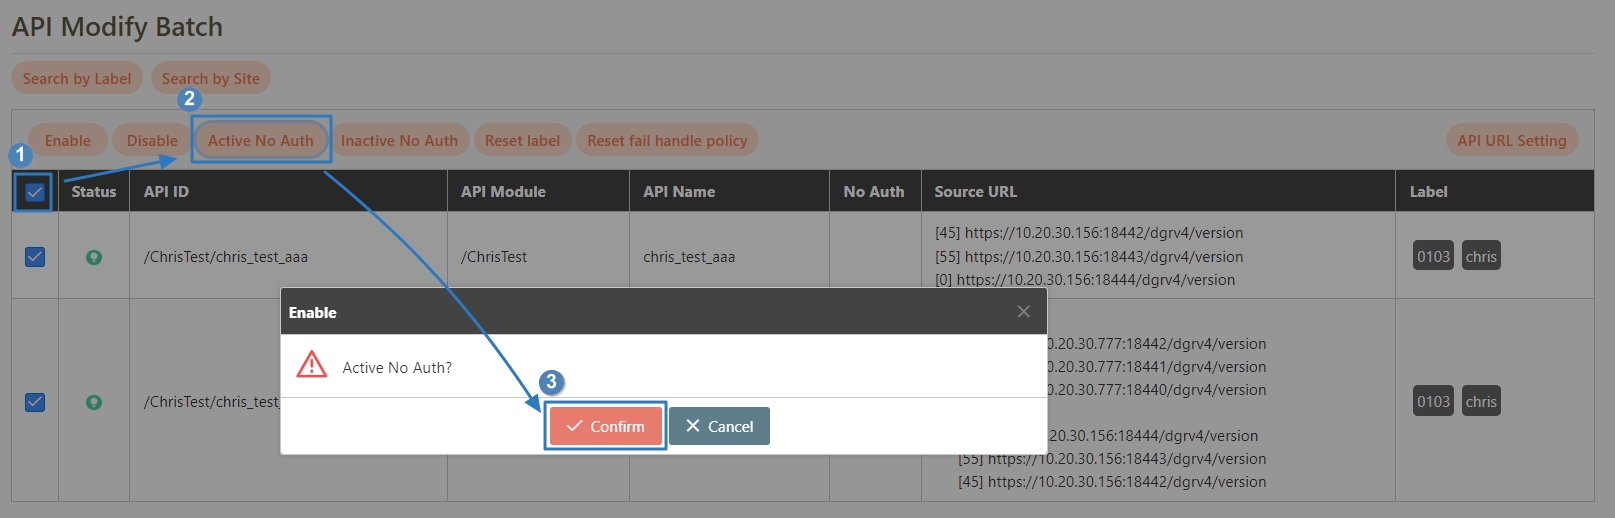
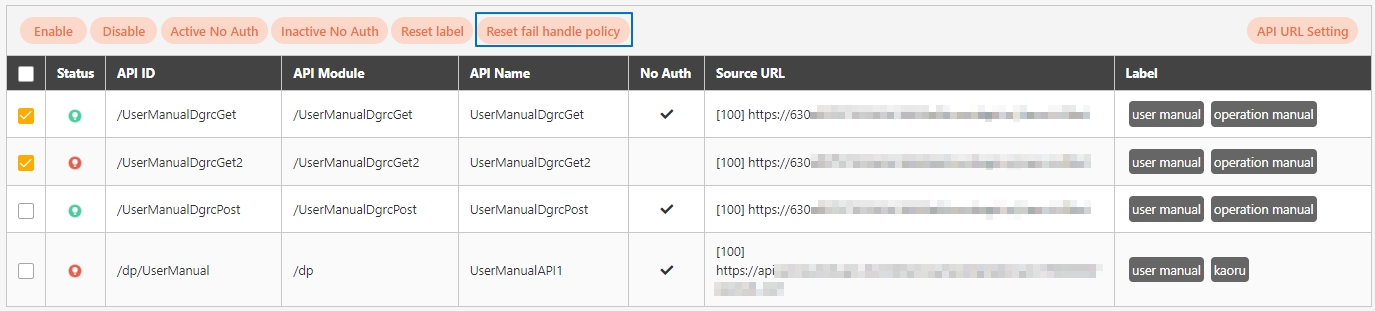
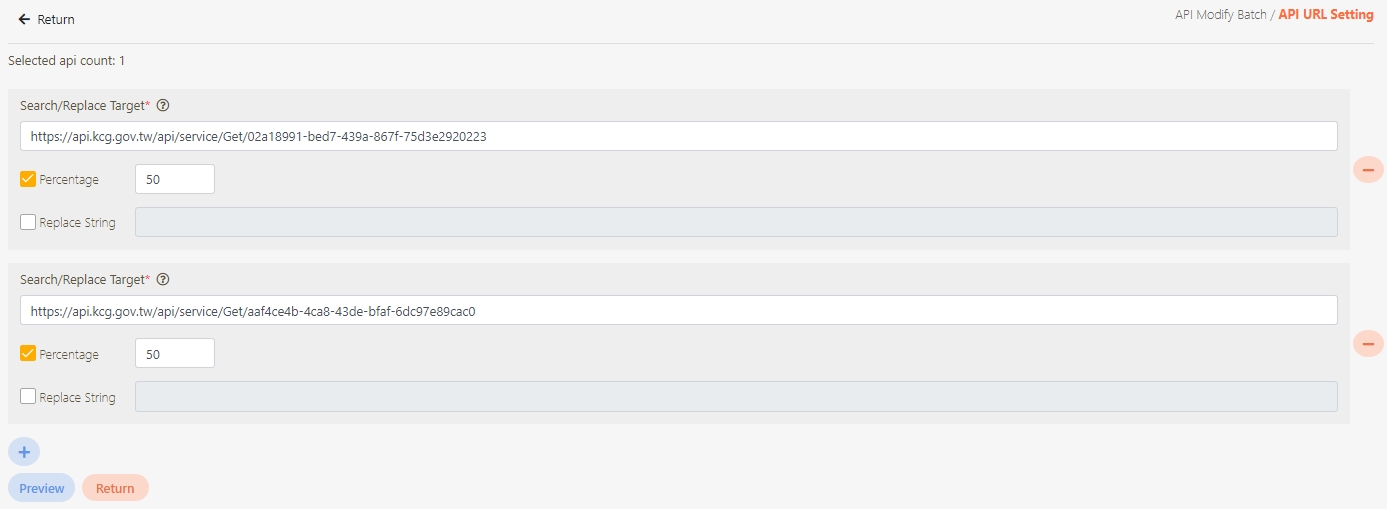
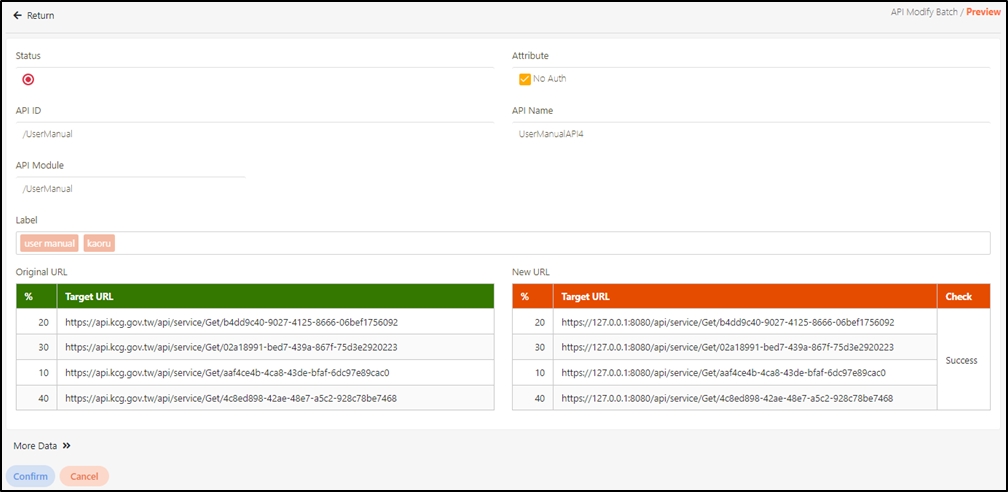
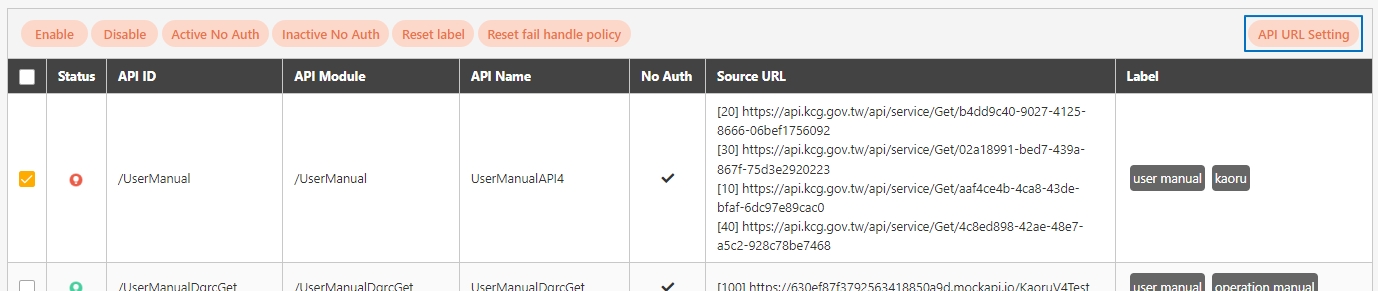
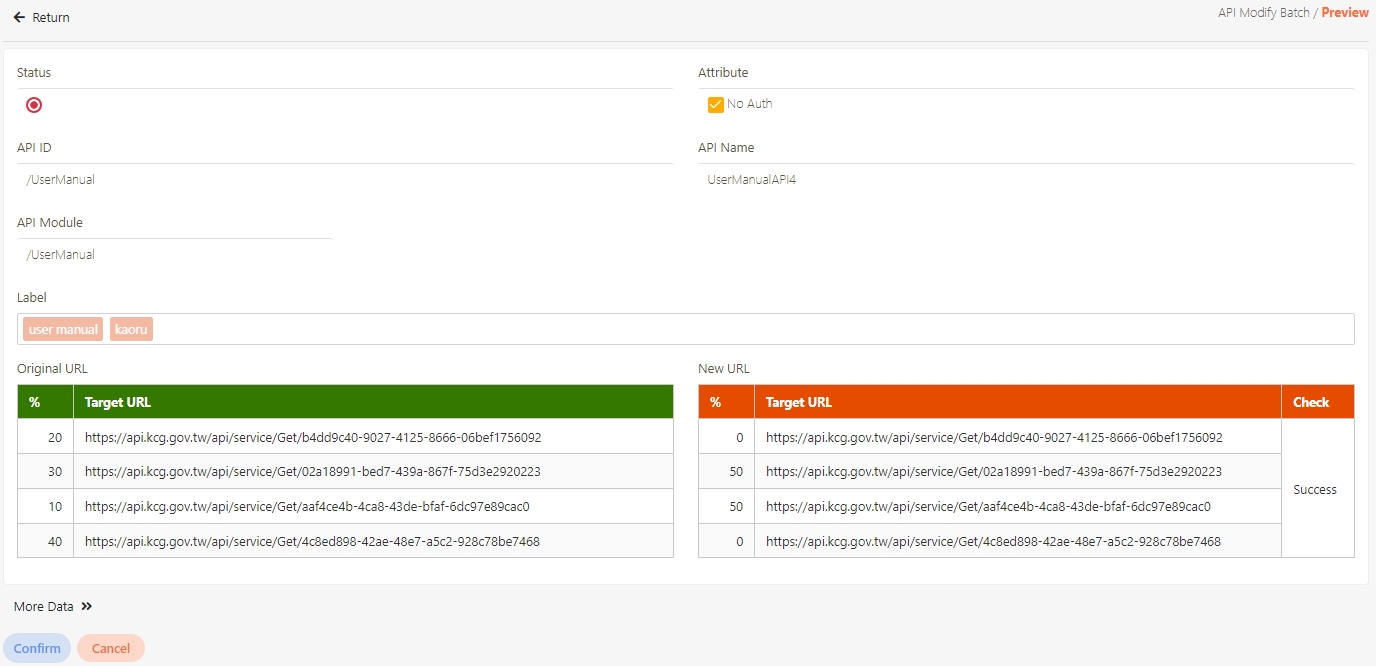
API Modify Batch
A feature that allows administrators to perform bulk updates or changes to multiple APIs simultaneously. This includes enabling/disabling APIs, modifying authentication settings, updating API metadata, and applying consistent configurations across selected APIs for efficient management.
API RESP distribution
A report that visualizes the distribution of API response statuses (e.g., success, client error, server error) over a given time period. It helps administrators identify trends in API performance, detect anomalies, and optimize backend processing.
API Scope
A granular level of access control that defines the specific operations or data an API Client can perform or access. API Scopes are used to limit API usage to predefined functionalities, ensuring secure and precise permission management within API Groups or individual APIs.
Approval Flow Settings
A feature that allows administrators to configure and manage the workflow for approving requests, such as API publishing, client account creation, or API authorization.
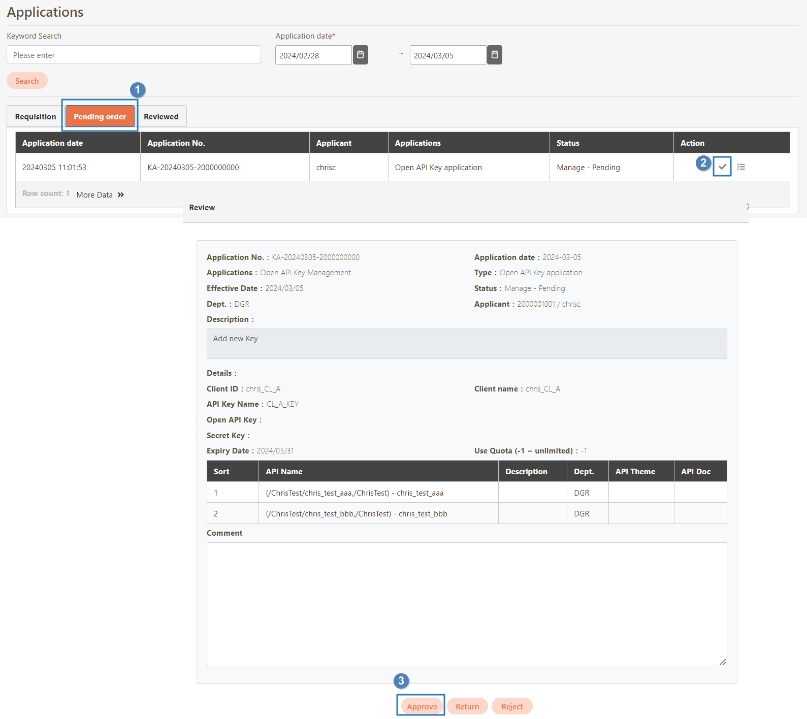
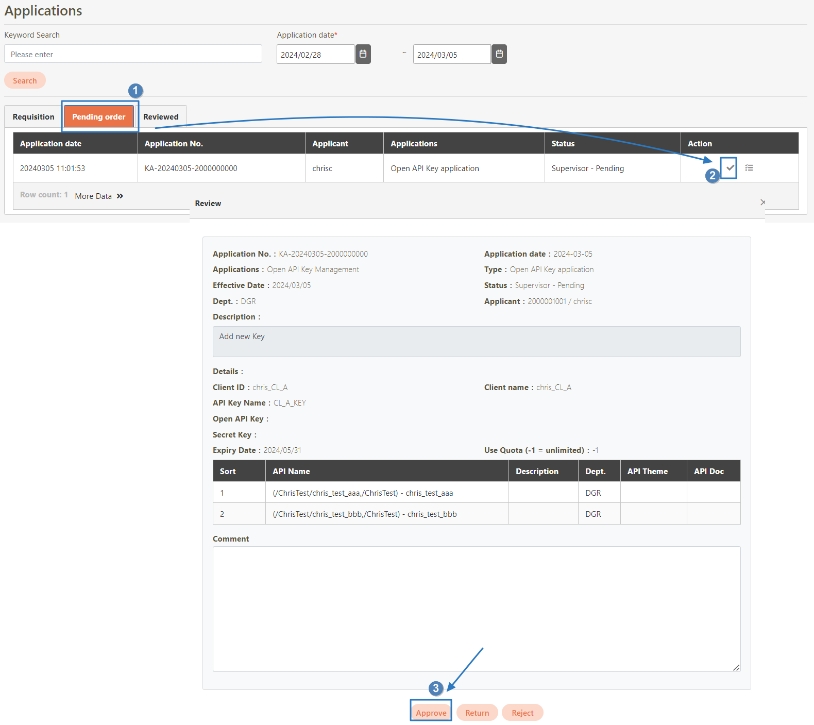
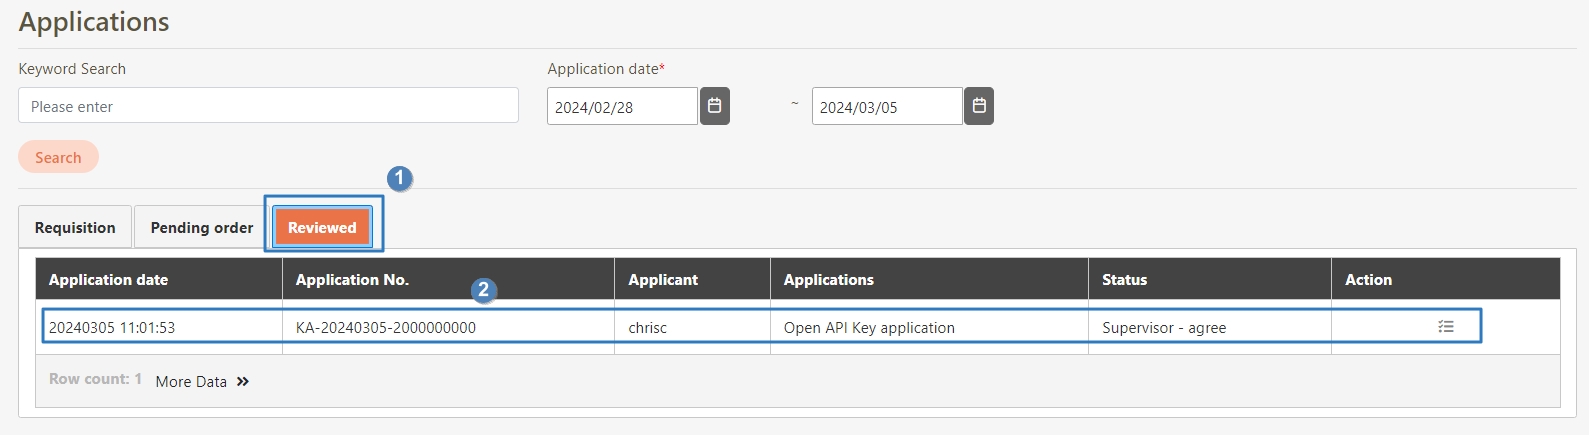
Application Forms
A feature that facilitates the management and submission of requests related to API usage, such as API publishing, client account creation, and API authorization. Application Forms streamline the approval process by allowing administrators to review, approve, or reject requests within the platform.
Applications
Registered entities or systems that consume APIs within the platform.
Authentications
Mechanisms to verify the identity of API Clients or users before granting access to APIs. Supported methods include OAuth 2.0, JWT, LDAP, and Mutual TLS.
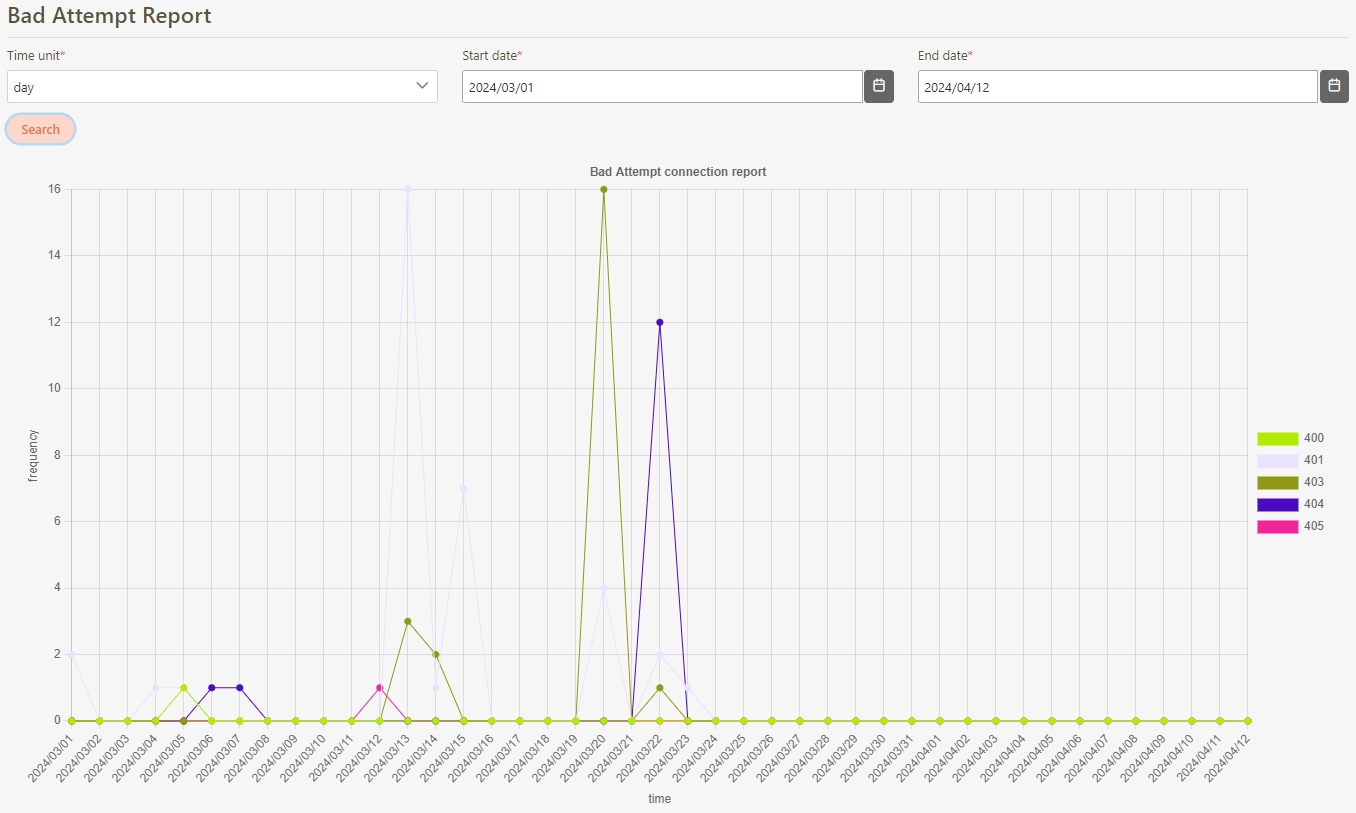
Bad Attempt Report
A report that logs and analyzes failed API call attempts, such as unauthorized access, invalid requests, or exceeded rate limits.
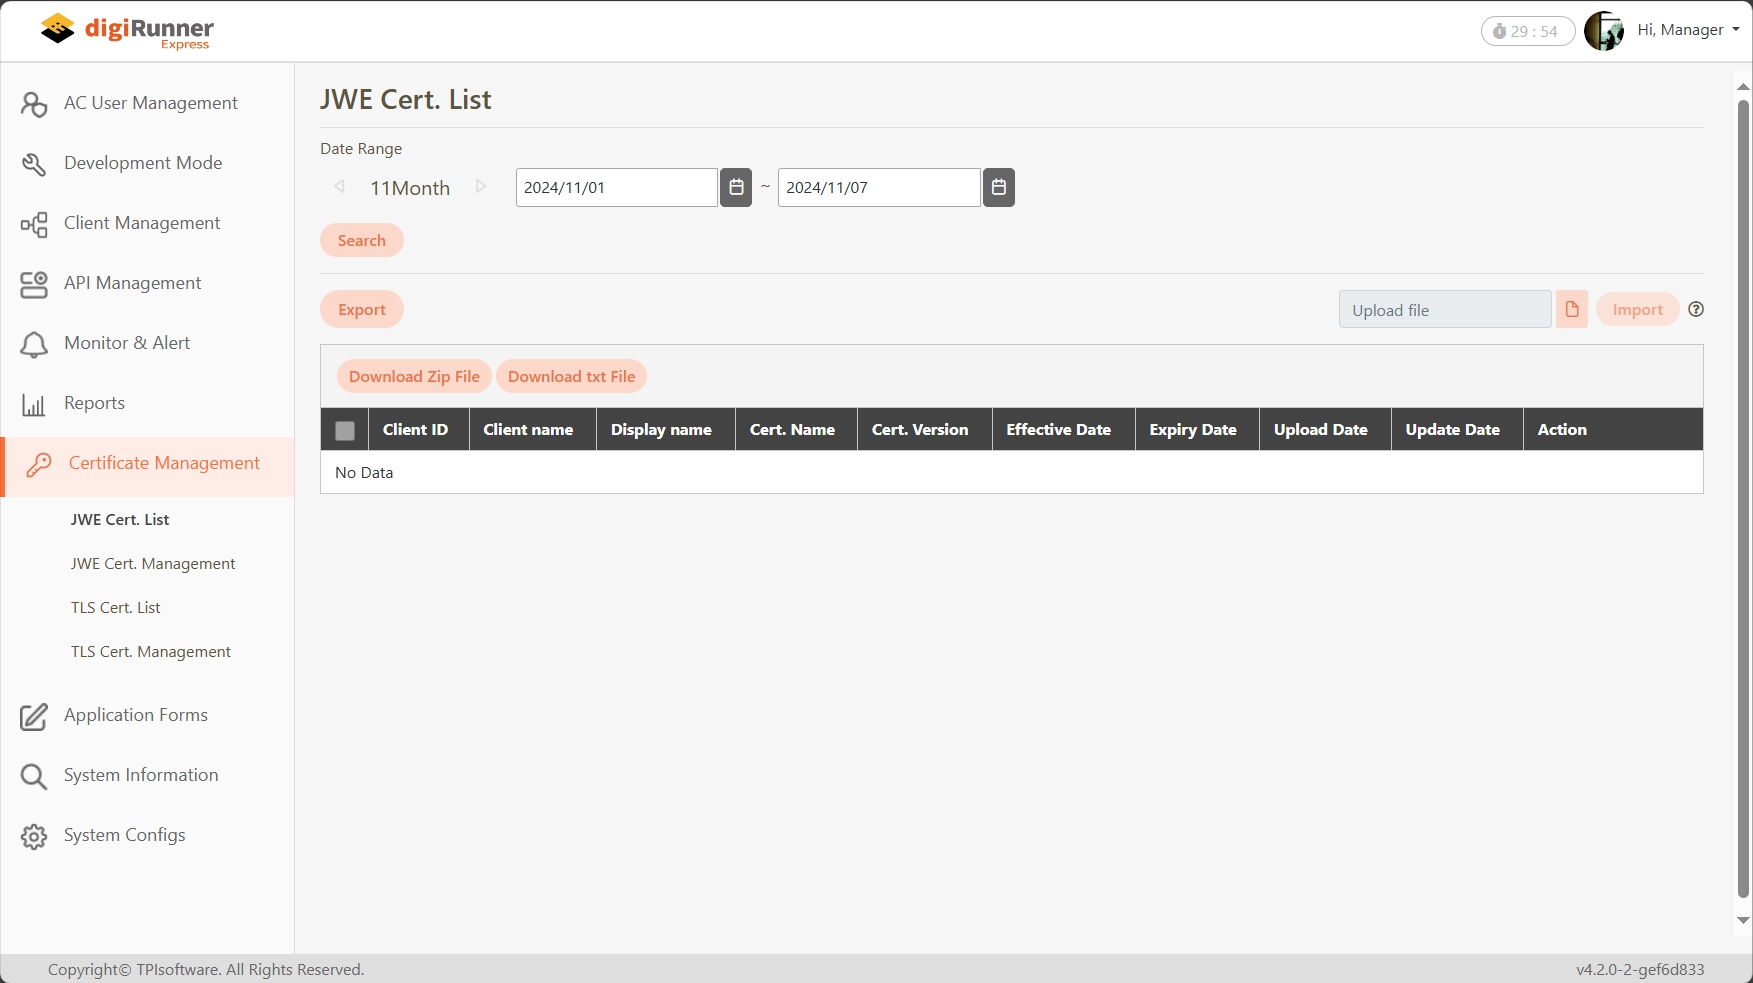
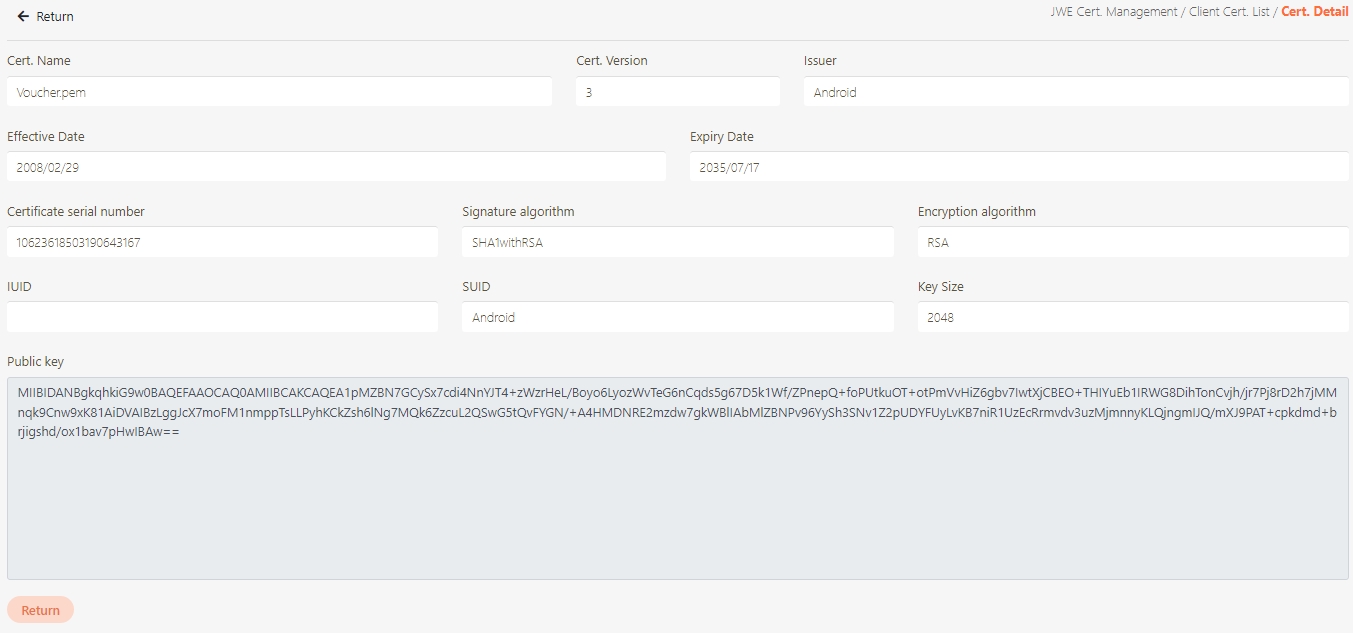
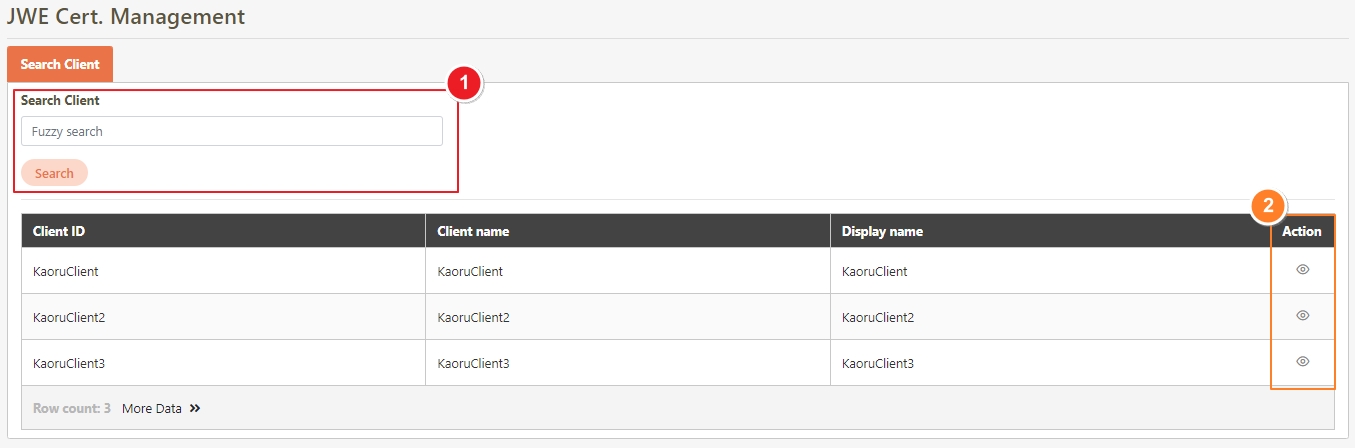
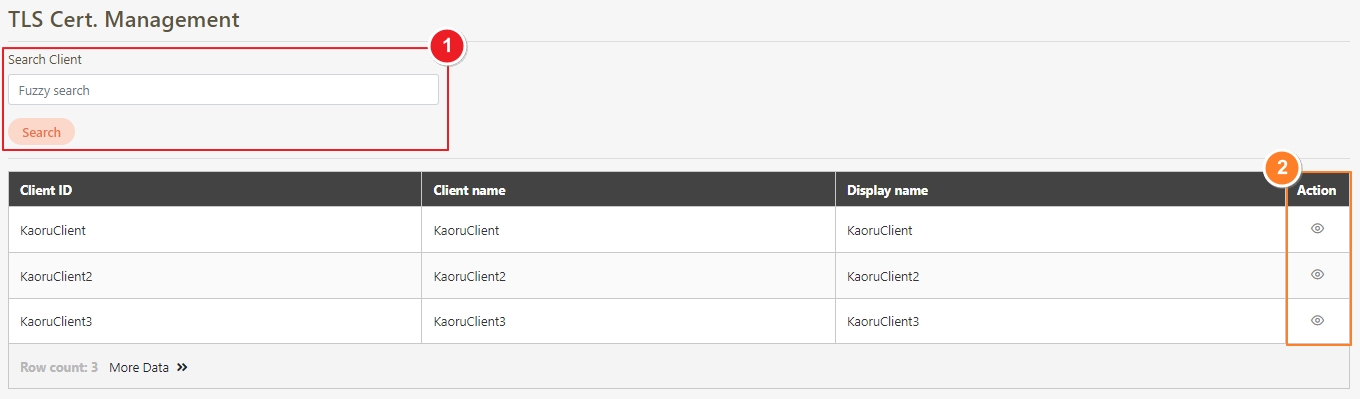
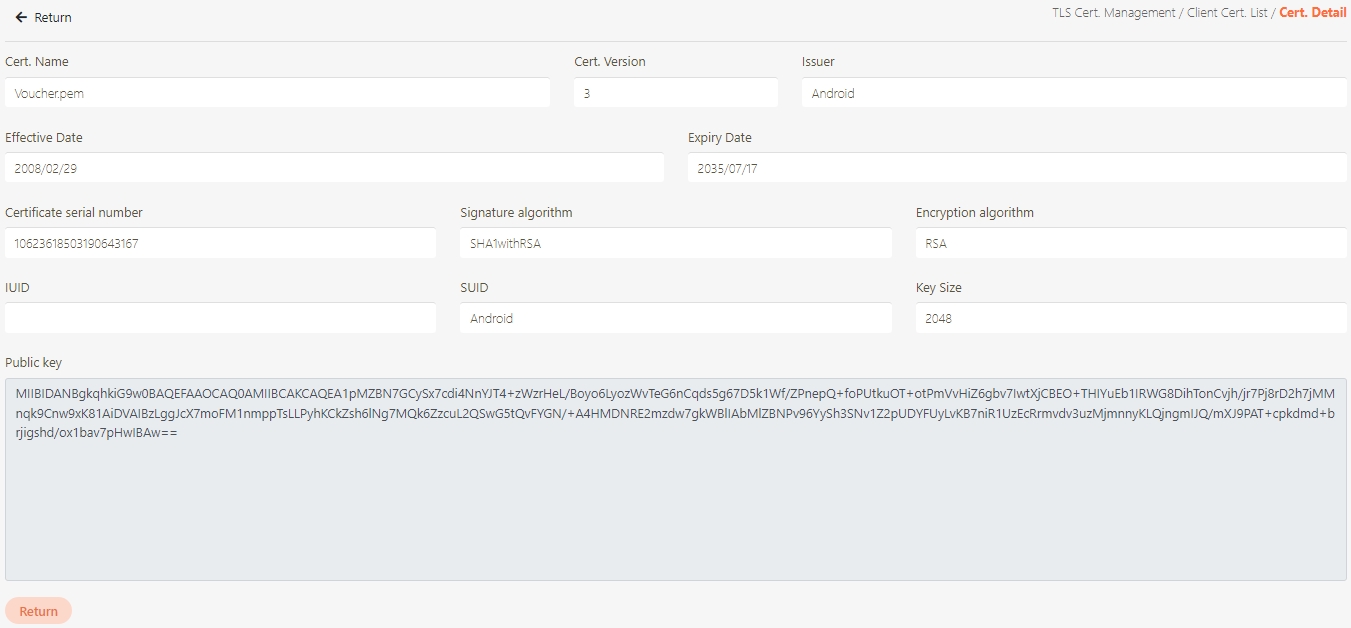
Certificate Management
The administration of digital certificates used to secure API communication. This includes managing JWE and TLS certificates, ensuring data encryption, validating client identities, and enabling secure data transmission between systems.
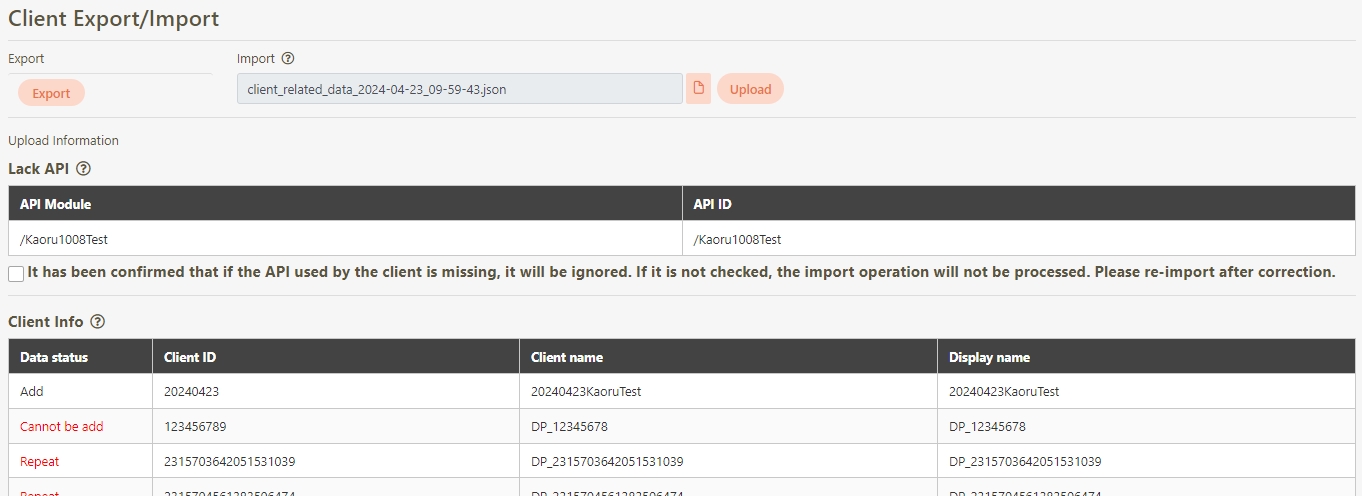
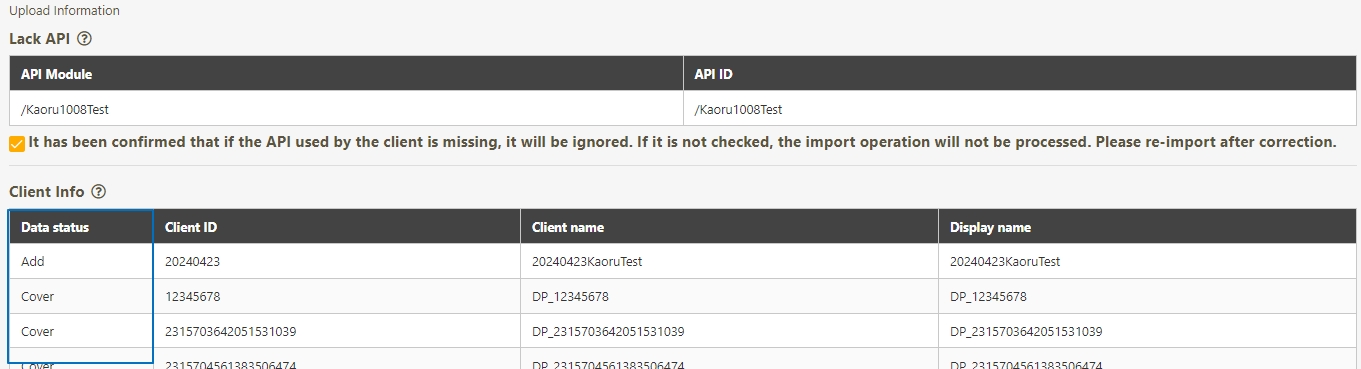
Client Export/Import
A functionality that allows administrators to export API Client configurations to a file for backup or migration purposes. Similarly, administrators can import these configurations into the system to quickly restore or replicate client settings across environments.
Customer Setting
Customizable parameters or configurations specific to an organization or client within the platform.
Development Mode
A mode in digiRunner where configurations and tests are performed in a non-production environment. It allows administrators to simulate and validate API setups, user interactions, and system behaviors without impacting live services.
Embedded Function Management
The capability within digiRunner to manage built-in functions or services that are integrated directly into the platform. This includes configuring, enabling, or disabling specific functionalities and features as required for system operations.
Files
Digital assets or documents stored within the platform for operational purposes, such as configuration files, logs, or reports.
Function Management
A feature within the digiRunner Admin Console allowing administrators to configure, view, and manage available functions. Function Management ensures that each user role has appropriate access, maintaining organized and secure use of digiRunner’s capabilities.
GTW(Gateway)
A centralized entry point that handles API traffic between clients and backend services.
IdP (Identity Provider)
A service that manages and authenticates user identities, enabling secure access to applications within digiRunner. An IdP verifies user credentials and provides authentication tokens that grant users access based on their roles and permissions.
Items
Configurable elements within the platform that represent specific data points or attributes, such as system resources, API properties, or user-defined variables.
Mail Log
A record of all email communications sent by the system, including notifications, alerts, and confirmations.
Mail Template Export/Import
A feature that allows administrators to export email templates for backup or sharing purposes and import templates into the system to standardize communication formats.
Online Console
A real-time monitoring interface within the platform that provides administrators with tools to track API performance, analyze logs, and view system health.
RDB Connection
A configuration within the platform that allows establishing connections to relational databases (RDBs).
Recurring Tasks
A feature that enables the automation of tasks to repeat at specified intervals.
Reports
A feature that provides detailed analytics and insights into API usage, performance, and system operations.
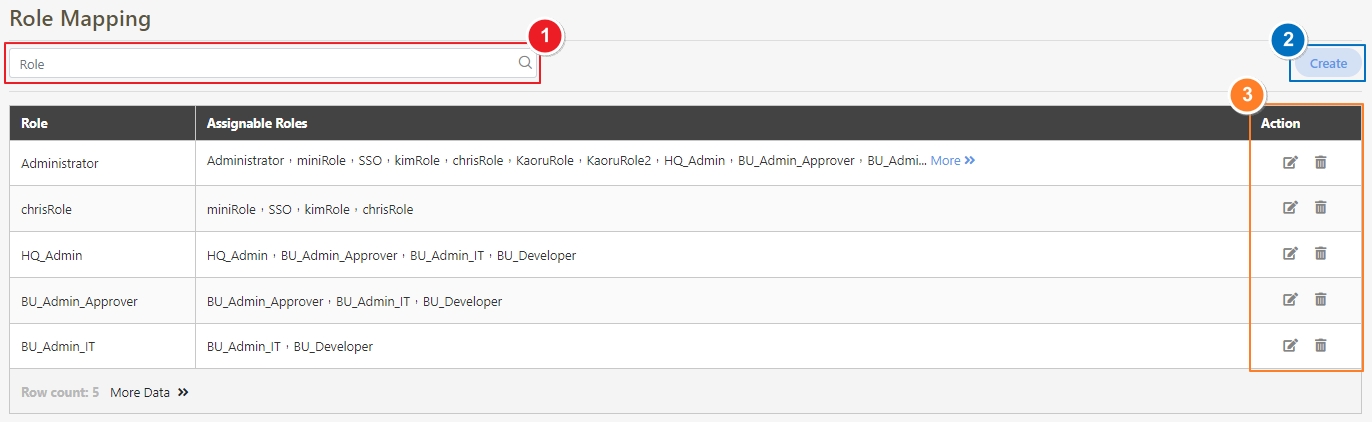
Role Mapping
The process of associating users or groups with specific roles in digiRunner. Role Mapping ensures that users automatically receive the appropriate permissions based on their assigned role, facilitating organized and secure access control across the Admin Console and API resources. This feature simplifies permission management by linking roles to users or groups according to their responsibilities.
Scheduled Tasks
A feature that allows administrators to automate specific operations or processes at predefined times.
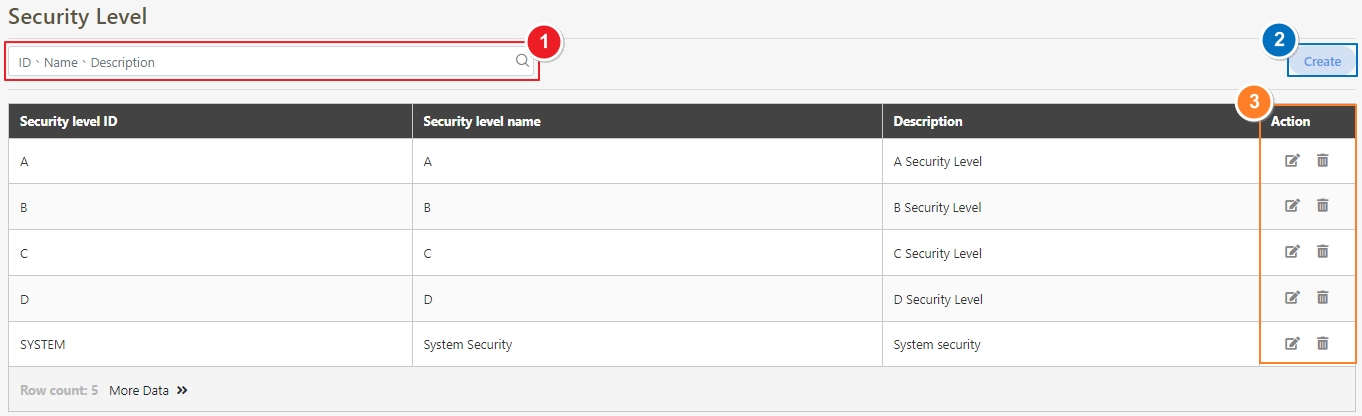
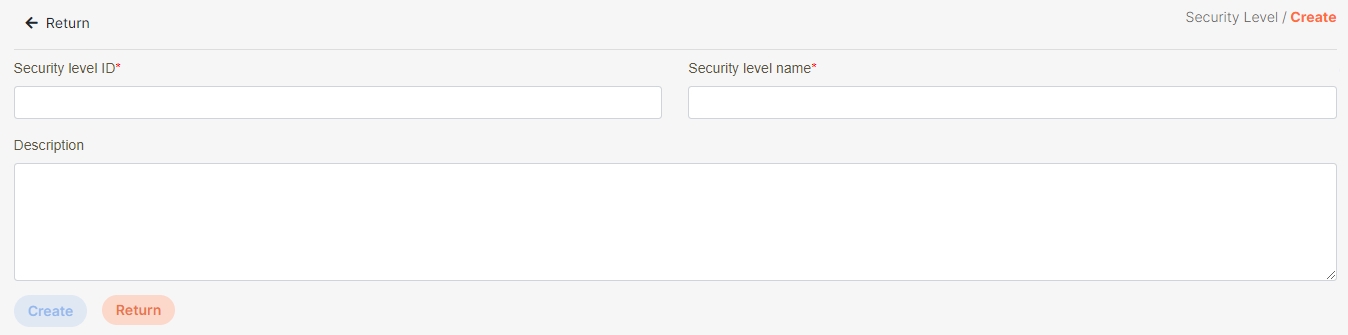
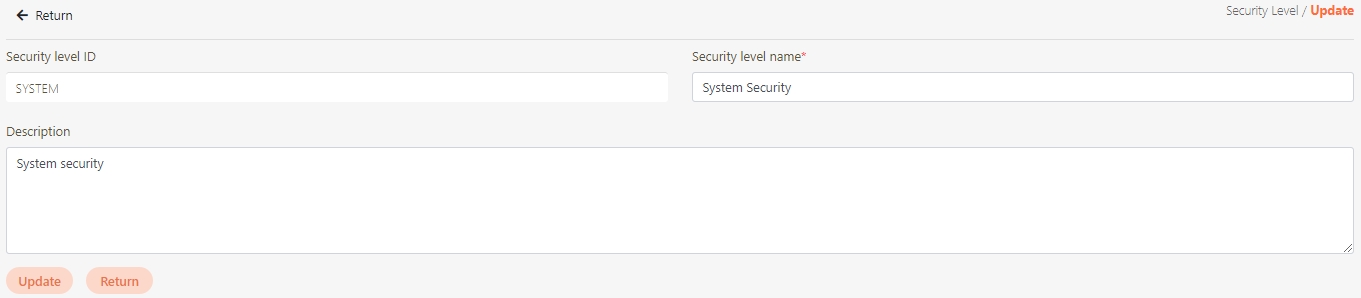
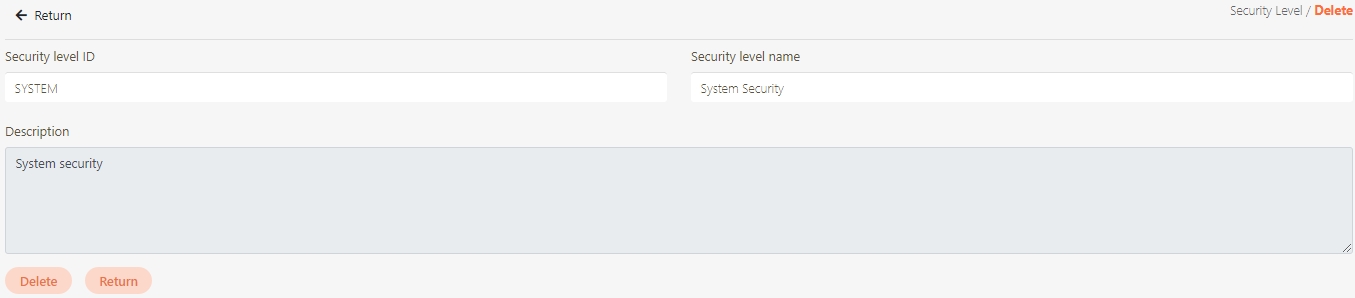
Security Level
A classification system used to define and enforce access permissions and protection measures for APIs. Security levels are applied to API Groups or individual APIs to ensure that only authorized API Clients with matching security clearance can access them.
Setting
A configurable parameter or option within the platform that determines how specific features or functionalities operate.
Static Webpage Reverse Proxy
A feature that routes client requests for static web pages (e.g., HTML, CSS, JS) through a reverse proxy. It optimizes delivery by caching responses and managing access to static resources, ensuring faster load times and enhanced security.
System Configs
A section for managing the platform's core settings, including system preferences, item configurations, proxy settings, and API-related parameters.
System Information
A centralized repository of data about the platform's configuration, performance, and operational status.
txID (Transaction ID)
A unique identifier assigned to each API transaction or request in digiRunner.
WebSocket Proxy Management
A feature that allows administrators to configure and manage WebSocket proxies, enabling real-time, bidirectional communication between clients and servers.
Explore the scenarios digiRunner applied in the manufacturing industry:
A leading financial services provider sought to address a fragmented API infrastructure and ensure compliance with relevant regulations. Their objectives were to:
Unify API Management: Integrate APIs across platforms for streamlined workflows and seamless interactions between banking systems and third-party providers.
Ensure Security and Compliance: Strengthen security mechanisms to meet strict financial regulations such as PCI DSS and GDPR.
Accelerate Innovation: Reduce time-to-market for new services by optimizing API development and management.
Optimize Operations: Implement robust tools for API monitoring, governance, and traffic management to improve operational efficiency.
APIs scattered across multiple platforms hindered integration and consistent performance.
Weak security protocols posed vulnerabilities in sensitive data handling and regulatory compliance.
Lengthy API deployment cycles hampered the rollout of new services.
Lack of unified monitoring and governance tools increased workload and costs.
Acts as a single entry point for all API requests, unifying traffic routing and balancing loads dynamically.
Endpoint Management: Simplifies endpoint discovery and reduces duplication by consolidating APIs under a centralized directory.
Traffic Throttling and Rate Limiting: Ensures stable system performance by limiting excessive traffic from individual users or applications.
OAuth 2.0 and OpenID Connect: Implements advanced authentication and authorization to secure sensitive transactions.
Token Management: Automates access token generation and validation for secure API communication.
Audit Trails: Maintains detailed logs of API interactions for compliance audits and investigations.
API Analytics Dashboards: Provides real-time insights into API traffic patterns, user behavior, and system health.
Error Tracking: Identifies and reports API performance issues, minimizing downtime and improving reliability.
Alert Mechanisms: Sends automated alerts for anomalies or unauthorized access attempts, enabling immediate response.
Global Policy Enforcement: Applies universal policies for security, access control, and traffic quotas across all APIs.
Version Management: Ensures smooth updates and backward compatibility for APIs, minimizing disruption for developers and consumers.
Role-Based Access Control (RBAC): Employs role-based permissions, ensuring users only access authorized endpoints.
Dynamic Scaling: Automatically adjusts system capacity based on API demand, maintaining performance during peak usage.
Red/Black Deployment: Facilitates zero-downtime API updates by deploying new versions alongside existing ones, enabling seamless rollouts.
Consolidated fragmented APIs into an integrated system, improving connectivity with external partners.
Strengthened compliance with regulations through robust security protocols, encrypted communications, and audit-ready logs.
Significantly reduced deployment times, accelerating market launches for financial products.
Centralized management tools streamlined workflows, minimized errors, and reduced operational overhead.
Improved API infrastructure supported dynamic, personalized services to enhance customer satisfaction and foster loyalty.
By adopting digiRunner's comprehensive API management platform, the financial institution achieved its digital transformation goals, enabling a secure, scalable, and future-proof digital ecosystem. This strategic upgrade positions them to lead in an ever-evolving financial landscape.
For more insights into digiRunner’s capabilities and its open-source initiatives, visit .
Explore the scenarios digiRunner applied in the medical industry:
In the rapidly evolving high-tech manufacturing sector, a leading global electronics manufacturer faced challenges integrating fragmented systems, streamlining workflows, and scaling operations efficiently. By adopting digiRunner’s API management platform, they bridged the gaps between legacy systems, IoT devices, and ERP solutions to build a fully interconnected smart factory. digiRunner empowered them to achieve real-time data exchange, automated quality control, and optimized production at scale, delivering a competitive edge in the Industry 4.0 era.
High-tech manufacturers are advancing toward smart factory principles to achieve:
Streamlined Operations: Real-time monitoring and automation for increased efficiency.
Enhanced Interconnectivity: Seamless integration of IoT devices, ERP systems, and enterprise applications.
Quality and Scalability: Consistent product quality while accommodating growth.
Improved Collaboration: Strengthening supplier and customer relationships through digital platforms.
Heterogeneous data formats and systems impede integration.
Reliance on manual workflows slows production and decision-making.
Lack of digital traceability hinders compliance and inspections.
Disconnected platforms for suppliers, customers, and orders create inefficiencies.
Legacy systems fail to handle increasing production demands effectively.
digiRunner delivers purpose-built solutions to address these challenges and meet manufacturing goals:
Integrates IoT devices to enable automated material handling, predictive maintenance, and unmanned operations.
Provides real-time dashboards for monitoring device health, production progress, and issue resolution.
Offers a multi-layered API gateway with role-based access controls to secure manufacturing processes.
Groups APIs by function—such as production, logistics, and quality—for streamlined governance and usability.
Supports traffic throttling, ensuring stability during high-demand periods.
Connects financial accounting, inventory tracking, and production scheduling in real time.
Standardizes ERP interactions via API orchestration, enabling smooth, consistent data exchanges.
Centralizes supplier management platforms with CRM systems to enable efficient order tracking and procurement.
Provides APIs for virtual showrooms and customer portals, enhancing engagement and visibility.
Automates inspection workflows with traceable production histories to ensure compliance and quality.
Utilizes analytics tools to identify quality trends and proactively implement predictive improvements.
Uses containerized microservices to streamline simulation testing and product development pipelines.
Employs big data analytics for forecasting trends and accelerating innovation cycles.
Through digiRunner, manufacturers achieve:
Automation and streamlined APIs reduce downtime and improve efficiency.
Digitized workflows ensure consistent standards and regulatory compliance.
Predictive analytics and synchronized data improve decision-making.
Integrated platforms enhance relationships with partners and customers.
digiRunner’s architecture supports growth and technological evolution.
digiRunner equips high-tech manufacturers to overcome operational inefficiencies, ensuring a seamless transition to smart factory models. By delivering specific solutions that enhance automation, connectivity, and quality, digiRunner empowers organizations to stay ahead in Industry 4.0, achieving innovation, efficiency, and scalability.
A leading healthcare provider aimed to address challenges arising from fragmented data systems, increasing demands for data security, and the need for compliance with stringent healthcare regulations. Their objectives were to:
Unify Data Sharing: Enable seamless, interoperable communication between internal systems and external partners.
Ensure Robust Security: Safeguard sensitive patient data and meet regulatory requirements such as HIPAA.
Streamline Operations: Simplify external integrations and enhance the efficiency of healthcare services.
Patient records, billing, and other systems operated in silos, leading to inefficiencies and impeding data flow.
Meeting HIPAA standards while ensuring secure data sharing posed a significant challenge.
Integrating with insurance providers, telemedicine platforms, and other partners was time-consuming and inefficient due to inconsistent APIs.
Inefficient API management led to delays, redundancies, and a lack of visibility into performance and usage.
API Gateway: Served as a secure entry point, routing and balancing all API traffic for improved scalability and bottleneck prevention.
Seamless Data Exchange: Unified disparate systems using standardized protocols like FHIR for consistent, real-time data sharing across platforms.
End-to-End Encryption: Protected patient data in transit and at rest using robust encryption, ensuring compliance with healthcare regulations.
Role-Based Access Control (RBAC): Restricted data access to authorized personnel only, minimizing security risks.
Secure API Authentication: Used OAuth 2.0 and tokenized access for secure API interactions, eliminating risks associated with static credentials.
Audit Logs and Compliance Reports: Tracked all API interactions for transparency and regulatory compliance, ensuring accountability.
API Orchestration: Facilitated smooth, secure collaboration with external entities by managing all integrations through proxies and orchestration layers.
API Versioning: Structured change management ensured stability and minimized disruptions during API updates.
Real-Time Performance Monitoring: Continuously monitored API usage, detecting and alerting on anomalies for proactive issue resolution.
Rate Limiting and Throttling: Controlled API request rates to prevent abuse and ensure system reliability under heavy load.
Enabled real-time, consistent data flow across systems, improving coordination and decision-making.
Safeguarded sensitive health data with advanced encryption and access control, ensuring adherence to HIPAA and other regulations.
Simplified external integrations allowed the provider to rapidly deploy new services, enhancing patient care.
Centralized API management eliminated redundancies, optimized workflows, and simplified the maintenance of integrations.
digiRunner transformed the healthcare provider’s fragmented systems into a secure, unified data-sharing platform. With a robust API management framework featuring advanced security, orchestration, and monitoring capabilities, digiRunner empowered the organization to deliver fast, efficient, and secure healthcare services.
For detailed information on digiRunner’s features and its open-source offerings, explore .
For more insights into digiRunner’s capabilities and its open-source initiative, visit .
The insurance industry is undergoing a significant transformation, with many organizations striving to replace rigid legacy systems with modern, microservices-driven architectures. The “small kernel with innovative microservices around” strategy is at the heart of this transformation, combining a stable, centralized core system (the kernel) with agile microservices to enhance scalability, responsiveness, and customer-centric innovation. digiRunner API Management serves as a pivotal business middle platform, enabling insurers to overcome legacy infrastructure challenges and seamlessly adopt this modern architecture.
Inflexibility of Monolithic Systems: Legacy mainframe systems are often tightly coupled and difficult to modify, making integration with modern microservices architectures both complex and costly.
Technical Debt: The effort required to overhaul entrenched legacy infrastructures often creates significant technical and operational challenges.
Risk of Downtime: Migrating from monolithic systems to microservices can risk disruptions in critical operations such as claims processing and policy management.
Disconnected Systems: Legacy environments frequently lack real-time capabilities, leading to inconsistent data updates and delays in customer service.
Siloed Processes: Data silos impede seamless communication between departments, slowing decision-making and service delivery.
Increased Vulnerabilities: A distributed system introduces new security risks, especially when transitioning from centralized legacy systems.
Regulatory Hurdles: Compliance with stringent insurance industry regulations requires advanced monitoring, governance, and audit capabilities.
digiRunner acts as the essential business middle platform, addressing the complexities of integrating legacy systems with a modern microservices architecture. By serving as a bridge, digiRunner enables insurers to modernize incrementally, reducing risks while maximizing operational efficiency and innovation.
API Gateway: Serves as a central hub for managing communication between legacy kernels and new microservices. It ensures secure, reliable routing, load balancing, and data exchange.
Role-Based Access: Implements robust, token-based authentication to secure sensitive core operations such as underwriting and claims processing.
Operational Resilience: digiRunner’s middleware stabilizes legacy systems, enabling insurers to build flexible, scalable microservices around a reliable core.
Dynamic API Registration: Simplifies the onboarding process for new microservices with batch imports and OpenAPI standards, reducing time-to-market.
Decoupled Migration: digiRunner facilitates gradual migration by allowing insurers to build, scale, and test microservices independently without disrupting the legacy core.
Smart API Caching: Enhances performance by reducing redundant calls to the legacy core, improving overall system efficiency.
Real-Time Monitoring: Ensures synchronization between legacy systems and microservices, reducing data inconsistencies.
Traffic Management: Dynamically distributes requests across microservices to balance workloads and avoid bottlenecks.
Mock API Testing: Provides a safe environment for pre-deployment testing, ensuring seamless operation post-integration.
Unified Authentication Protocols: Ensures consistent security across both legacy systems and microservices with OAuth 2.0 and token-based frameworks.
Regulatory Compliance Tools: Provides real-time analytics, automated audits, and compliance dashboards to meet insurance industry standards.
Policy-Based Management: Groups APIs into logical clusters to simplify governance, enforce security measures, and align with organizational policies.
By enabling microservices integration, digiRunner empowers insurers to develop and deploy new products quickly, adapting to market demands and gaining a competitive edge.
The harmonization of legacy systems and microservices minimizes redundancies, ensures data consistency, and optimizes resource allocation, resulting in significant cost savings.
The agility of microservices enables real-time, personalized interactions, fostering greater customer satisfaction and loyalty. Customers enjoy seamless digital interfaces and responsive, data-driven services.
digiRunner’s architecture supports the evolving needs of insurers, from handling increased transaction volumes to launching innovative services, ensuring readiness for future growth.
With advanced governance and secure communication protocols, digiRunner protects sensitive customer data while ensuring adherence to evolving regulatory requirements.
digiRunner API Management transforms the migration from legacy systems to a microservices architecture into an achievable reality for insurers. By facilitating seamless integration, operational stability, robust security, and dynamic scalability, digiRunner bridges the gap between traditional and modern systems. This transformative approach enables insurers to achieve agility, efficiency, and customer-centric innovation, ensuring long-term success in an increasingly competitive market.
Learn more about digiRunner’s features and explore its open-source initiative at .
Modern public sector organizations face increasing pressure to deliver efficient, transparent, and citizen-focused services. However, the lack of solid and consistent API control, manual processes, and fragmented API governance create barriers to achieving these goals. By leveraging the digiRunner API management platform, governments can overcome these challenges, enabling secure, streamlined, and scalable digital ecosystems that align with open government principles.
Disparate APIs Across Departments: Siloed systems complicate integration, hindering seamless service delivery.
Inconsistent Data Standards: Varied data formats and outdated technologies hinder interoperability and collaboration.
Security Risks: Rapid API growth without centralized oversight increases vulnerabilities.
Inefficiencies: Lack of unified policies and management results in redundant efforts and slower service deployment.
Open Data Dilemmas: Publishing open data must balance accessibility with stringent security to protect sensitive information.
Regulatory Compliance: Ensuring data governance aligns with privacy laws and standards demands advanced monitoring.
digiRunner’s robust API management capabilities address these challenges by providing secure, efficient, and citizen-centric solutions:
Permissions Framework: Allows for structured access control across departments, ensuring clear boundaries and responsibilities.
Lifecycle Management: Streamlines API deployment, updates, and deprecation for optimized operations.
Integration Workflows: Facilitates legacy system integration with modern APIs through orchestration features, minimizing manual coding.
Automated Data Mapping: Ensures smooth transformation of legacy data formats into standardized APIs (e.g., JSON), accelerating digital transformation.
Advanced Authentication: Implements OAuth 2.0, OpenID Connect, and token-based access control to safeguard sensitive citizen data.
Scalability: Supports increasing traffic and high-demand periods, ensuring uninterrupted service delivery.
Data Conversion and Encoding: Facilitates integration of diverse systems, ensuring data consistency across agencies.
Open Data APIs: Provides secure public APIs, driving innovation while ensuring strict access control.
Unified Digital Services: Provides citizens with intuitive, branded portals for streamlined access to services such as healthcare, taxation, and social benefits.
Developer Ecosystem: Supports third-party developers in enhancing public services, fostering ecosystem innovation.
Streamlined Access: Standardized APIs ensure seamless and convenient citizen services.
Real-Time Updates: Delivers timely, accurate information across services, enhancing user satisfaction.
Efficiency Gains: Centralized API management reduces redundancies and accelerates service rollouts.
Data-Driven Decision-Making: Enables actionable insights through integrated, real-time data analytics.
Comprehensive API Security Policies: Protect sensitive data while supporting open data initiatives.
Regulatory Compliance: Real-time monitoring and automated audits ensure adherence to privacy and security standards.
Open Data Ecosystem: Engages developers and private organizations to create value-added solutions, fostering innovation and public engagement.
digiRunner empowers public sector organizations to achieve the goals of open government by providing a robust, secure API management platform. By balancing data transparency with strong security measures, digiRunner enables seamless integration, operational efficiency, and citizen-centric service delivery. Governments can confidently transition to a digital-first model, setting a benchmark for innovation, trust, and sustainable growth.
Governments worldwide are striving to modernize operations to meet citizen demands for faster, seamless, and transparent services. One government client sought to overcome critical inefficiencies and achieve the following objectives:
Integrate Disparate Systems: Facilitate seamless data integration across platforms to streamline workflows and improve inter-agency cooperation.
Automate Manual Processes: Minimize human error and expedite operations by digitizing repetitive administrative tasks.
Enable Open Government: Establish secure, scalable systems for data transparency and citizen access, fostering trust and civic engagement.
Enhance API Security: Protect sensitive government and citizen data while ensuring compliance with stringent security regulations.
Ensure Scalability for Future Demands: Build a flexible infrastructure capable of handling evolving digital demands and higher transaction volumes.
The lack of integration between departmental systems hindered efficient workflows and delayed service delivery.
Processes like data entry and document verification were prone to errors, reducing productivity and complicating resource allocation.
Without robust security measures, APIs were vulnerable to unauthorized access, exposing sensitive data to potential breaches.
Inter-agency collaboration was inefficient due to inconsistent standards and a lack of secure communication protocols.
End-to-End Encryption: Protects sensitive government and citizen data in transit and at rest using advanced encryption protocols.
Multi-Layered Authentication: Implements OAuth 2.0 and OpenID Connect to authenticate users and secure access to government APIs.
Role-Based Access Control (RBAC): Restricts API usage to authorized personnel or systems, ensuring granular control over sensitive data.
Real-Time Security Monitoring: digiRunner continuously monitors API interactions to detect anomalies, unusual access patterns, or unauthorized activities.
Certificate-Based Authentication: Uses TLS and JWT certificates to establish secure connections and enhance trust during data exchanges.
digiRunner’s API Gateway consolidated fragmented systems, ensuring smooth data exchange while optimizing traffic routing, monitoring, and load balancing for scalability.
Rate Limiting and Quotas: Prevents API misuse by limiting the number of API calls per user or system, ensuring fair resource allocation and preventing overloads.
API Proxy with Secure Exposures: Connects internal APIs to external agencies without compromising backend systems, allowing safe data sharing for inter-agency collaboration.
Flexible API Versioning: Ensures backward compatibility during updates, maintaining stable integrations across agencies.
Audit Trails and Compliance Reports: Logs API interactions to track data usage, ensure transparency, and maintain regulatory compliance.
Blue/Green Deployments: Supports zero-downtime updates by maintaining parallel production and testing environments.
Dynamic Load Balancing: Distributes traffic intelligently to avoid bottlenecks and maintain performance during peak demands.
Consolidated systems eliminated redundancies, enabling cohesive workflows and faster decision-making across departments.
Advanced API security measures safeguarded sensitive data, reducing risks of breaches and ensuring compliance with data protection regulations.
Open Government initiatives, supported by transparent and secure API frameworks, improved citizen access to services and boosted confidence in public systems.
Automation of manual processes reduced operational costs and allowed staff to focus on strategic initiatives.
The scalable infrastructure ensured readiness for emerging technologies like IoT and AI, empowering the government to adapt to growing demands.
digiRunner has become a cornerstone for digital transformation in the public sector, offering secure, scalable, and efficient API solutions to achieve Open Government goals. By enabling transparent, citizen-centric services and enhancing inter-agency collaboration, digiRunner empowers governments to deliver better services while maintaining strict security standards.
The insurance industry faces mounting pressure to modernize its technology landscape, ensuring agile operations, robust integration capabilities, and a superior customer experience. With legacy systems struggling to meet the dynamic demands of the market, the goal is clear: adopt transformative solutions to stay competitive.
Monolithic architectures hinder scalability, making maintenance arduous and integration with external services complex.
Performance bottlenecks restrict innovation and growth opportunities.
Legacy development cycles are slow, delaying the launch of new products and services.
Inflexible processes limit responsiveness to market changes.
Outdated programming languages and mainframe systems exacerbate talent shortages and maintenance difficulties.
digiRunner addresses these challenges with a suite of API management tools designed to streamline operations, improve agility, and deliver exceptional performance.
API Gateway: Acts as a unified entry point for API requests, ensuring seamless routing, load balancing, and access control.
Dynamic Traffic Management: Balances API traffic across multiple backend servers, optimizing system performance during peak loads.
API Grouping and Permissions: Logical grouping of APIs simplifies access control and ensures secure, efficient communication between systems.
Rapid API Onboarding: Features like batch imports, OpenAPI integration, and configurable proxy paths speed up API deployment.
Smart API Caching: Reduces response times by caching frequently requested data, enhancing service availability during high-demand periods.
Mock API Testing: Allows developers to simulate API behavior independent of backend readiness, enabling parallel development and faster delivery.
Authentication Server: Implements secure protocols like OAuth 2.0 and OpenID Connect for robust authorization and data protection.
Token Management: Ensures secure, role-based access through dynamic token settings and certificate-based encryption.
Regulatory Alignment: Built-in monitoring and analytics provide visibility and ensure compliance with industry standards.
API Lifecycle Management: Offers centralized tools for API registration, version control, and performance monitoring.
Developer Portal: Simplifies API discovery and integration for external and internal teams, fostering collaboration and innovation.
API Performance Analytics: Tracks usage patterns and system performance, identifying optimization opportunities for sustained efficiency.
digiRunner API Management is a game-changer for the insurance sector, transforming legacy limitations into opportunities for growth. By addressing integration, scalability, and security challenges, digiRunner empowers insurers to modernize their systems, reduce time-to-market, and enhance customer satisfaction. This strategic adoption of API management ensures that insurers not only meet but exceed the expectations of a rapidly evolving market.
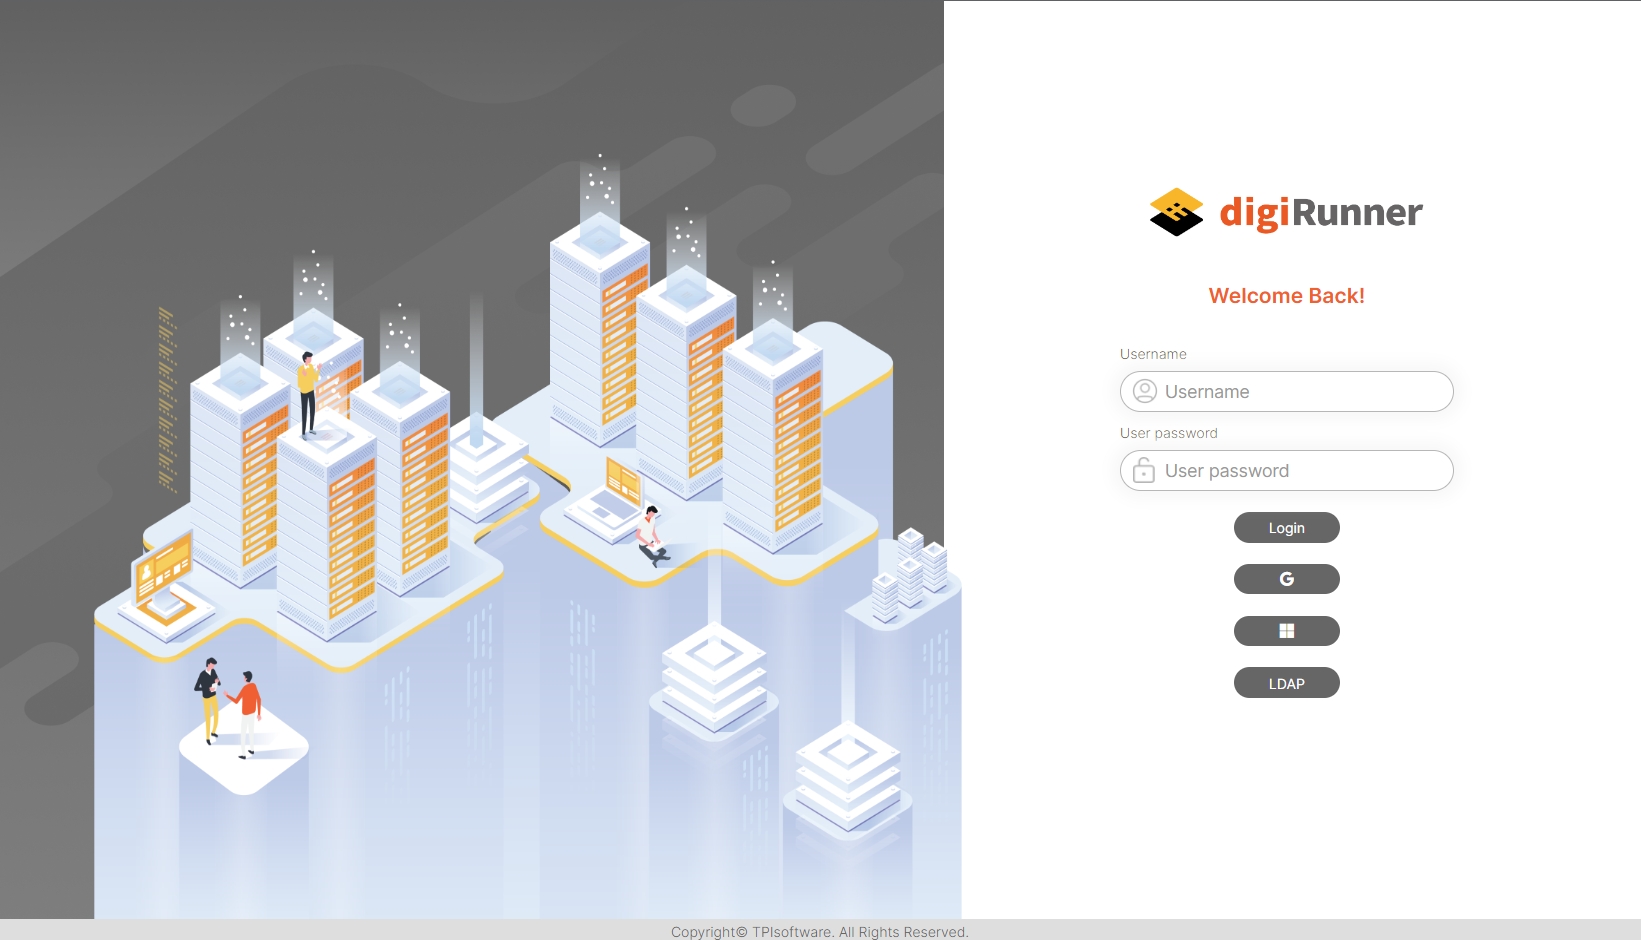
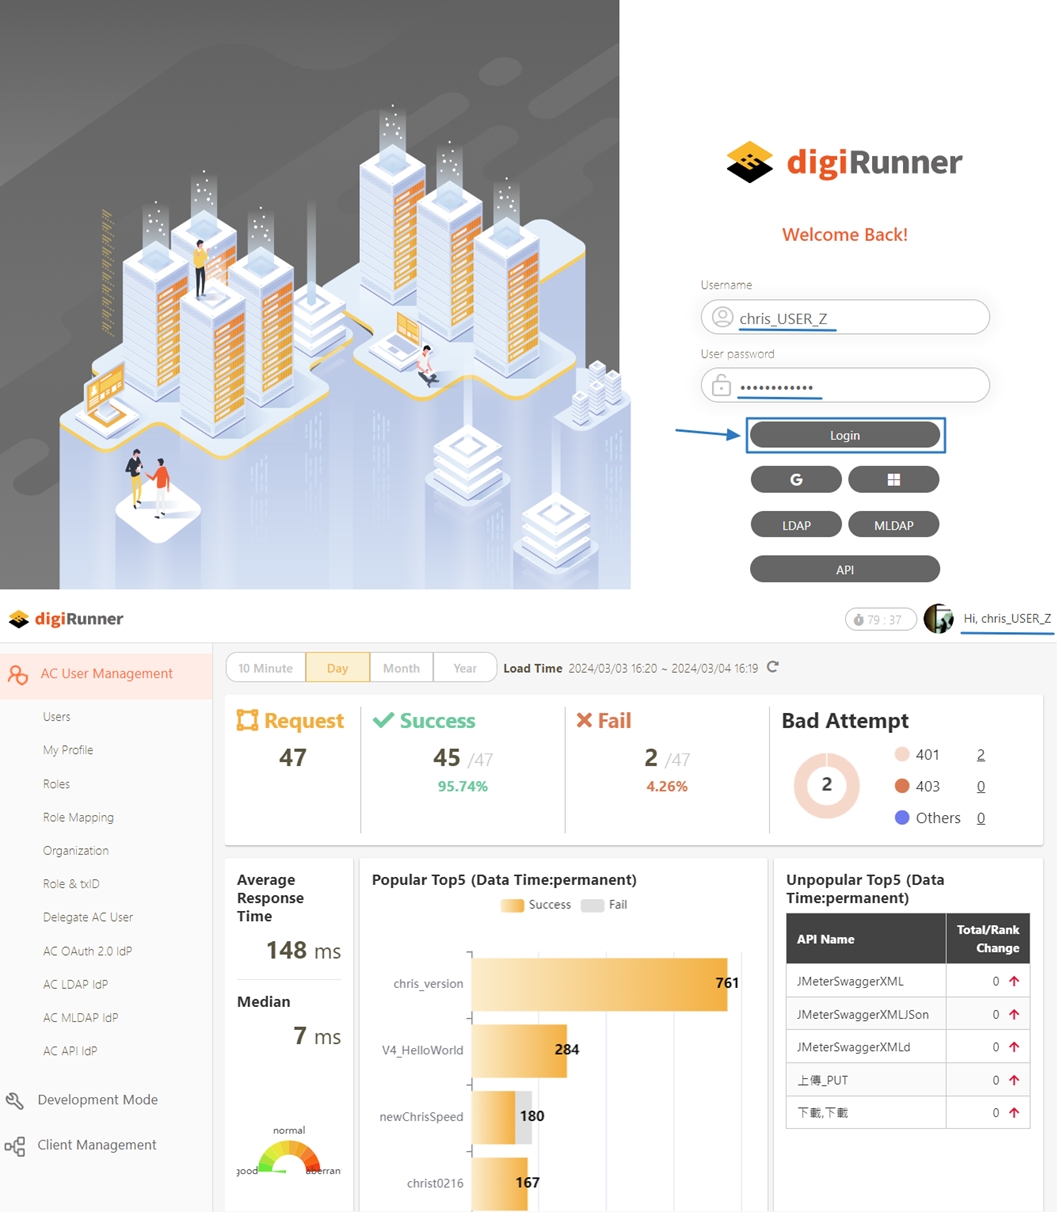
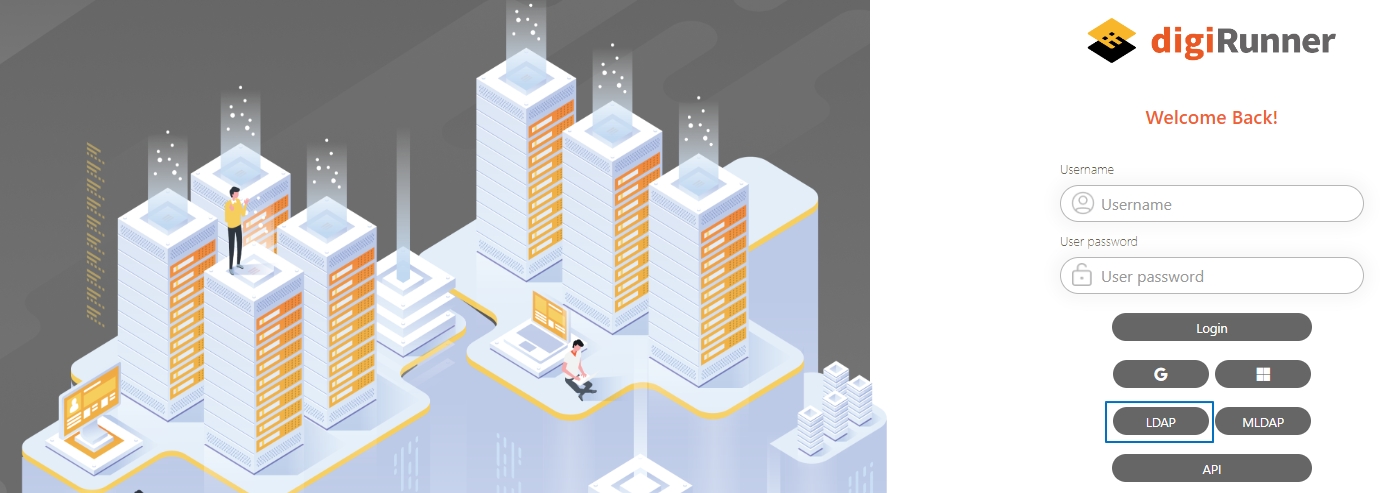
Log in using the default credentials:
Username: manager
User password: manager123
Upon successful login, you will see the text digiRunner Express displayed in the upper left corner.
After installing digiRunner, configuring an SMTP server is essential to enable system-generated email notifications — such as account creation alerts, password reset messages, system warnings, API key application.
This section provides step-by-step instructions for setting up the SMTP mail sender within the digiRunner Admin Console.
Log in to your digiRunner Admin Console.
Go to System Configs > Setting to access the configuration page.
In the Setting page, enter keywords mail or smtp in the search bar.
Click the search icon to filter and display related configuration keys.
Update the following key parameters based on your mail server configuration:
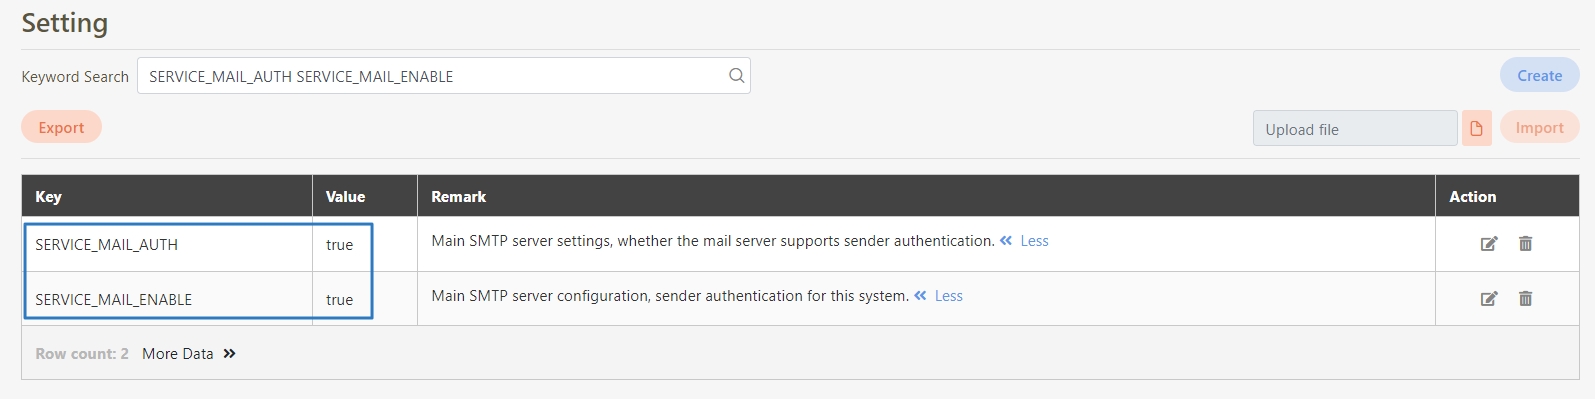
SERVICE_MAIL_ENABLE
Enables or disables email functionality. Must be set to true.
SERVICE_MAIL_AUTH
Enables SMTP authentication. Set to true if login credentials are required.
SERVICE_MAIL_STARTTLS_ENABLE
Enables TLS encryption. Strongly recommended.
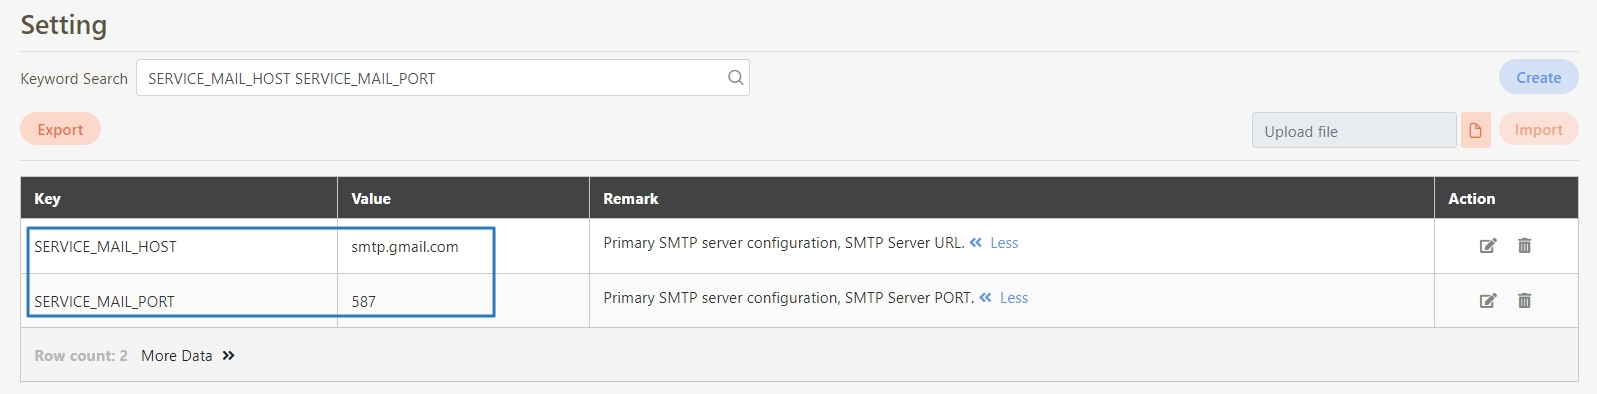
SERVICE_MAIL_HOST
Your SMTP server address, e.g., smtp.gmail.com.
SERVICE_MAIL_PORT
SMTP server port, typically 587 for TLS.
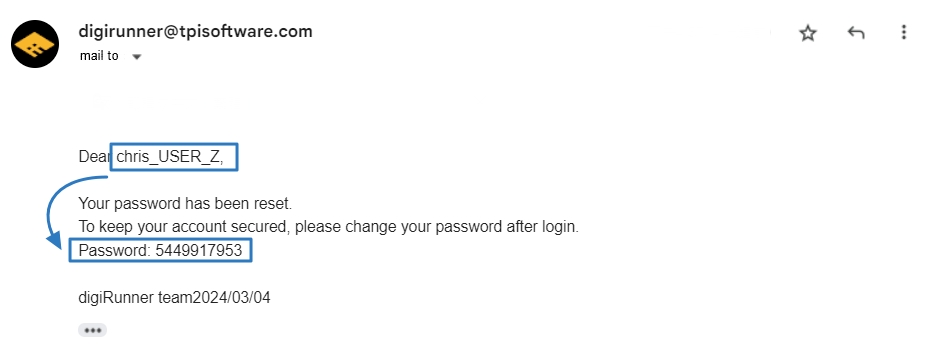
SERVICE_MAIL_FROM
Sender email address shown in the From field.
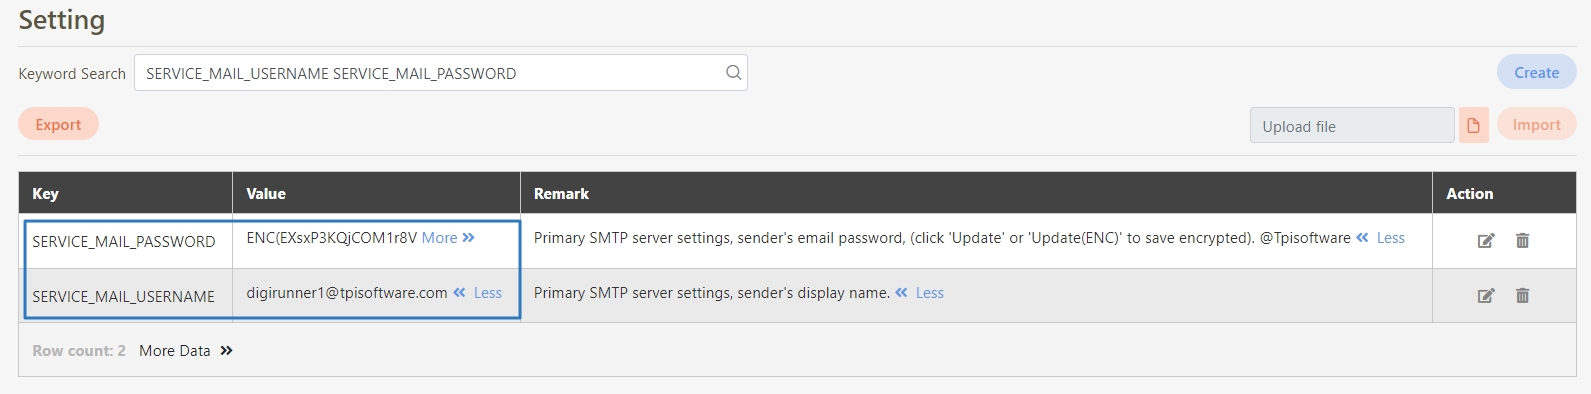
SERVICE_MAIL_USERNAME
SMTP username for authentication.
SERVICE_MAIL_PASSWORD
SMTP password for authentication.
Make sure both SERVICE_MAIL_ENABLE and SERVICE_MAIL_AUTH are set to true to enable proper email functionality.
By default, digiRunner uses Gmail’s SMTP, smtp.gmail.com, and port 587 for TLS-encrypted delivery.
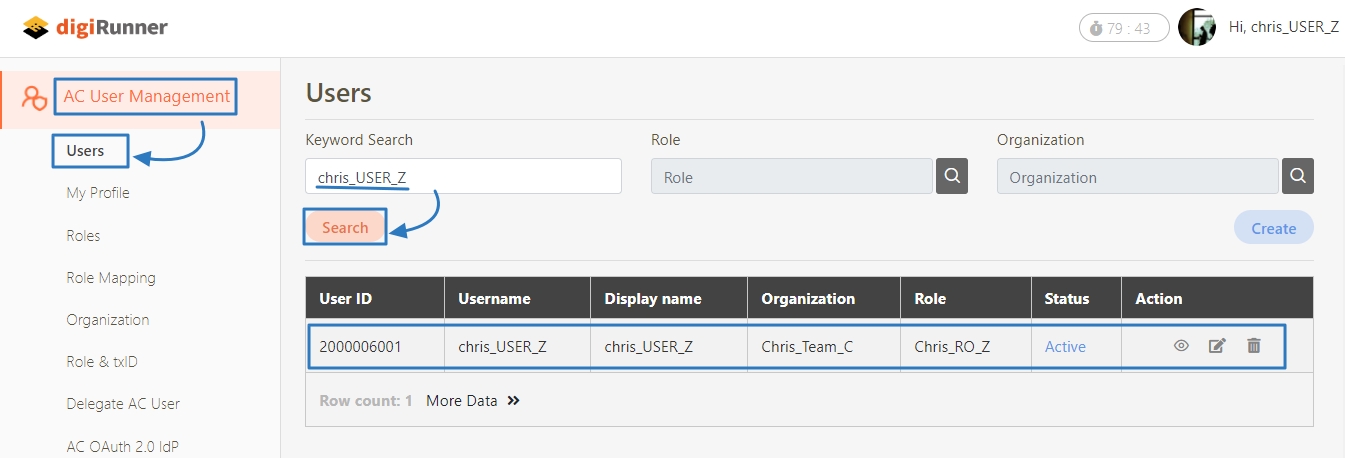
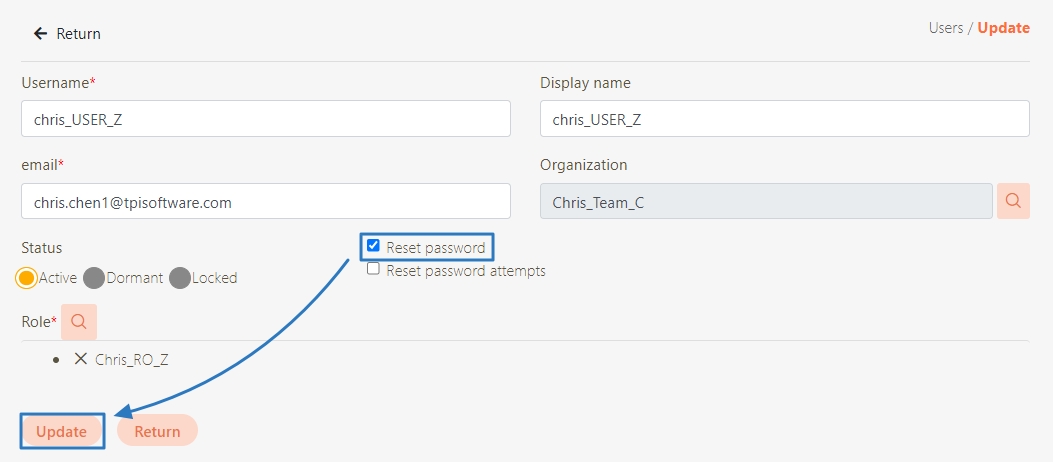
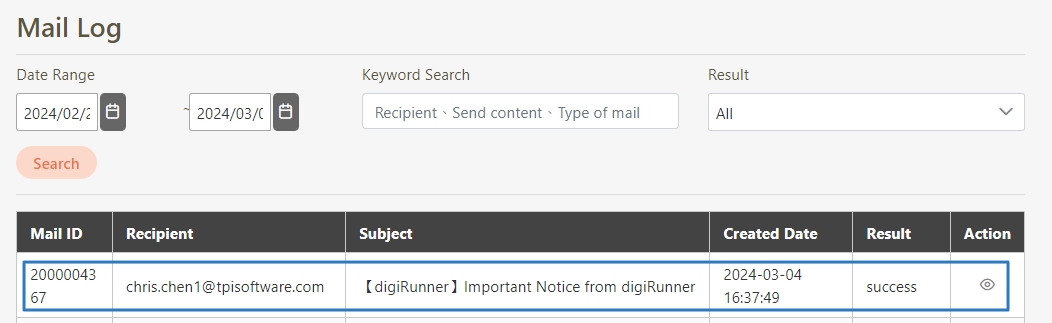
To ensure that your SMTP configuration works properly, create a new user, reset a password, or trigger a system alert to trigger an email-sending event.
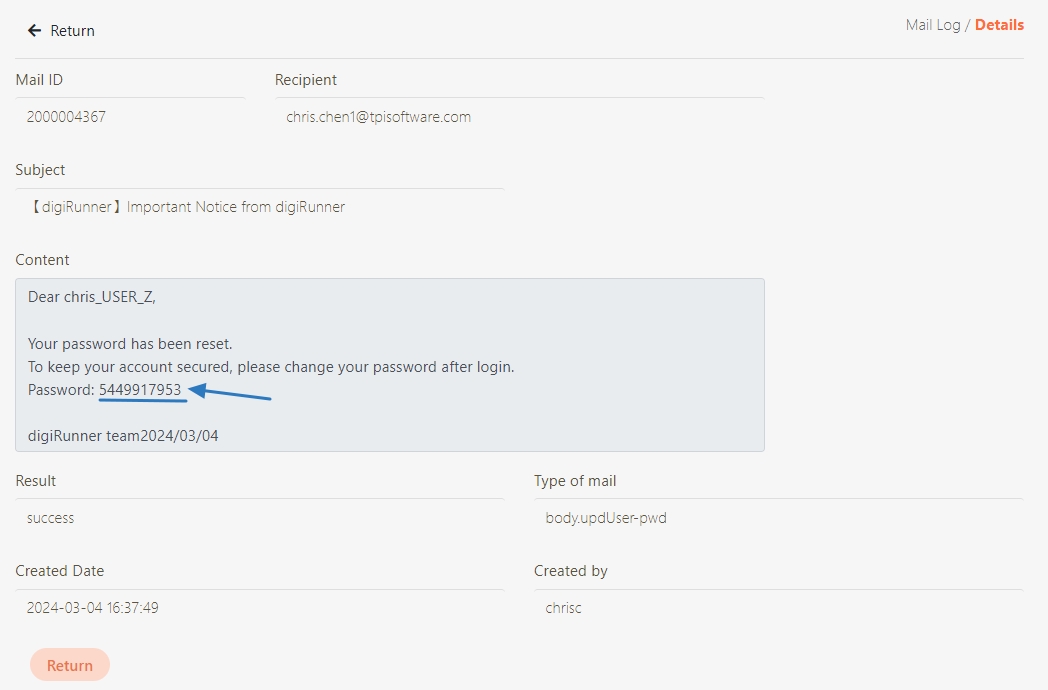
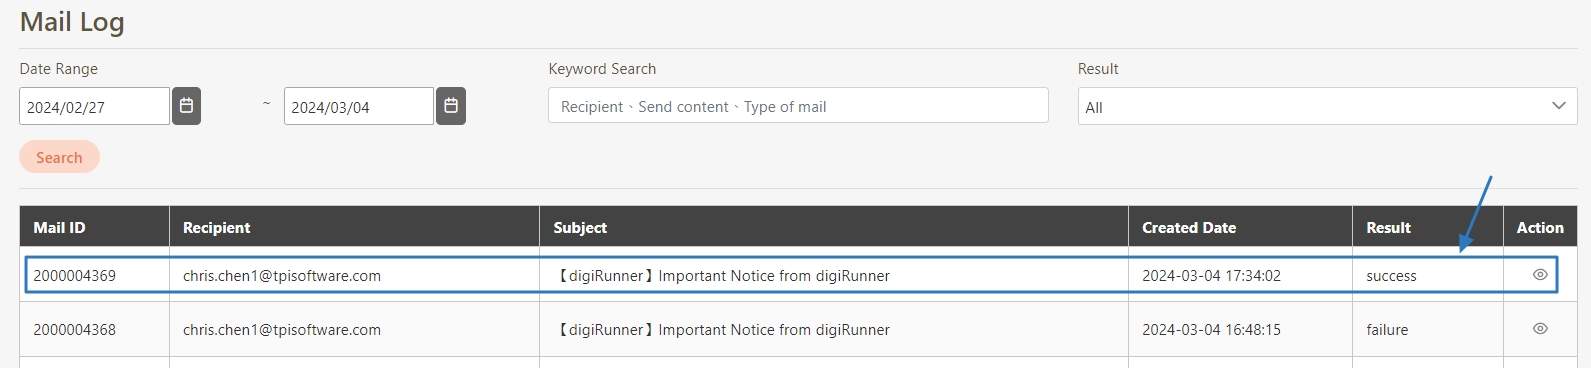
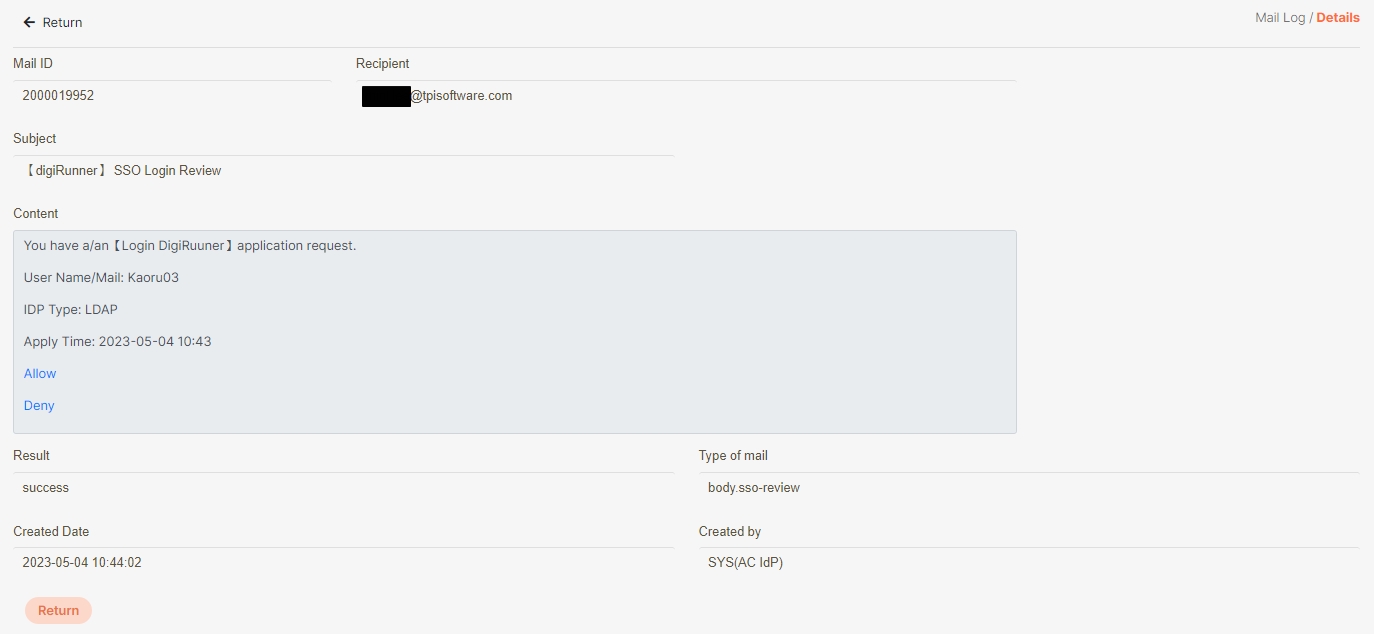
Go to System Information > Mail Log to check the result:
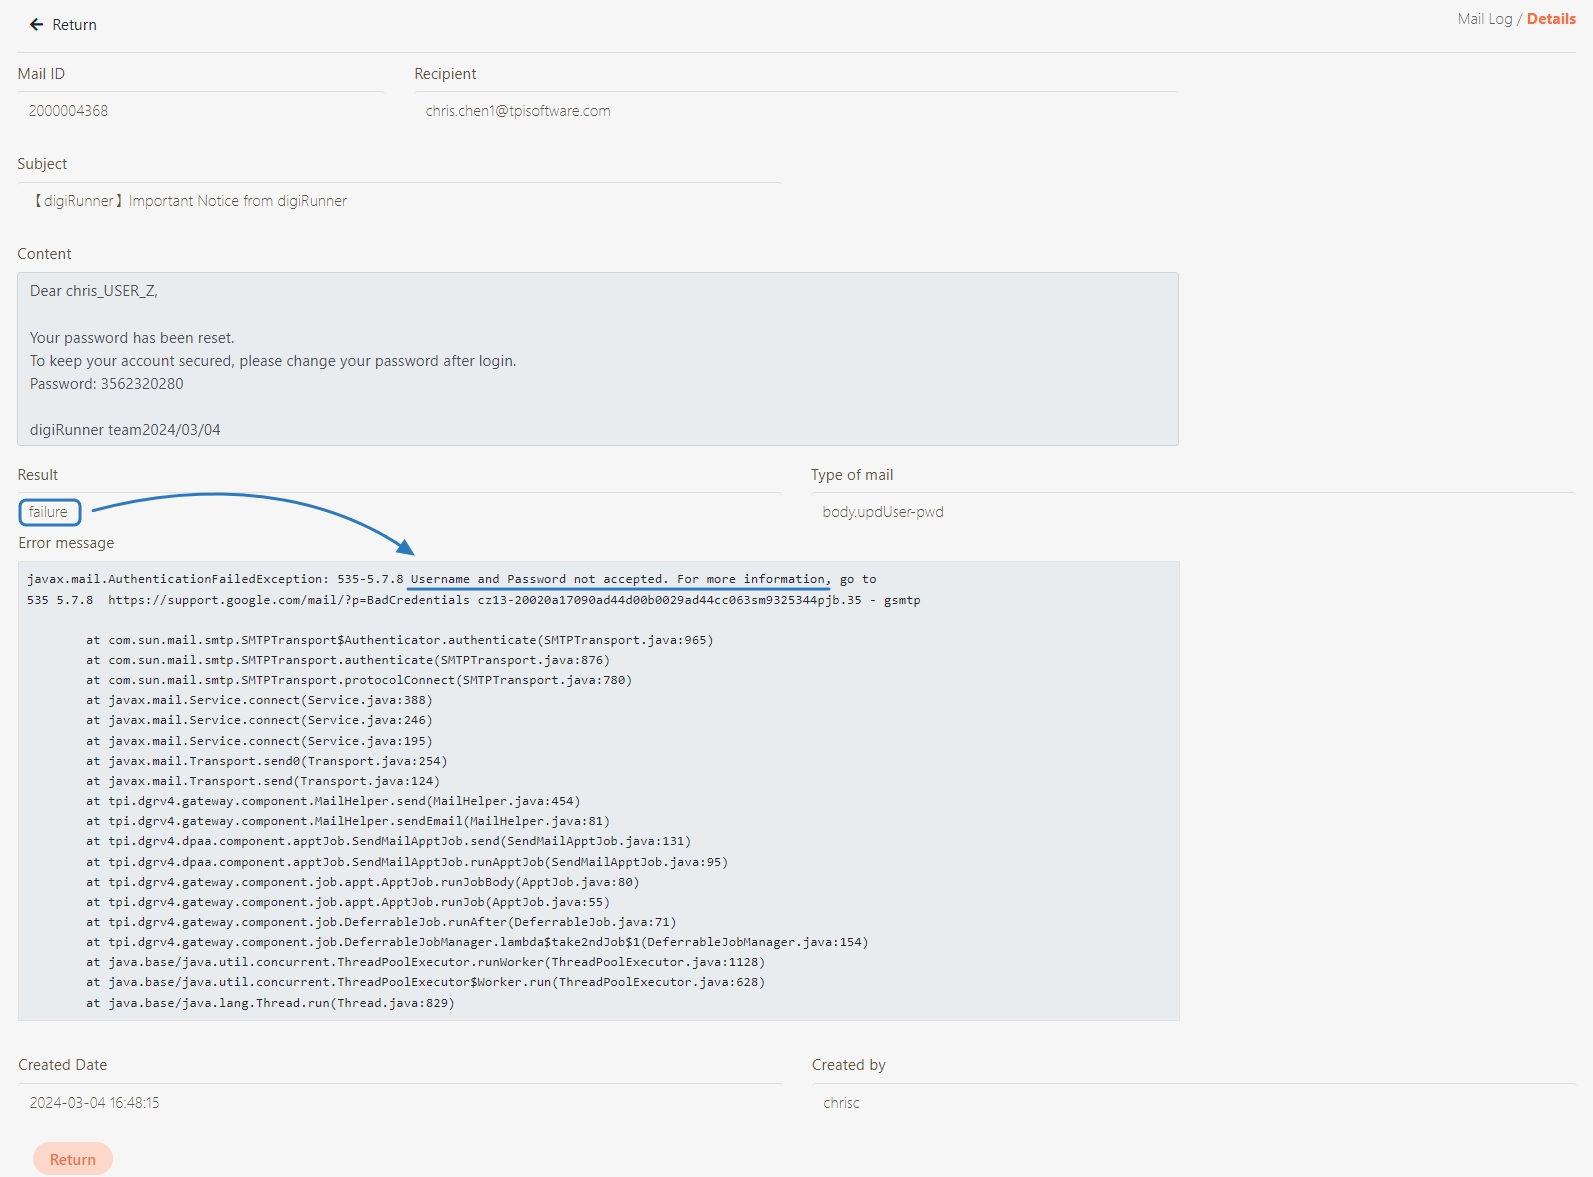
If Result = success, the email was sent correctly.
Example error: A message displaying Username and Password not accepted indicates your SMTP credentials are incorrect.
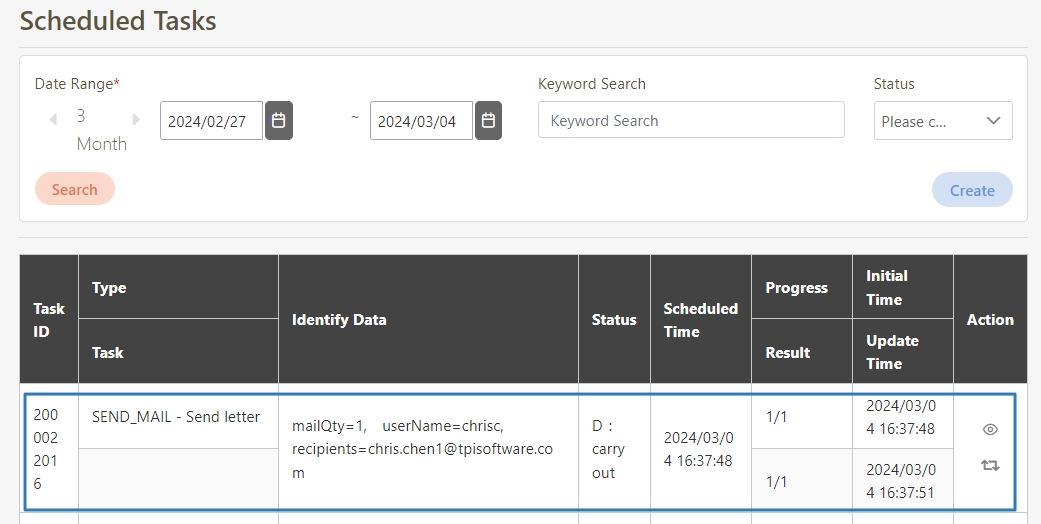
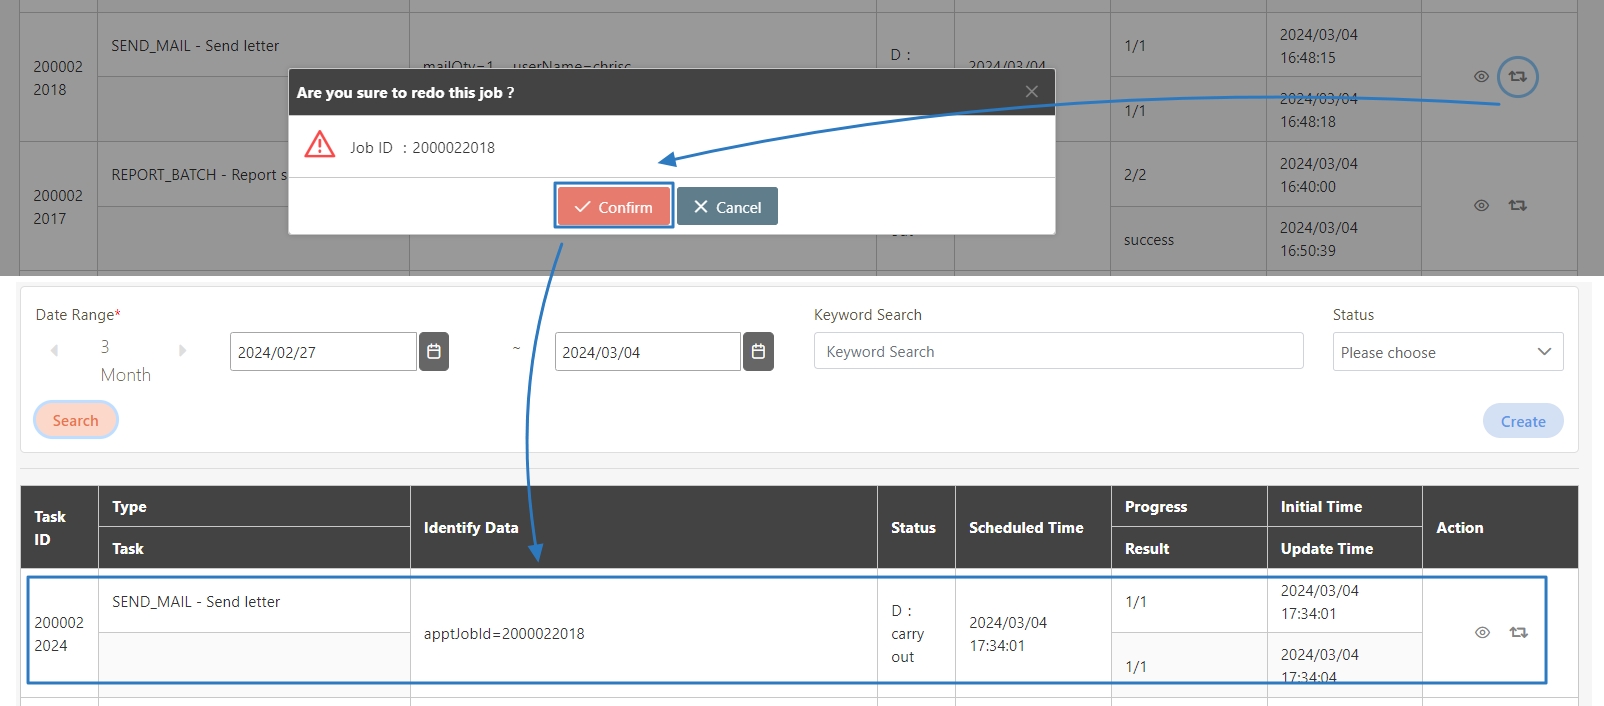
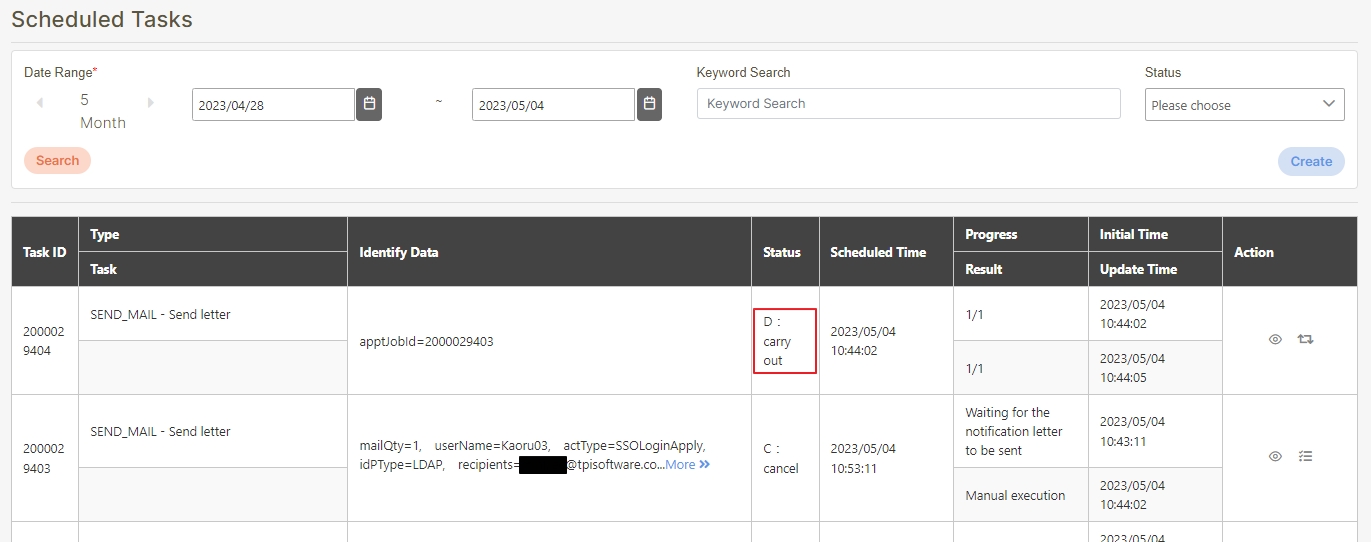
Go to System Information > Scheduled Tasks to proceed.
Find the task, e.g., SEND_MAIL.
NOTE:
Always enable TLS to ensure secure transmission.
Double-check SMTP credentials, hostnames, and port settings.
Ensure your firewall allows outbound connections to the SMTP server (typically on port 25, 465, or 587).
For Gmail users:
Enable App Passwords or Allow less secure apps if required.
Avoid using personal accounts in production environments.
Global manufacturing involves complex operations that demand seamless integration and coordination. For one industry leader operating ten factory sites worldwide, the lack of a unified ERP system hindered productivity and scalability. With disparate supply chain management (SCM) and customer relationship management (CRM) systems across sites, inefficiencies, high costs, and inconsistent processes posed significant challenges. This scenario details how digiRunner, a next-generation API management platform, helped streamline operations, optimize costs, and ensure centralized control.
The manufacturer aimed to achieve the following objectives:
Streamlined Global Operations: Establish unified workflows across factories for efficient production planning and cross-site collaboration.
Cost Optimization: Reduce ERP licensing and integration expenses by consolidating and simplifying system architecture.
Enhanced Customer Order Management: Enable real-time visibility into order processes for operational and sales teams.
Global Data Security: Strengthen protection against API vulnerabilities by implementing advanced security protocols and ensuring API performance for real-time operations.
Each site relied on distinct ERP workflows tailored to local operations, impeding cross-site integration.
Lack of standardized ERP processes limited centralized data analysis and strategic decision-making.
Independent SCM and CRM integrations resulted in excessive licensing expenses across factory sites.
Inadequate API security exposed sensitive business data to vulnerabilities and breaches.
Inefficient data exchanges delayed critical business decisions and disrupted operations.
digiRunner leveraged its robust API management capabilities to address these challenges while achieving the objectives. Through its advanced features, the platform improved security, streamlined operations, and enhanced performance.
Implemented OAuth 2.0, OpenID Connect (OIDC), and Single Sign-On (SSO) for enhanced authentication and access control.
Applied granular access controls and role-based permissions to limit exposure and unauthorized access.
Deployed real-time monitoring and anomaly detection tools to proactively identify and mitigate security threats.
Enabled efficient load balancing to prevent system slowdowns and ensure timely response rates across multiple factory locations.
Integrated intelligent caching mechanisms to accelerate response times for frequent data requests.
Improved system throughput by dynamically routing API requests across available pathways to prevent bottlenecks.
Created a unified gateway to optimize data exchange, eliminating redundancies and accelerating system interactions.
Cross-system integration brought together ERP, workforce management, and supply chain processes into a single cohesive structure.
Served as a secure communication bridge between disparate systems, ensuring smooth and secure backend operations.
Managed data routing and secured interconnections between ERP workflows and operational processes.
Provided a centralized admin console for real-time API monitoring, lifecycle management, and compliance enforcement.
Offered built-in firewall and security compliance tools to ensure sensitive business data remained protected.
The implementation of digiRunner delivered significant results:
Efficiency Gains: Optimized ERP function calls, reducing system response times and enhancing development efficiency.
Enhanced Production Control: Standardized workflows streamlined production schedules, resulting in notable improvements in planning cycles and resource utilization across sites.
Cost Savings: Centralized architecture led to reduced licensing and administrative expenses.
Operational Synergy: Integrated processes supported dynamic production planning and improved real-time order management, boosting customer satisfaction.
Improved Security and Performance: Enhanced API security reduced breach risks, while performance optimizations ensured timely data processing.
Sustainability: digiRunner’s scalable model reduced paper dependency and provided flexibility for future site integrations.
By leveraging digiRunner, the global manufacturer streamlined operations, strengthened security, and optimized performance across its decentralized sites. digiRunner’s advanced API management platform transformed ERP processes, enabling operational agility, strategic decision-making, and long-term scalability. Focusing on security, performance, and integration, digiRunner proved essential for navigating the complexities of modern global manufacturing.
Learn more about digiRunner’s features and explore its open-source initiatives at .
Explore digiRunner’s open-source innovations and advanced capabilities by visiting .
Find out more about digiRunner’s advanced features and open-source journey by visiting .
To install digiRunner API Management, go to our , and follow instructions in the README.md file.
After completing the installation, open your browser and navigate to: .
Now, let's , and start to explore digiRunner's features!
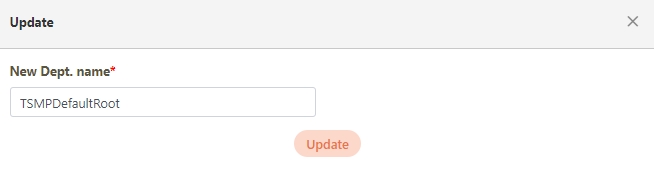
Click on the (Update) icon next to each parameter to update its value, then click Update to apply the changes.
If Result = failure, click on the (Details) icon to view the error.
Click on the (Redo) icon, and click Confirm to re-trigger the mail sending task.
For more insights into digiRunner’s capabilities and its open-source initiatives, visit .
Rate limiting in digiRunner controls the number of API requests allowed within a specific time frame, ensuring system stability and preventing abuse. The rate limiting configuration can be applied to individual clients or groups based on their API access levels.
In digiRunner, rate limiting is implemented through adjustments to the API Quota and TPS/Node settings.
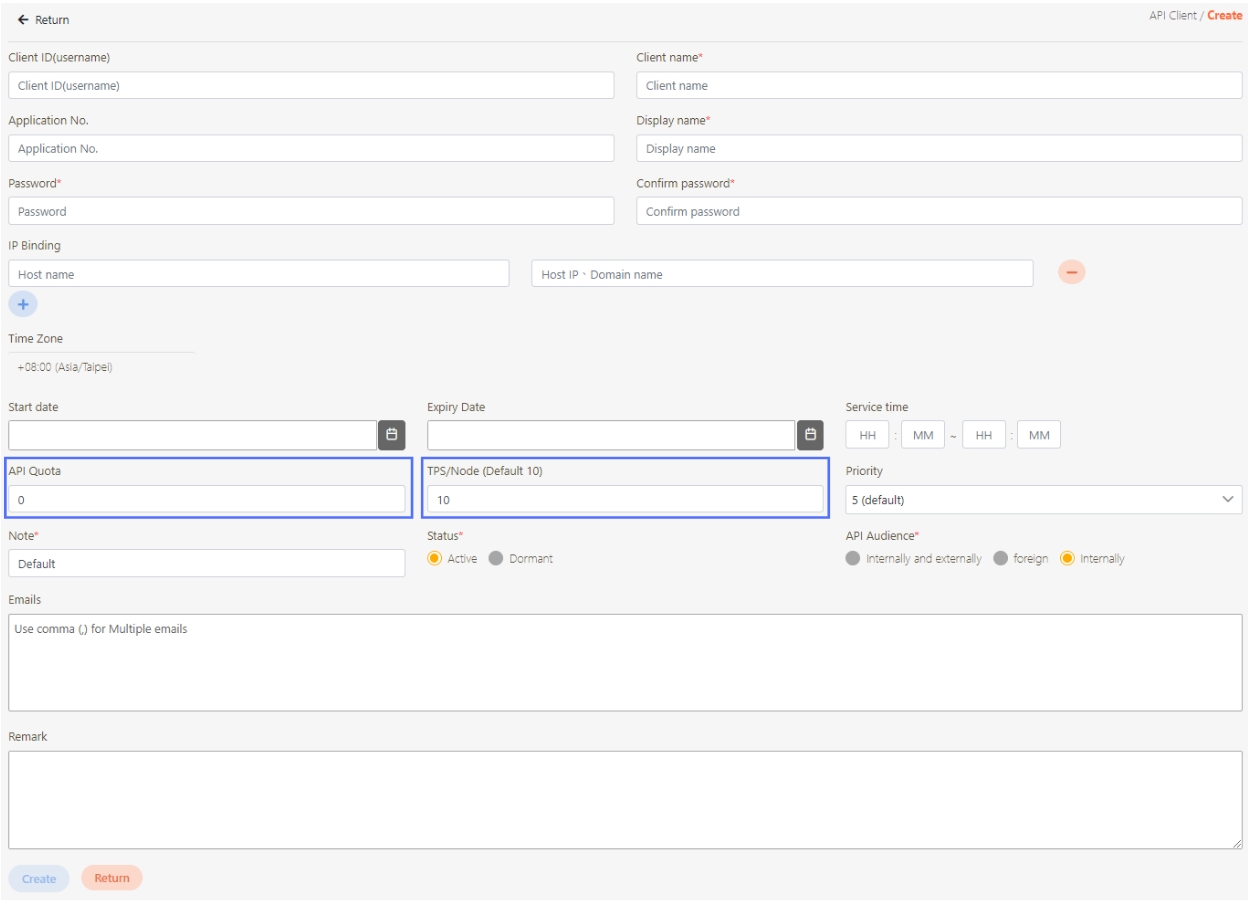
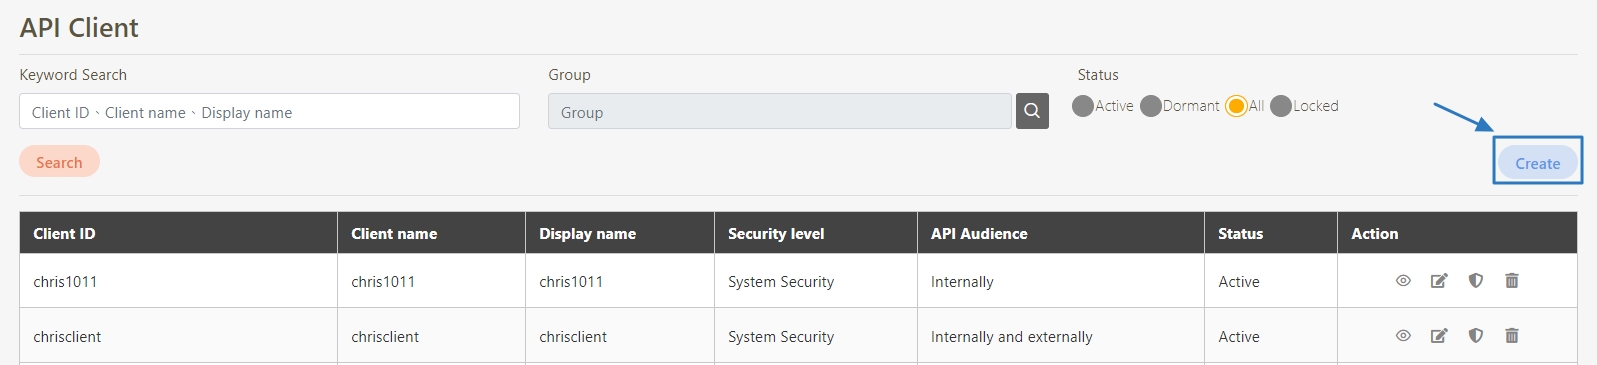
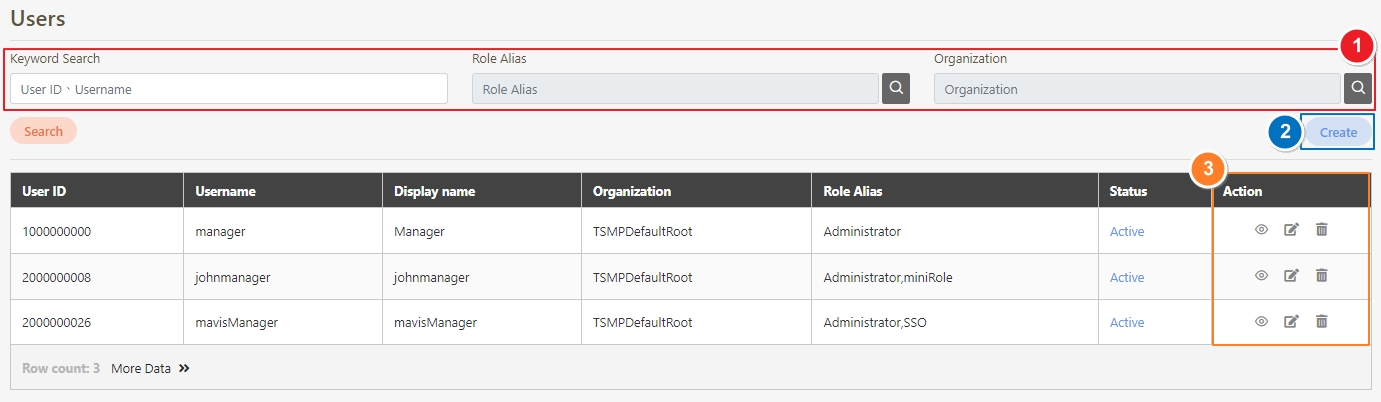
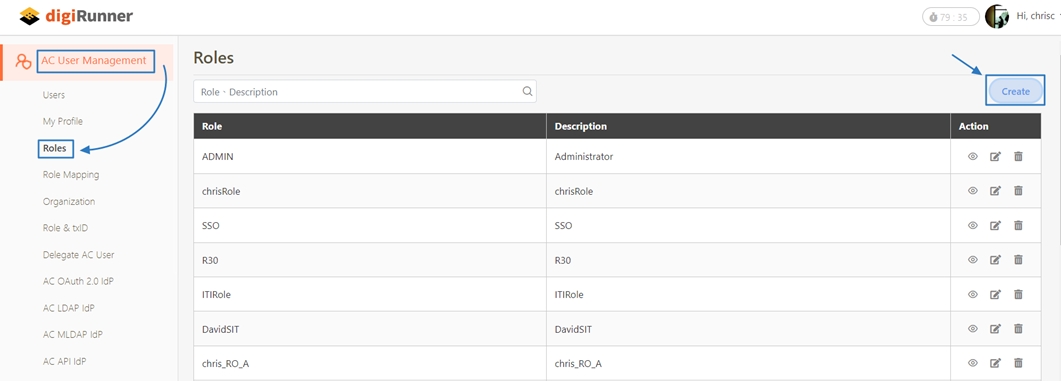
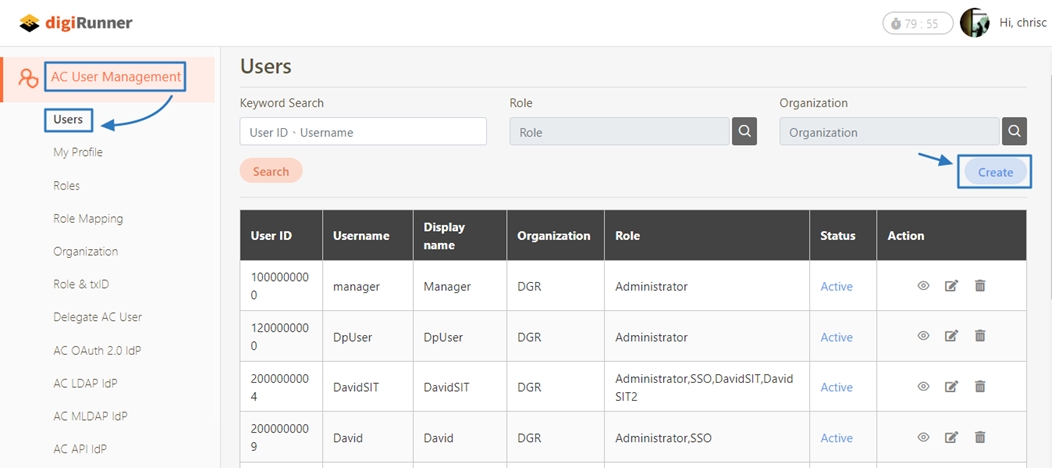
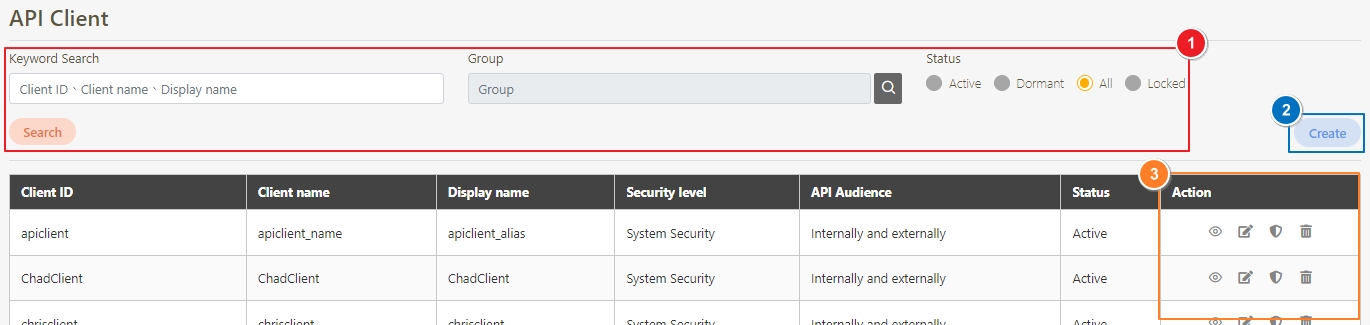
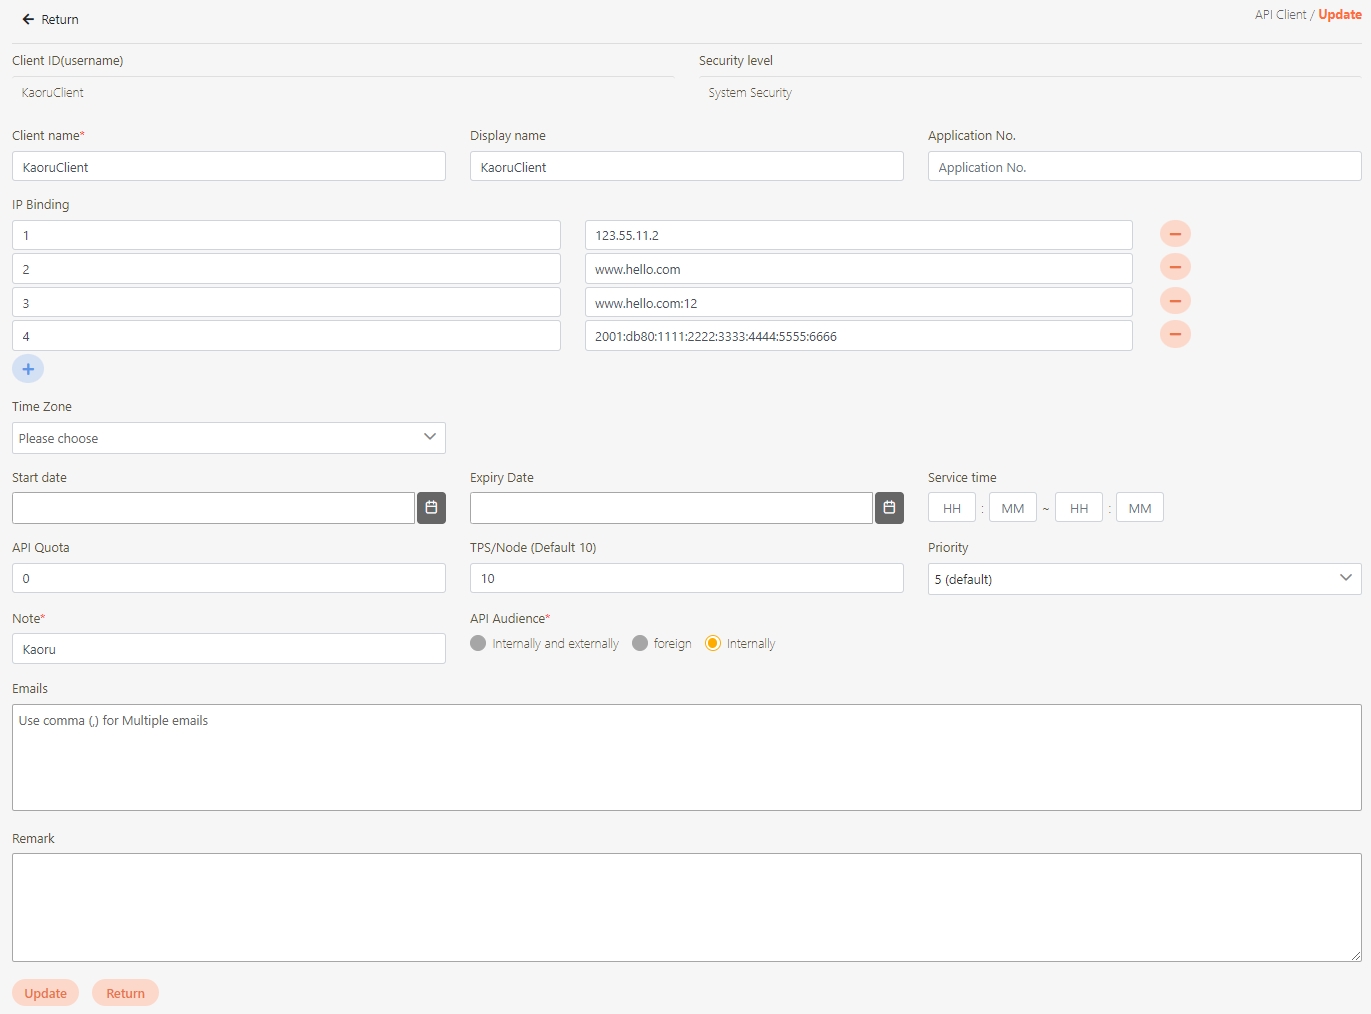
Go to Client Management > API Client to manage clients subject to rate limits. You can either create a new client or update an existing one.
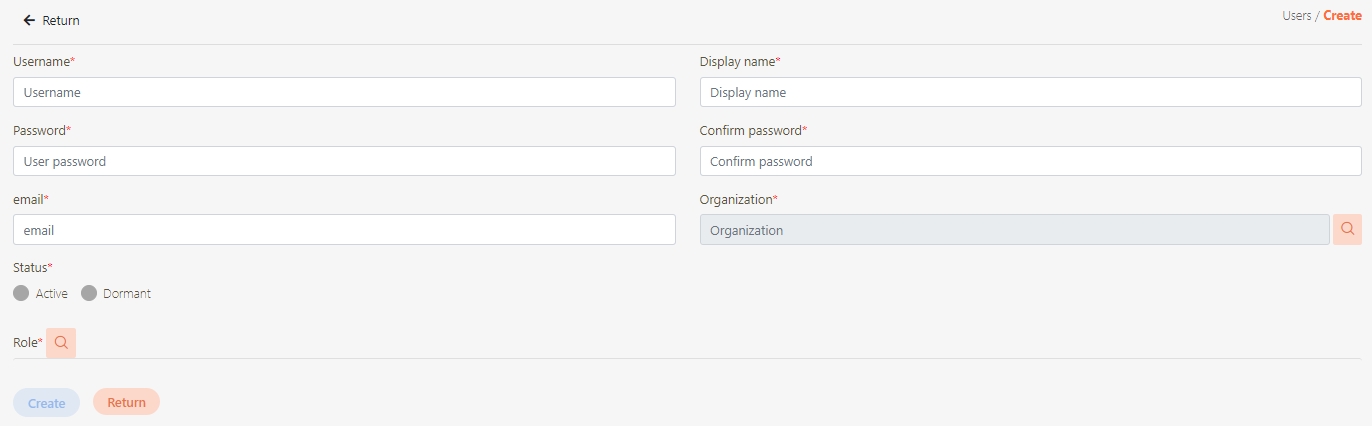
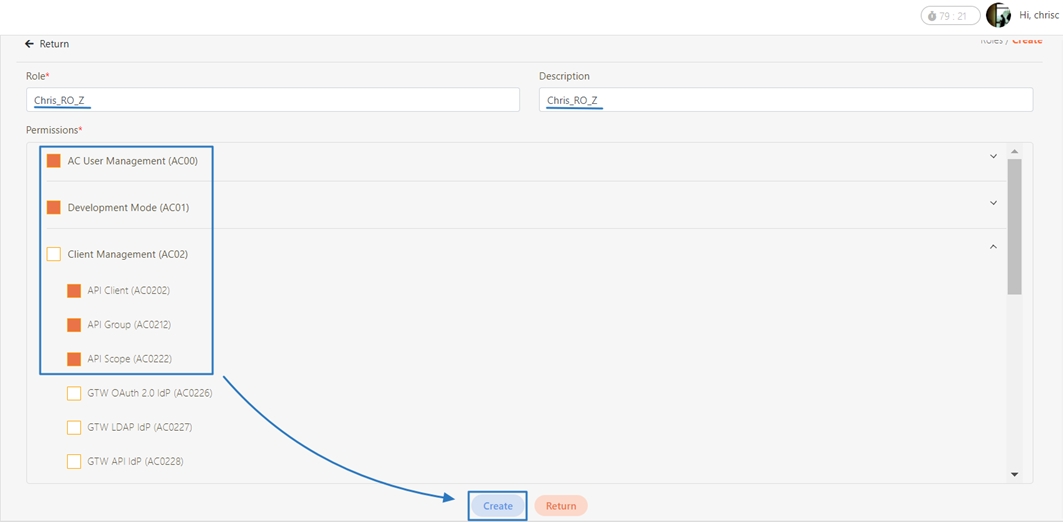
Click Create to access the client creation page.
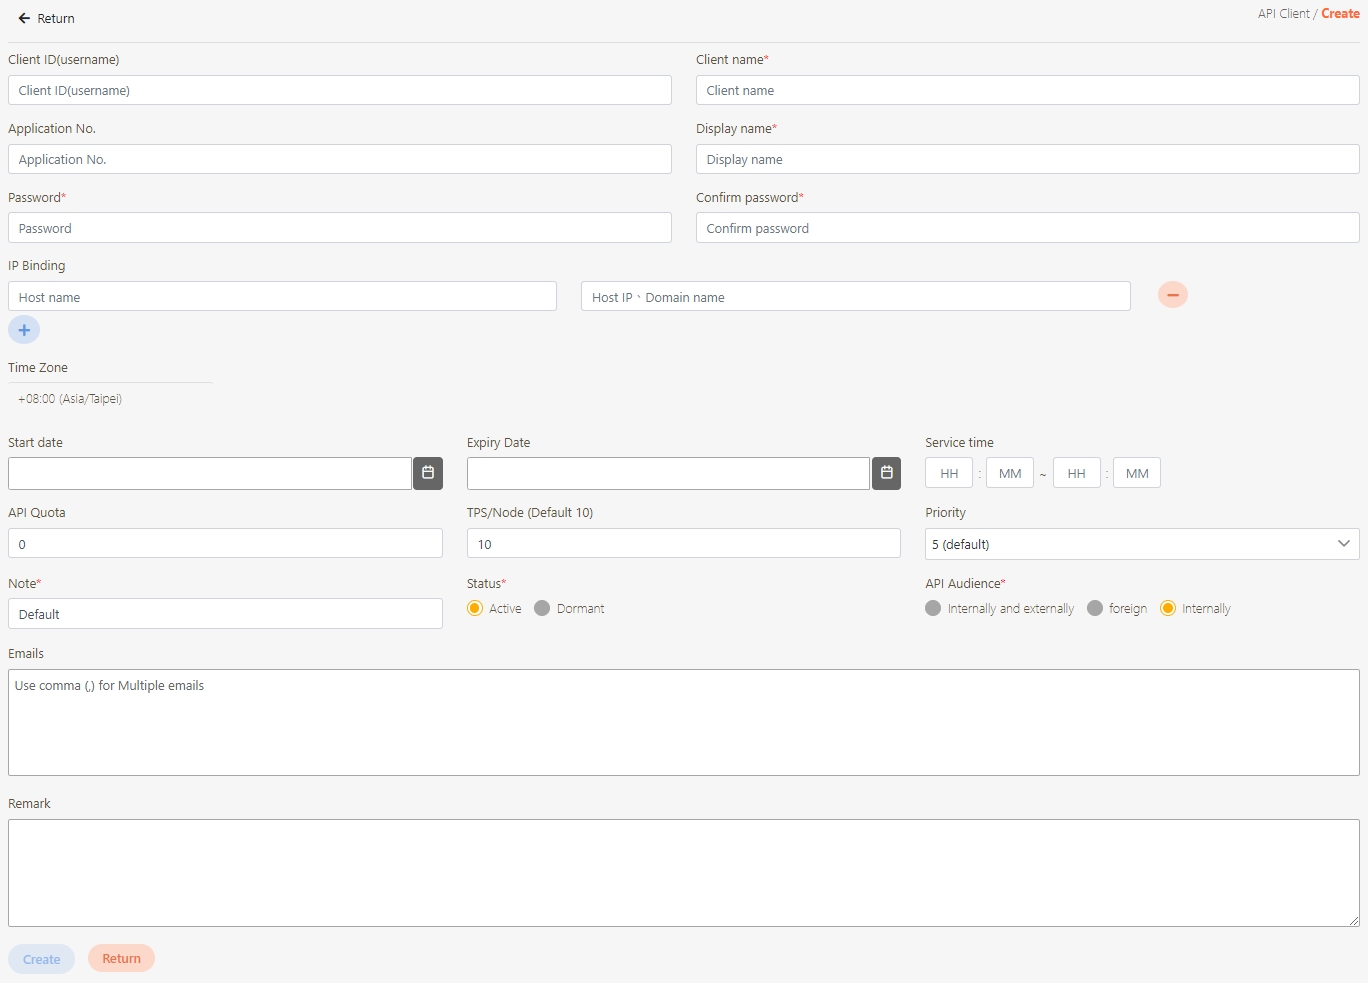
When creating or updating an API client, configure the API Quota and TPS/Node (Transactions per second) settings.
API Quota: Specifies the total number of API calls the client can make without restriction. If the same API was pressed repeatedly 10 times, it also counts as 10 times.
If set to 0, it means there are no limits.
TPS/Node (Default 10): Specifies the number of times this client can call the API per second. The default for this field is 10, meaning that the API will be called 10 times per second. For example, if both the TPS/Node and API Quota are set to 10, the user can make 10 API calls per second. However, once the user reaches a total of 10 calls for the day, further API access will be denied.
If set to 0, it means there are no limits.
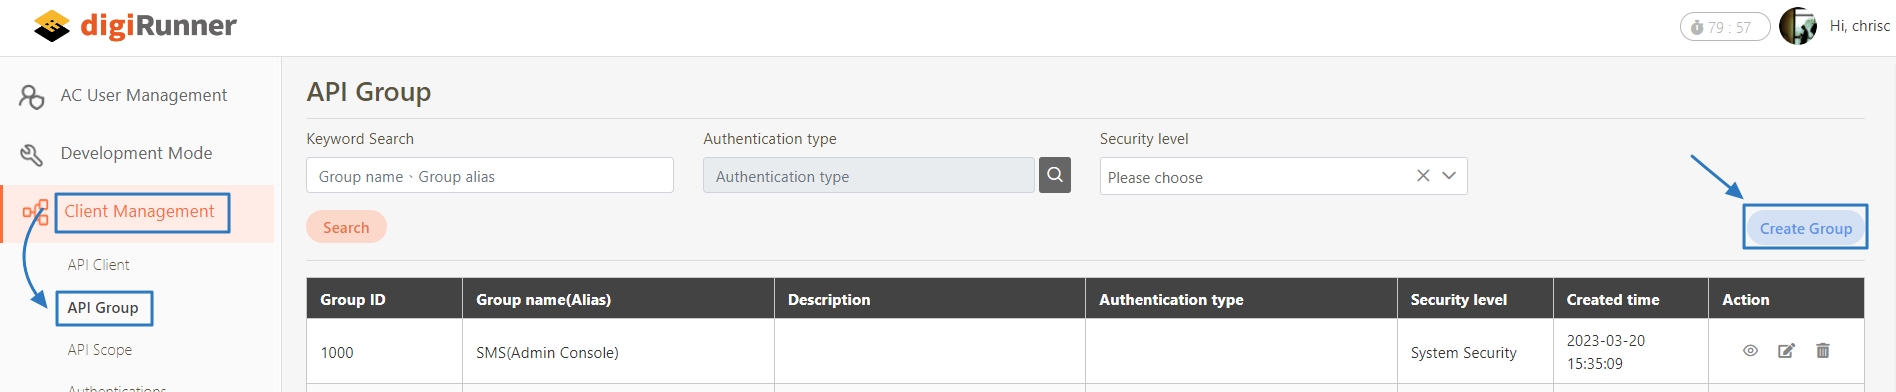
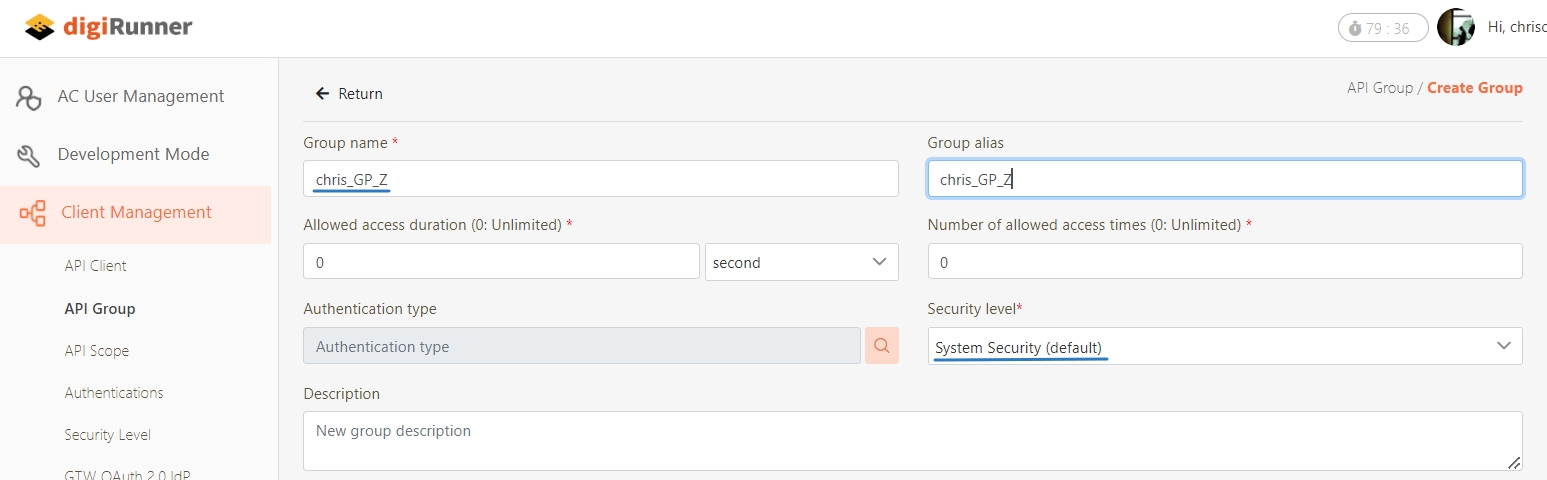
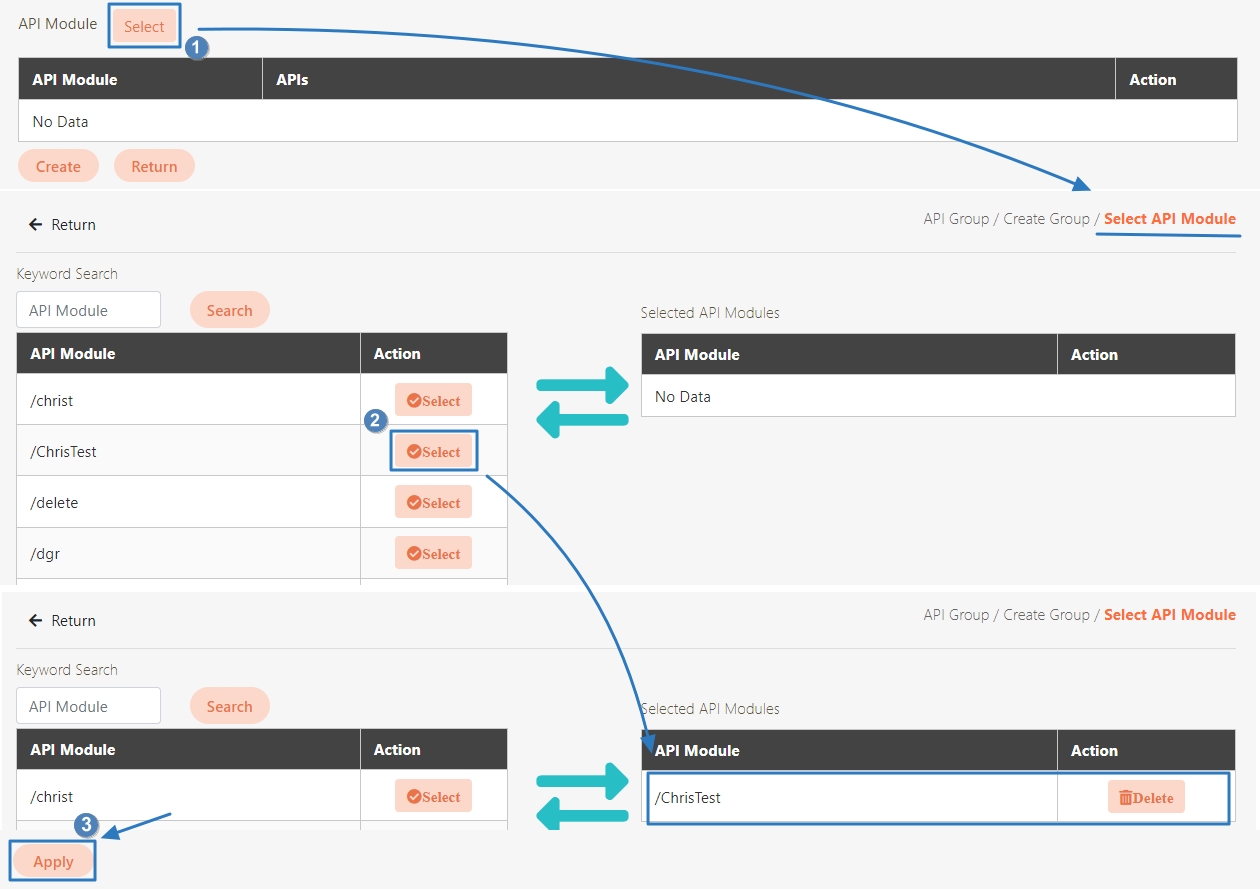
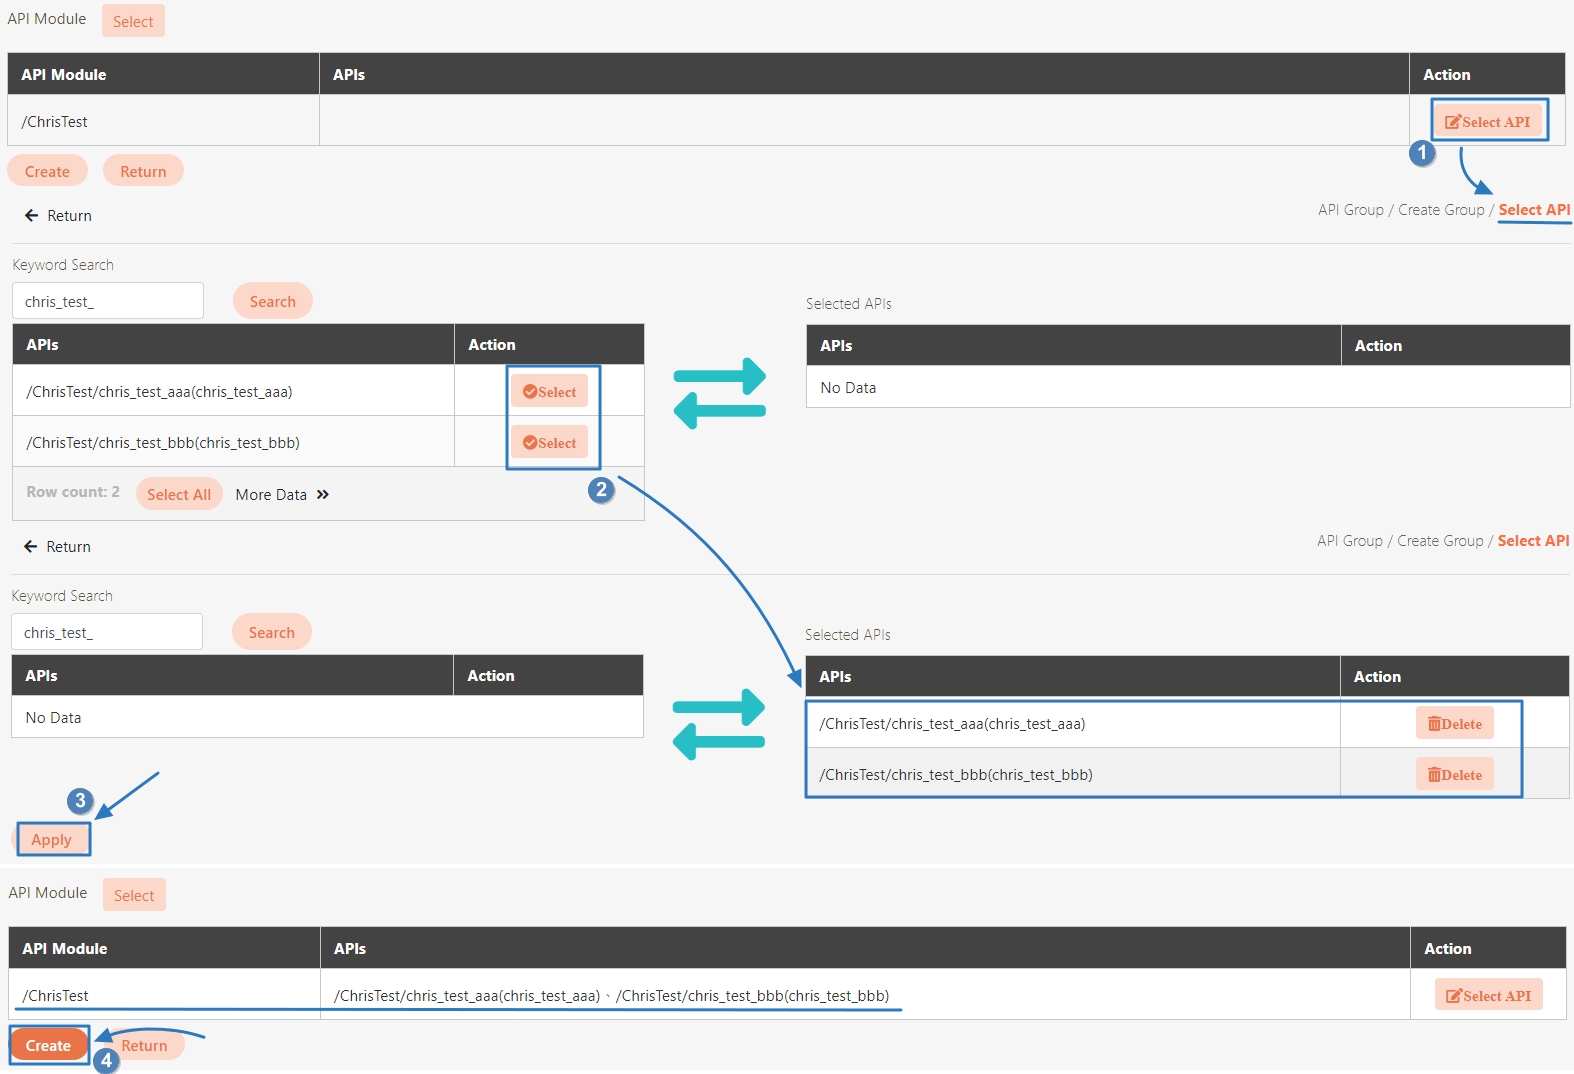
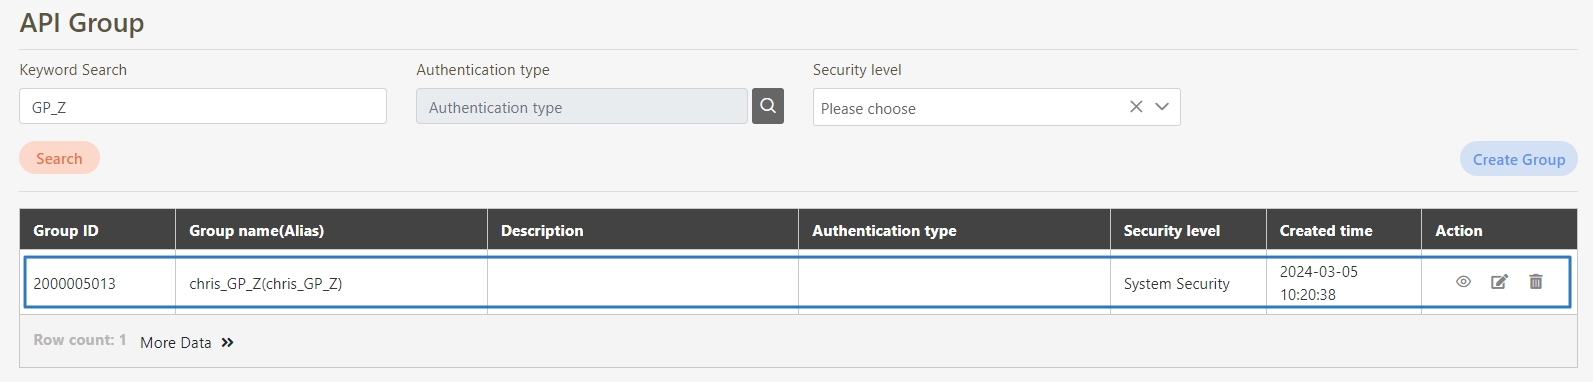
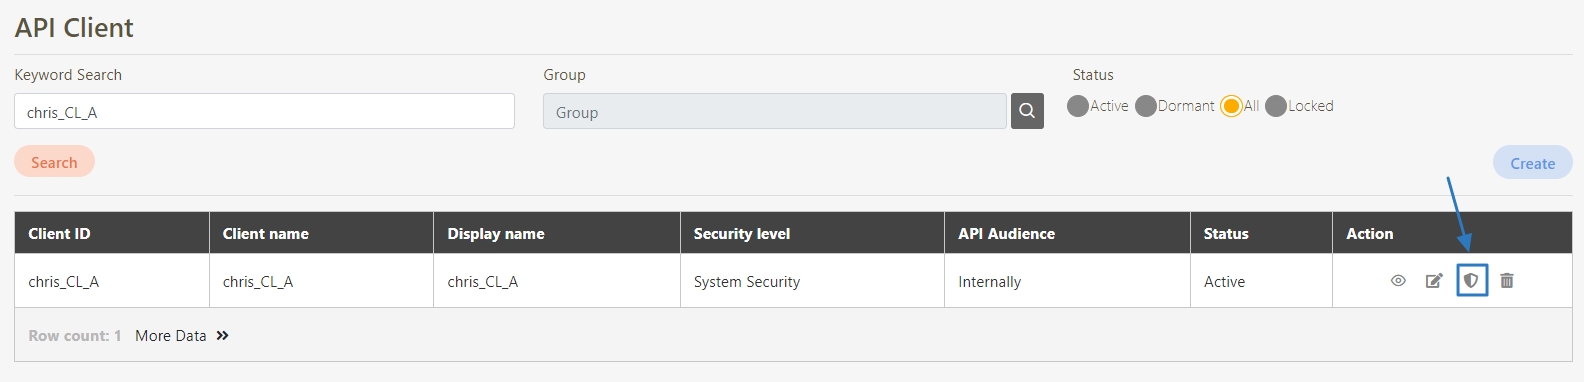
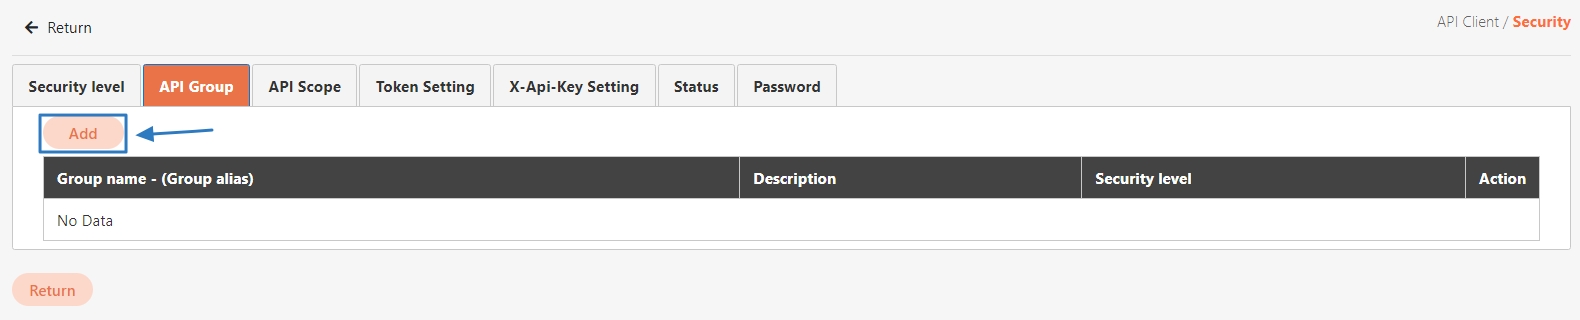
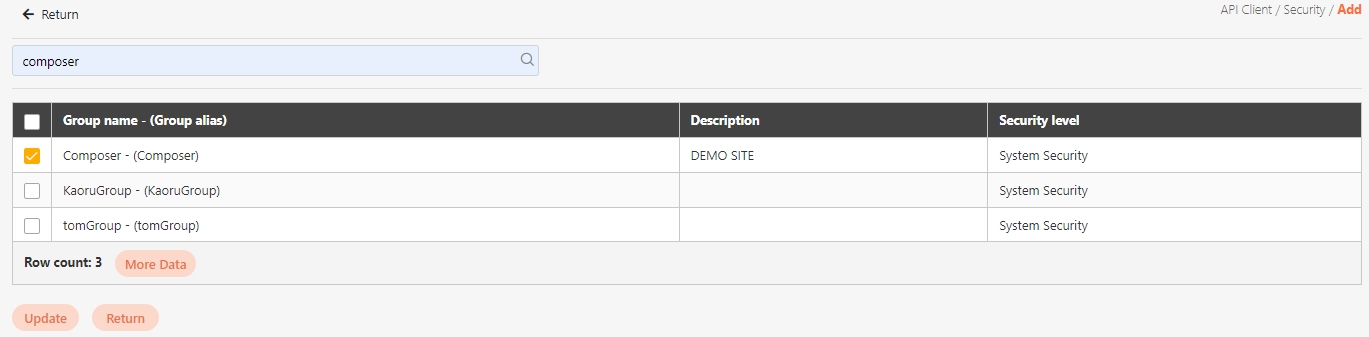
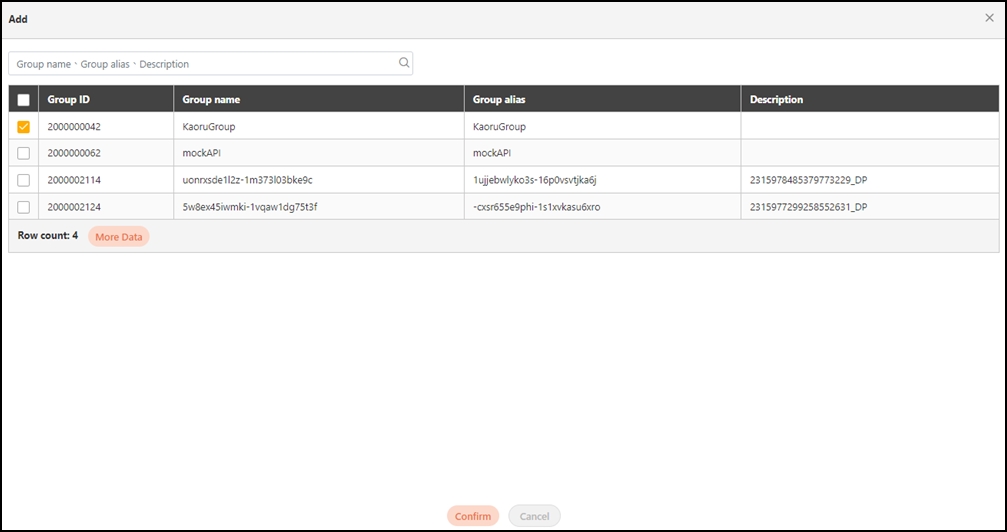
Go to Client Management > API Group.
Create a new group for clients to which you want to apply rate limiting.
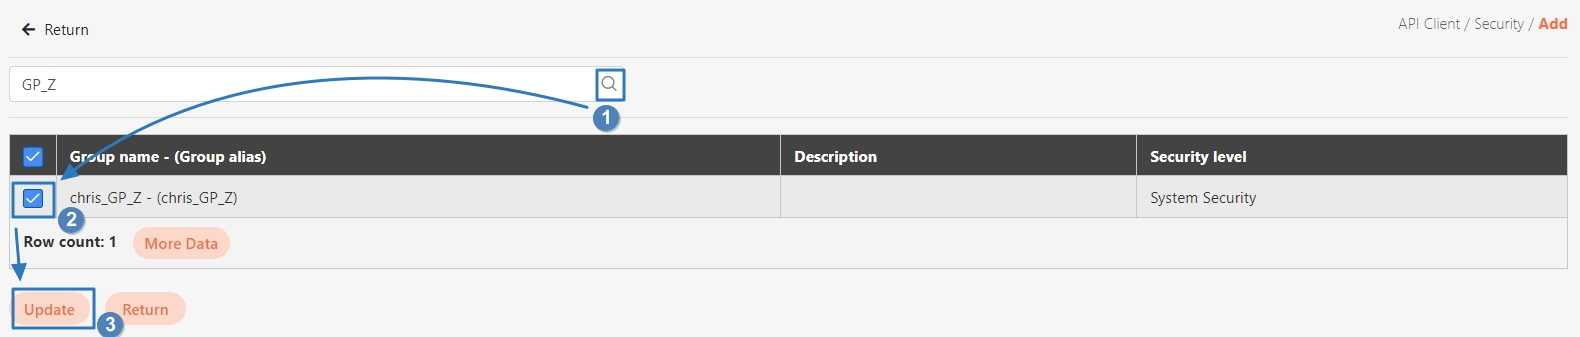
Add the desired API to this group, which will apply the rate limiting rules.
Assign the clients to the group so that they inherit the rate limiting settings for this API.
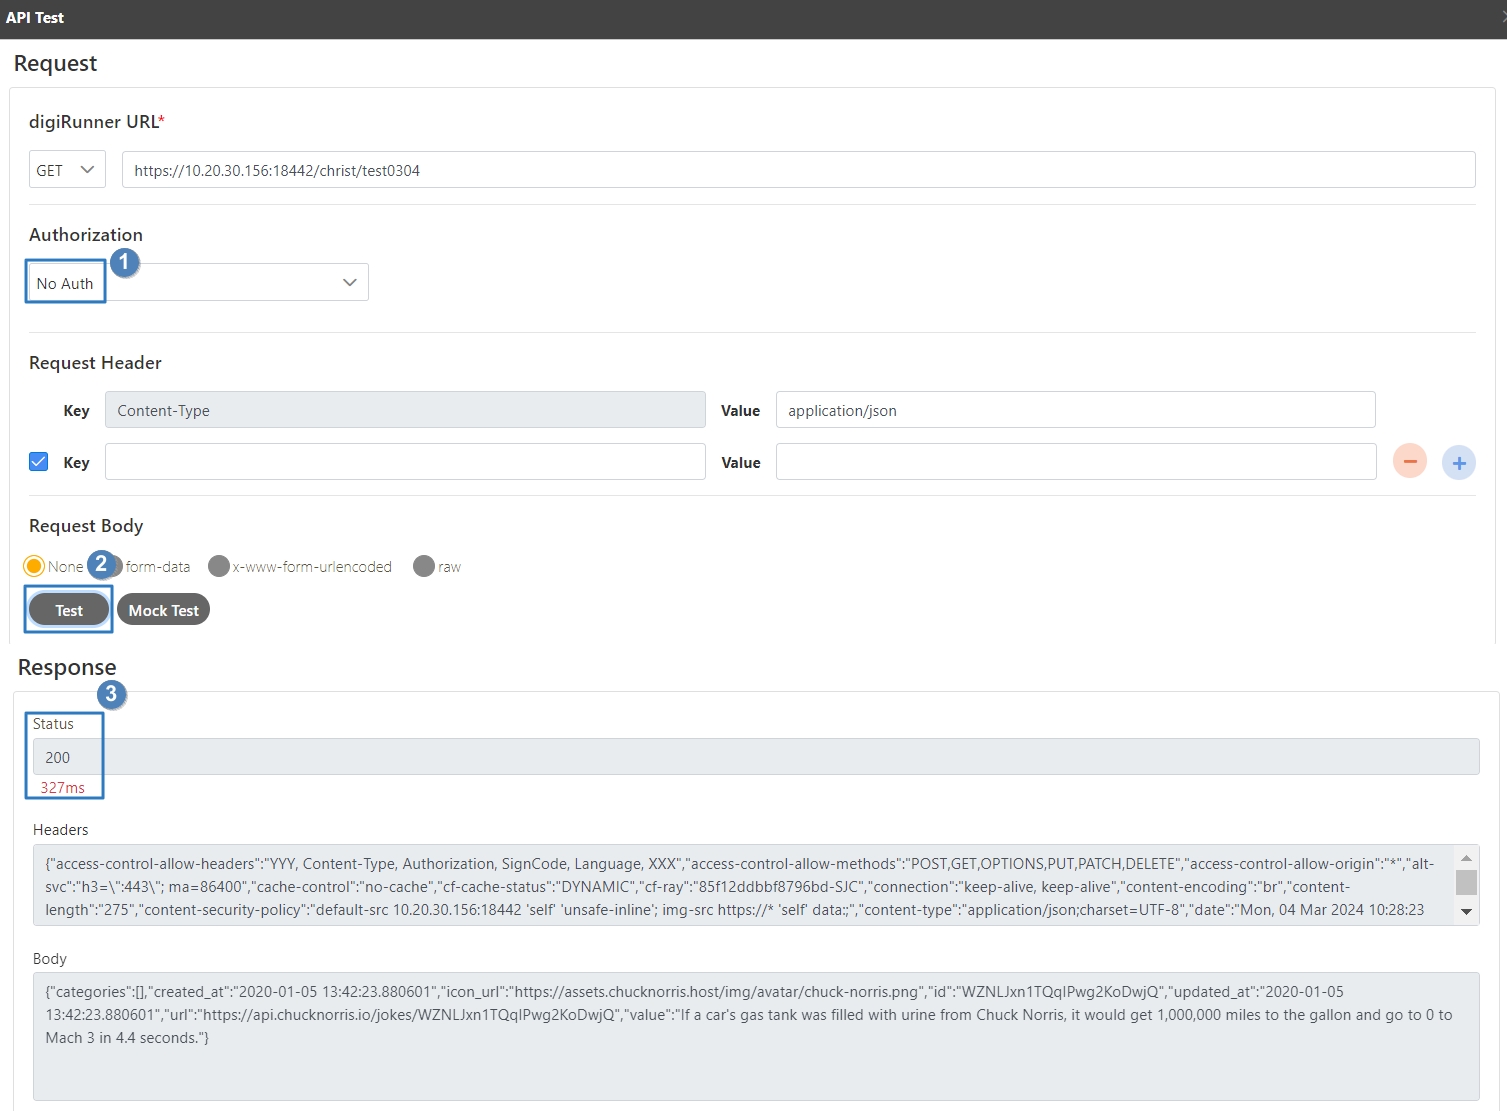
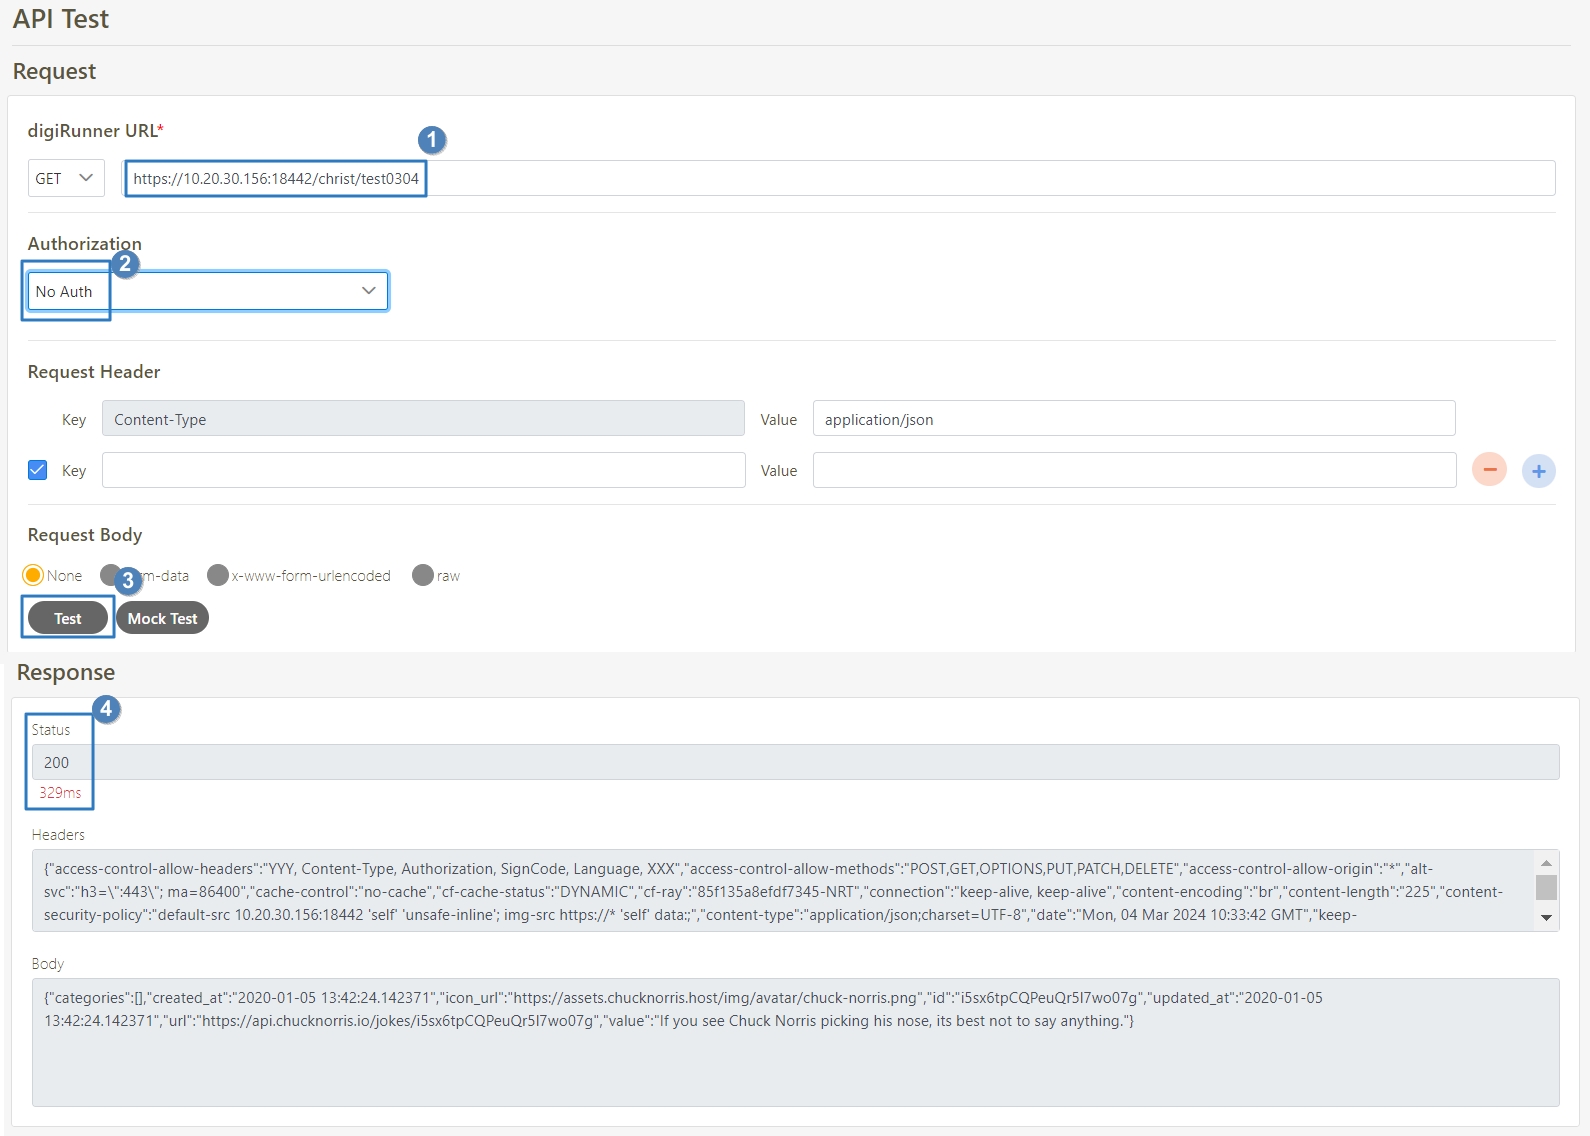
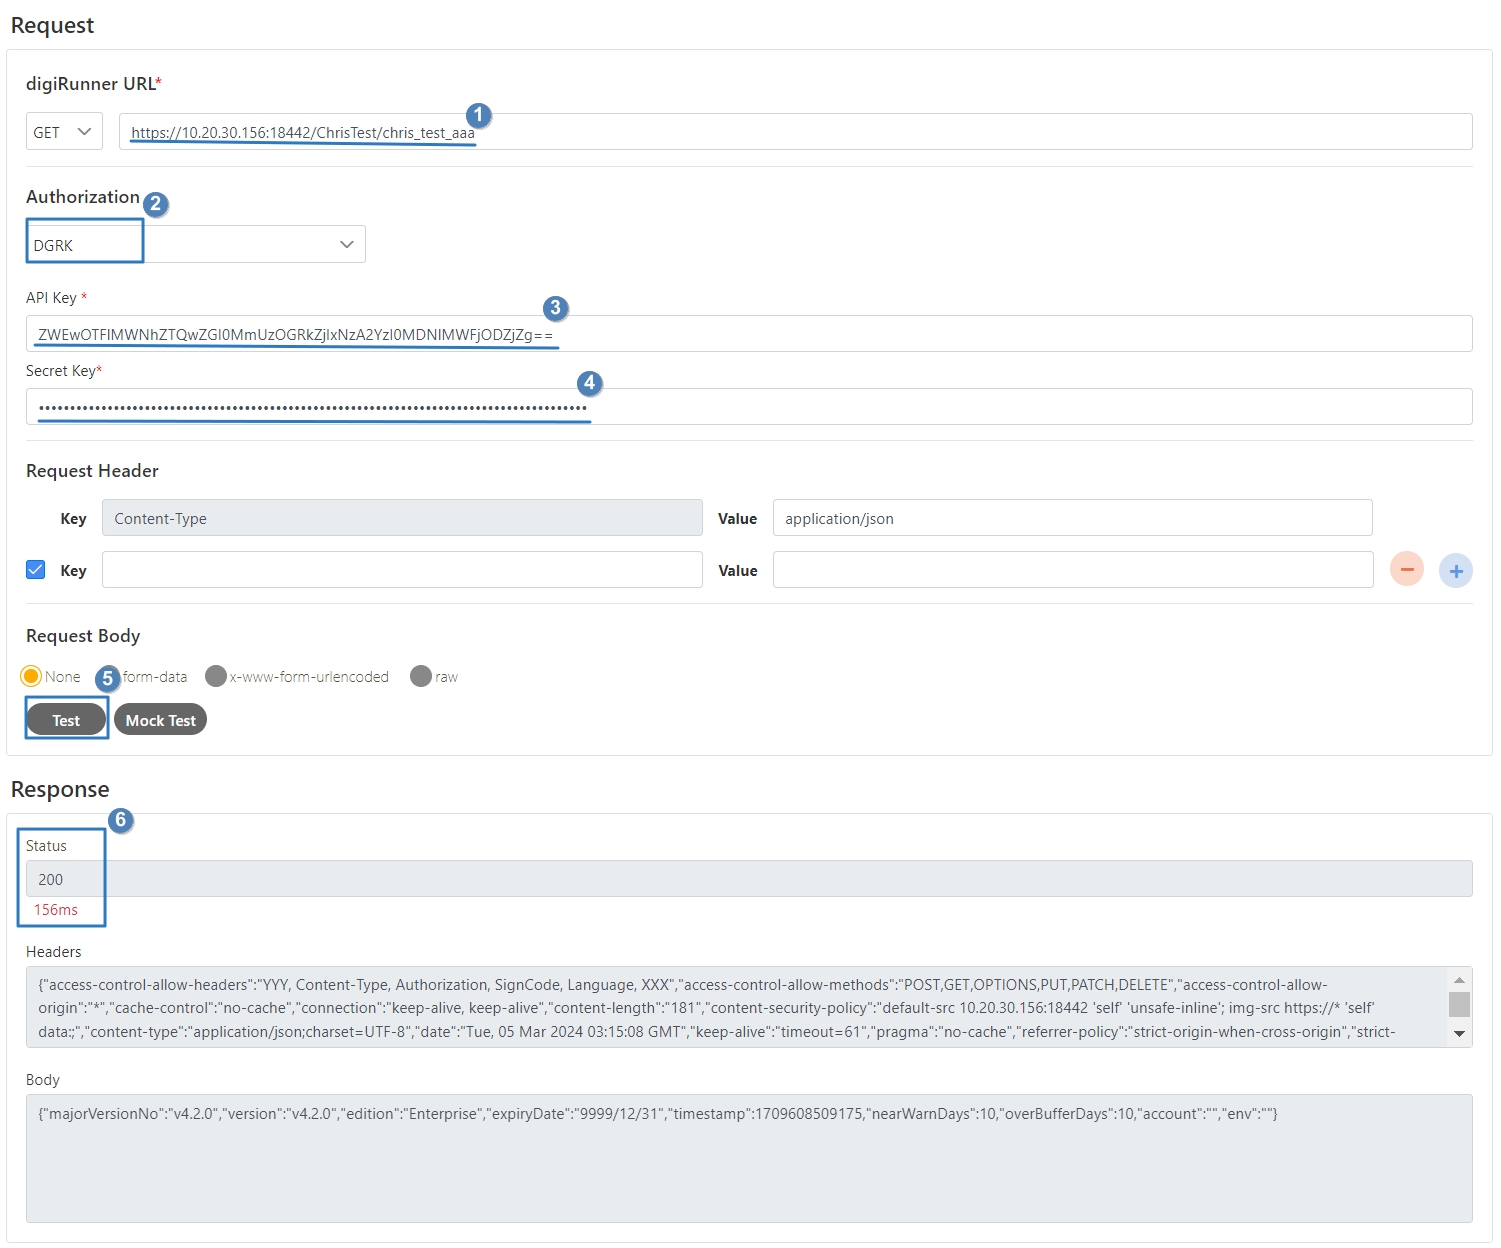
Go to API Management > API Test to test the API with the rate-limited group.
Send requests to the API via the API Test feature to verify that rate limiting is enforced.
Observe API responses; if the rate limit is exceeded, the server will return an HTTP 429 (Too Many Requests) error.
For more information about client creation, please refer to.
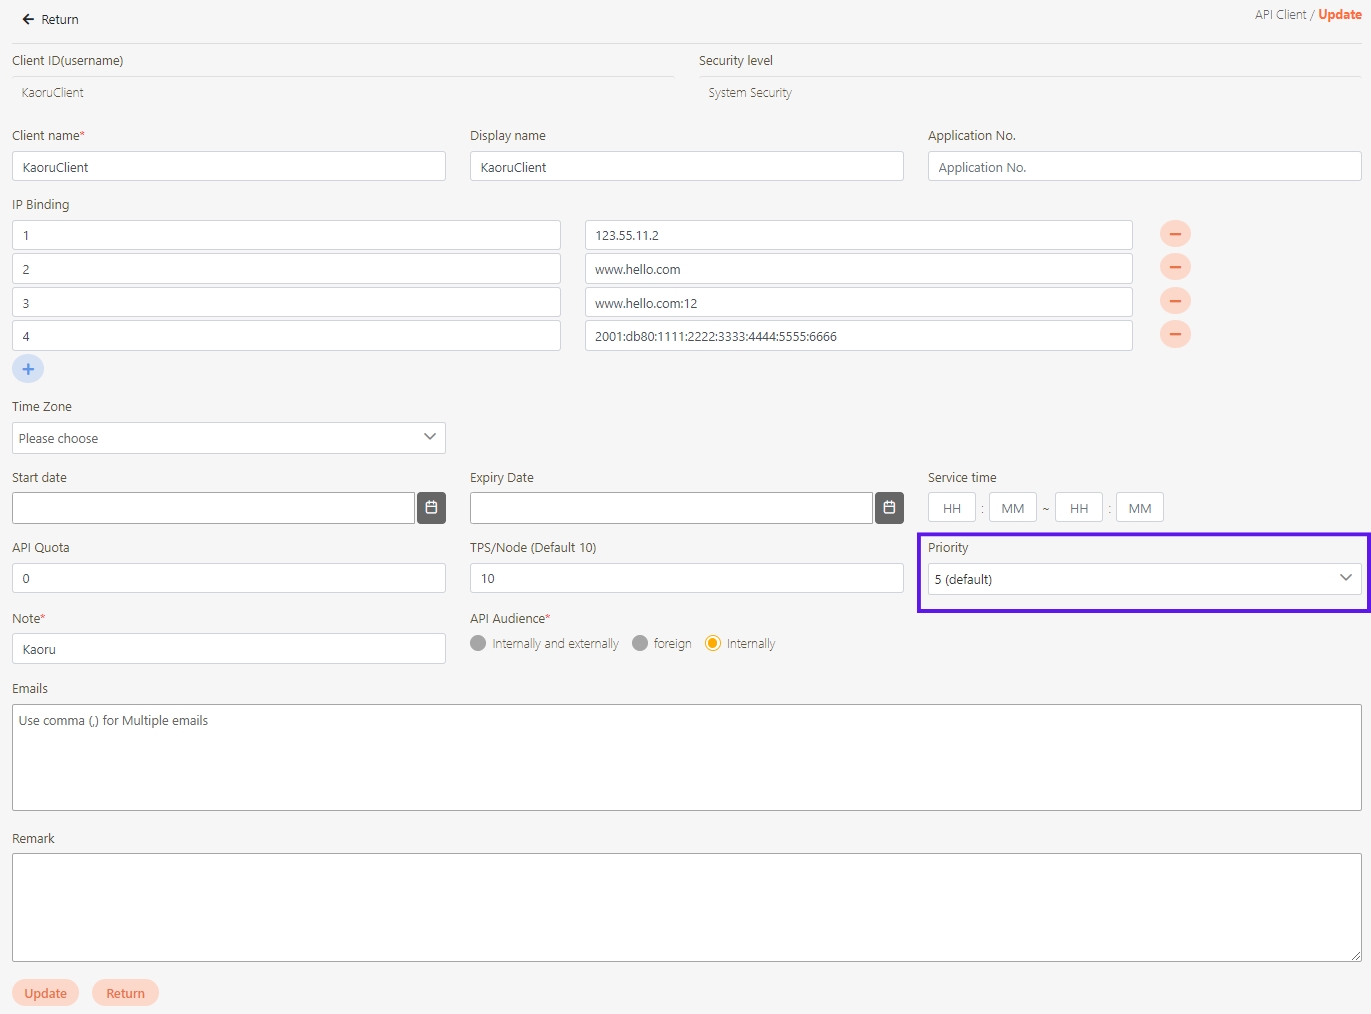
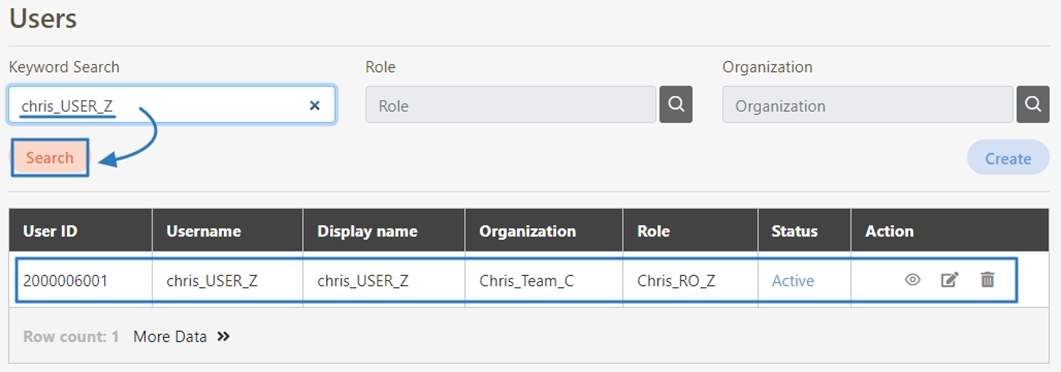
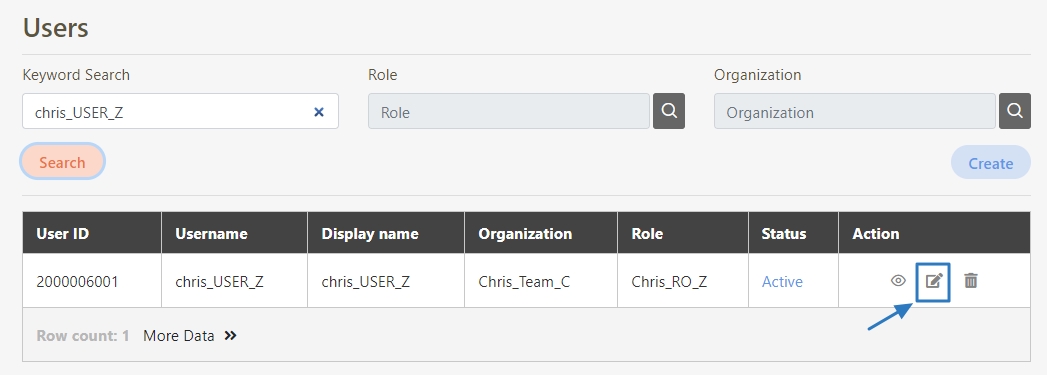
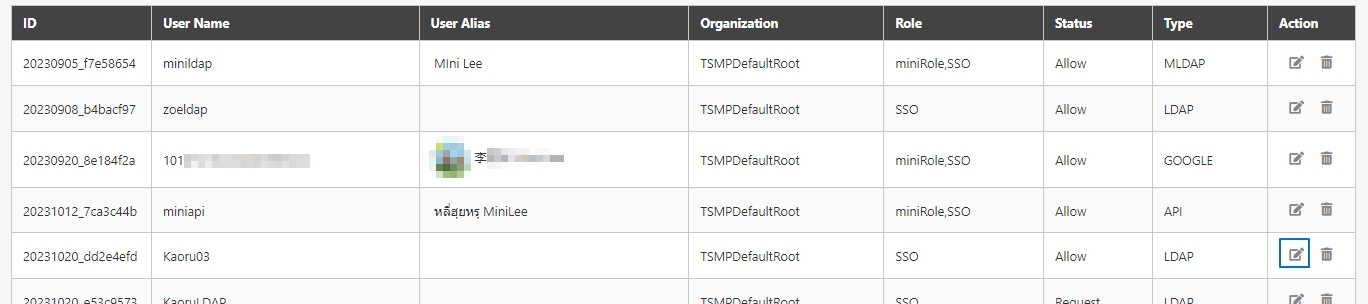
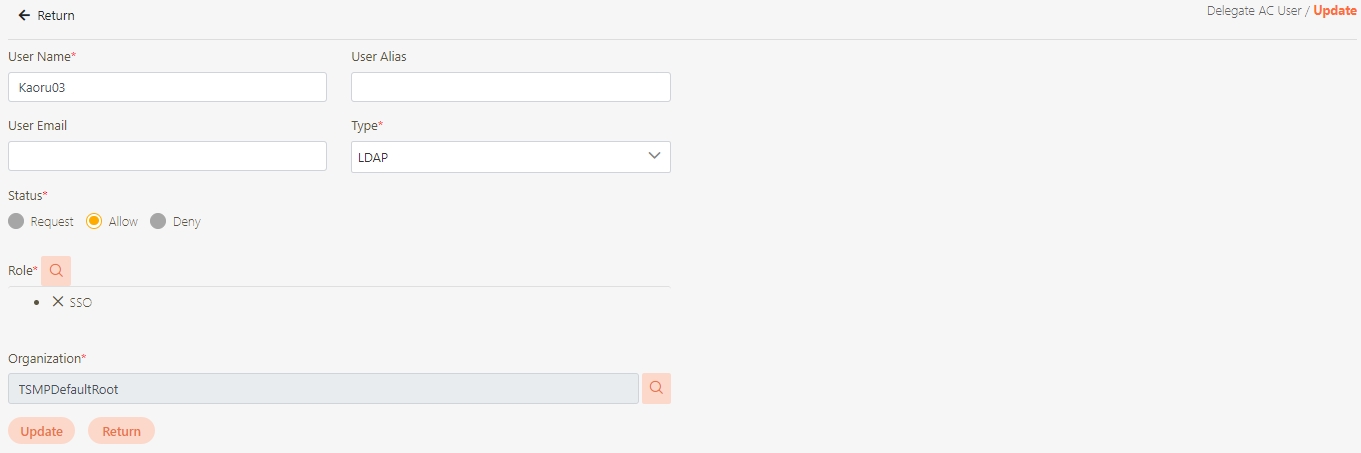
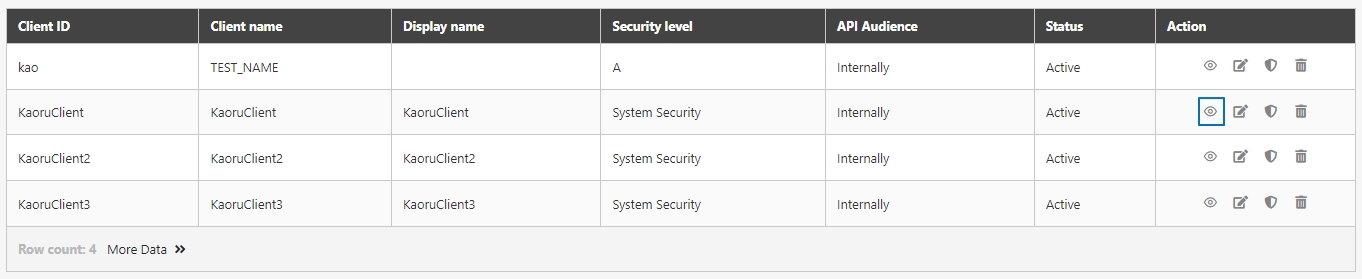
Search for the client to modify, and click on the icon to access the update page.
For more information, please refer to .
For more information, please refer to .
VIP Gateway Priority Settings in digiRunner allow users to prioritize API requests from VIP clients (high-value users) over regular clients. This ensures that during periods of high traffic or system stress, VIP clients access services faster and more reliably, enhancing their user experience and maintaining critical operations.
Go to API Client Management in the digiRunner Admin Console.
Locate the Priority option, and adjust the priority level to ensure the client receives higher priority in the gateway compared to regular clients.
Priority: The level determining the order in which this user can access the gateway during periods of network congestion.
In this field, 0 indicates the highest priority, and 9 indicates the lowest.
Proxy caching in digiRunner enhances performance by storing frequently accessed API responses and static web resources, reducing backend load and speeding up response times for end users.
Go to API Management > API List, and search for the API you want to enable proxy caching for.
In the API settings, locate the API Cache field and select from the following options:
None: Disables caching.
Adaptive: Adjusts caching dynamically based on API usage patterns.
Fixed: Caches responses for a set duration.
Set the cache duration in the Fixed Cache Time (Minute)* field, which is only available if API Cache is set to Fixed.
Click Update to save and exit.
Go to API Management > API Test.
Select the API or static resource that you have set up for caching.
Send requests to the API via the API Test feature to verify that proxy caching is enforced.
Record the response time for the first request. Since this is the first access, the proxy fetches the content from the backend and stores it in the cache.
Use the API Test feature to send the same request multiple times.
For subsequent requests, the response should be served from the cache, resulting in noticeably faster response times.
Select the client you want to assign VIP priority to, and click on the icon to access the update page.
If you don't have an API client or require more information, please refer to .
Select the target API, and click on the icon to access the update page to proceed.
For more information, please refer to .
Load balancing distributes incoming traffic across multiple servers to prevent any single server from becoming overwhelmed, improving fault tolerance, availability, and performance for APIs and backend services.
Go to API Management > API List, and search for the API you want to enable load balancing for.
In the API settings, you can add multiple Target URLs for backend services.
Locate the Target URLs field to configure the backend service URLs.
For each backend server or service that will receive traffic, specify its corresponding Target URL.
Assign a percentage of incoming traffic to each target URL. This is how load balancing is achieved. For example, you can distribute traffic as:
Target URL 1: 50%
Target URL 2: 30%
Target URL 3: 20%
Click Update to save and exit.
Go to API Management > API Test.
Select the API that you have configured for load balancing and send multiple test requests.
Observe the responses via the API Test feature. Check if the requests are routed according to the distribution percentages set in the load balancing configuration.
You should see requests distributed across the different backend servers or services.
Review the responses from each backend (target URL) to confirm that requests are handled by different servers.
Select the target API, and click on the icon to access the update page. You can either or update an existing one.
For more information, please refer to .
Sandbox testing in digiRunner enables developers to simulate API operations safely, ensuring functionality and service quality without impacting live services. It supports parallel development for frontend and backend teams using mock data, reducing delays and improving efficiency.
In the mock configuration section, fill in Mock Status Code, Mock Headers Key, Mock Headers Value, and Mock Body to simulate the API response during testing.
Mock Status Code: Specify the HTTP status code the API should return during the mock test, such as 200 for success, 404 for not found, 500 for server error.
Mock Headers Key: Specify the custom header keys to include in the mock response. These headers provide additional information, such as content type, authorization, or caching policies.
Mock Headers Value: Specify the corresponding values for the custom headers defined in the Mock Headers Key field. For example, for a Content-Type header, you could assign the value application/json.
Mock Body: Specify the simulated response body in JSON format. For example:
Go to API Test.
Use the Mock Test feature to send a request to the API and verify that the system returns the mock data configured previously.
Follow the steps below to call mock data set in digiRunner using an external tool like Postman.
Select the appropriate HTTP method (e.g., GET, POST) based on the API you are testing.
Fill in the URL of the API endpoint for testing.
Launch Postman, and go to the Headers tab (as shown in the image).
Add a new header with the key dgr_mock_test, and set its value to true (refer to steps 2 and 3 in the image). This informs digiRunner that you want to use mock data for the request.
Add any additional required headers, such as Content-Type or Authorization, according to the API specifications.
Once the mock headers are set up, send the request.
The response should include the mock data you configured in digiRunner, including the mock status code, headers, and body.
Disclaimer
Thank you for using digiRunner! digiRunner has undergone an initial vulnerability scan and open-source license compliance check, with no known issues identified. However, this project is provided under the Apache 2.0 License on an "as-is" basis and does not guarantee its suitability or security. Users must independently verify whether the project meets their specific needs and environments.
You may copy, share, modify, and distribute this work.
You must retain the following notices, accreditation, and disclaimers: “This product includes software developed by the digiRunner project under the Apache License, Version 2.0.”
Disclaimer: Under the terms of the License, this project is provided on an "as-is" basis. While the License allows free usage, this project does not offer any proprietary, explicit, or implied warranties. You should conduct a thorough analysis to ensure safety and applicability.
For detailed information about the license, please refer to the digiRunner GitHub repository.
Go to API Management, and click on theicon to update the API you want to test.
Detailed License Terms: digiRunner is provided under the (“License”), which allows you to use it freely under the following conditions:
The imported file must be a JSON file exported from digiRunner. This feature simplifies the process of handling multiple APIs with the same settings. If set to No Auth, it simplifies the authentication process, allowing for quick verification of API call success.
Application scenarios include the operation of launching APIs from the test environment to the official environment, the launching of multi-center APIM, or API migration.
Go to API Management > API List, and click Import API.
Click on the File icon, select the file, and then click Upload. A successful upload prompt will pop up, and the API information will be displayed in the table below.
Check the list to select all APIs, and then click the Import button to import the APIs successfully. The import result will be updated to success.
Go to API Management > API Modify Batch to enter the page. The default statuses of the newly imported APIs will be displayed with a red icon, indicating that the API is not yet enabled.
Check the box in the header cell to select all the APIs, and click Enable. A confirmation message will appear, click Confirm to save and exit.
A successful update prompt will pop up, and the status light will turn green, indicating that the API has been successfully enabled.
The default status of No Auth for newly imported APIs is disabled, and the field is empty.
Check the box in the header cell to select all the APIs, and click Active No Auth. A confirmation message will appear, click Confirm to save and exit.
A successful update prompt will pop up, and the No Auth field will display a check symbol, indicating that No Auth has been enabled.
JWE (JSON Web Encryption) is a standard for securely transmitting encrypted data between two parties. In digiRunner, JWE safeguards API communications by protecting sensitive data from unauthorized access. The encryption ensures both the confidentiality and integrity of the transmitted data.
JWE encryption flowchart
In the JWT Settings field, toggle the switch to enable the JWT function.
Select JWE from the Request drop-down menu.
Select JWE from the Response drop-down menu.
Click Update to complete the encryption.
Go to Certificate Management > JWE Cert. List.
Set Date Range, and click Search.
View JWE encrypted certificates associated with specific API clients, including their status and expiration dates.
Go to Certificate Management > JWE Cert. Management.
Enter the keyword in the Search Client field to search for the client, and click Search.
Select the required JWE certificate file, and click Open to upload it. The uploaded certificate will now be available for use with the associated API client.
Go to API Management > API List, search for the API to be verified, and click on to enter the update page.
Locate the desired client in the results, and in the Action column, click on the icon to proceed.
In the details page, click on the icon to open the file selection window.
In the JWE Cert. Management section, locate the desired client, and in the Action column, click on the icon.
From the list of certificates, select the one you wish to delete and click on the button.
For more information, please refer to the.
IP Binding in digiRunner serves as an IP whitelisting mechanism, enabling administrators to restrict API access to trusted IP addresses. Implementing IP binding helps enhance security by ensuring that only authorized clients can interact with your APIs. By configuring IP whitelisting through IP binding, you can control and limit API access to specific, pre-approved IP addresses, reducing the risk of unauthorized access.
Before configuring IP binding, ensure the following:
You have administrative access to the digiRunner Admin Console.
You have identified the trusted client IP addresses.
To configure IP binding for a client in digiRunner, follow the instructions below.
Log in to your digiRunner Admin Console.
Go to Client Management > API Client to proceed.
To create a new client, click Create.
Locate the IP Binding field within the client configuration form.
Fill in the authorized client’s hostname or IP address. Only requests from these specified IP addresses or hostnames will be allowed to access the APIs associated with this client.
Specify the Start date to activate the client's access.
Set an Expiry Date to automatically revoke the client's access after a defined period. To allow indefinite access, leave this field blank.
Click Create for new clients, or Update for existing clients, to save your changes and activate IP binding.
Regular Review: Regularly audit IP binding configurations to reflect changes in authorized IP addresses.
Accuracy: Ensure IP addresses are correctly entered to prevent unintended access disruption.
Multi-layered Security: Combine IP binding with other security measures, such as API Keys and OAuth tokens, for robust protection.
Implementing IP binding within digiRunner significantly strengthens API security, ensuring that only verified and trusted IP addresses can access your API resources.
When internal/external personnel need to use APIs, a set of account and password needs to be acquired first, then pass client management authorization before they can be used. Users can also add and edit the API groups they need to use in groups, and when users and groups have matching security levels, clients can call the APIs in the group.
Group - A list of all APIs that control authorization; APIs authorized to be called successfully through Auth are defined by groups.
Client - To perform account and password verification for Auth authorization through the client, permission to call group APIs need to be obtained from the action of authorization groups.
The scope of authorization can refer to the establishment operation of group maintenance.
Go to Client Management > API Group, and click Create Group.
Fill in the required fields.
If there are APIs that require authorization, you need to go to the Module list field and click Select.
Go to the Module list and select the Module to authorize, and click Select.
It will move to the list of selected Modules, then click Apply.
Next, click Select API for that Module, and go to the list to select the API to authorize, then click Select.
It will move to the list of selected Modules, then click Apply. Return to the New page and click Create.
Creation of the group is completed, go to the API Group page and the data entry can be queried.
If you need more help when creating a API Group, please refer to the following link for more information.
Go to Client Management > API Client, and click Create.
Fill in the required fields.
Click Active for the Status field, and select Internally for the API Audience field.
Although the E-mails field is not required, but it is still recommended to fill it in since there is the E-mail verification function.
Click Create to complete the creation.
Go to the API Client page to verify if the entry has been successfully created.
If you need more help when creating a API Client, please refer to the following link for more information.
Click the API Group tab to enter the authorization setting page, then click Add.
Search for the created group, then click Update after selecting the group.
Confirm that the authorization setting page has data of connected groups displayed on the list to finish connection.
APIs registered in the system can use different OAuth Grant Type for verification.
Note: For other authorization methods such as Password and Basic Auth, etc., please refer to their corresponding processes.
Go to API Management > API Test, and the digiRunner URL field will automatically populate with the API URL registered in digiRunner.
In the Authorization field, select Client Credentials.
In the Client ID and Client password fields, fill in the client account and password that are registered and authorized for the API.
Click Test to view the response. In this example, the status code is 200, indicating the body contains the data defined by the API.
To update an existing client, locate the client in the list, and click on the icon next to the client.
For further details about API client configurations, refer to .
Go to Client Management > API Client, select a client and click on the Security icon .
APIs registered in the system can be configured to allocate IP traffic and restrict access.
This application is similar to the concept of double centers. Using the concept of branch company for explanation, Taipei IPs need to use Taipei APIs, and Kaohsiung IPs need to use Kaohsiung APIs; setting it properly will make them easier to manage and prevent errors from being accidentally triggered.
Go to API Management > API Registry, and click CUSTOMIZE to enter the registration page.
Fill in the required fields: API Name, digiRunner Proxy Path and Http Methods.
Since authentication is not required for now, select No Auth.
After selecting Source IP diversion for the Target URL field, click on the + icon to get two Source IP input boxes.
Fill in the local IP for the first Source IP, and fill in the API address to call for the target URL.
Fill in the Custom IP for the first Source IP, and fill in the API address to call for the target URL.
Click Register to complete the API registration.
Select No Auth for Authorization.
Click Test to view the response. Since the local IP is defined in the Source IP, it is expected that the return code will be received successfully and be 200, and the Body contains the data defined by the API.
In the Key field of the Request Header, fill in X-Forwarded-For, and in the Value field, fill in the custom IP that matches the Source IP.
Click Test to view the response. Since the custom IP is defined in the Source IP, it is expected that the return code will be received successfully and be 200, and the Body contains the data defined by the API.
In the Key field of the Request Header, fill in X-Forwarded-For, and in the Value field, fill in a random custom IP.
Click Test to view the response. Since the IP is not defined in the Source IP, it is expected that the call will fail, the return code received will be 401, and the Body will respond "Missing srcUrl information".
Go to API Management > API List, and select the API, the status light is red by default; click Enable.
A confirmation window will pop up, click Confirm to finish enabling the API, and the status light will turn green .
Click on the Test icon to open the testing area.
Path: AC User Management > User
In this section, you can find instructions on how to manage the users of the system, including creating, updating, deleting, and searching the users.
Click Create to access the user creation page.
Fill in the data or make selections as instructed below. The fields marked with “*” are required.
Username*: The account the user uses to log in to the system.
Display name*: The name of the user using the system.
Password* / Confirm password*: The password the user uses to log in to the system.
Password not limited to letters and numbers, up to 128 characters.
email*: After the user is created, related information will be sent to the E-mail the user registered.
Organization: Organization that the user belongs to.
Status*: Determines whether the user can log in to the system.
If the status was not changed to Active, this account will not be able to log in to digiRunner.
Role*: Roles selected; it represents the system permissions that this account has access to.
Change the status to Active.
After creating the user, the system will send a “user account created” email.
Those marked with “*” are required to make changes.
If Reset password is selected, the system will send a change password email to the user; the user can log in to the system using the password included in the email and go to My Profile to change the password.
If the user has Failed login attempts, Reset password attempts can be selected, and the system will reset the failed login attempts of the user.
Modify the desired fields, and click Update to save and exit.
If this user account is no longer used, it can be deleted from this page.
Click Delete to delete the user and exit.
Click on the icon next to Organization to display a tree diagram of organizations, and select the organization that the user belongs to.
Click on the icon next to Role to display the list of roles, and select the roles that the user can have. You can also choose the roles from Role Mapping.
If the wrong role was selected, click on the icon to delete it.
To search for user related information, Keyword Search can be used to search for user information, or click on the icon to search for roles and organizations.
Search for the user to modify, and click on theicon to access the Update page.
By default, when the account is entered incorrectly more than three times, the account is blocked by the system. To modify the number of password errors and change the user status to Active, go to Client Management > API Client > > Status. You can also check Reset password under the Password tab to reset the user's password.
Search for the user account to delete, and click on the icon to proceed.
Search for the user to view, and click on theicon to proceed.
If there is the need to confirm all data transferred during the calling of APIs, they can be viewed via the online console to make it easier for developers to debug, and to provide detailed information for developers to perform analysis. Users can view all data transmitted during API calls in the Online Console. This feature is useful for developers for debugging and data analysis.
Go to System Configs > Setting to view the list of all configurations.
Update the value to true, and click Update to apply the changes and enable tracing.
A new tab with the online console page opened needs to be prepared in advance before calling; you can go to 10.3 first to refer to the steps.
In the Authorization field, select No Auth, then click Test.
Review the response. A status code of 200 indicates a successful API call.
Go to System Configs > Online Console to enter the page.
Verify that the state field is set to OPEN to view the API logs. The example is shown below.
Enter TSMP_ONLINE_CONSOLE in the keyword field to search. If the returned value is false, click on the icon to access the update page.
Go to API Management > API List, select an API and click on the icon to access the API Test area.
Organization and role must be created first in order to perform the related permission management for the user.
Organization - Uses tree structure to realize permission control and group management for high-levels to restrict low-levels.
Role - This is the item list displayed on the left side of the management interface, used to achieve the expectation of controlling the functions used.
Log in, and go to AC User Management > Organization to view the organizational tree diagram.
Click Create to access the creation page.
Fill in the required fields: Dept. name, Contacts name, Contacts telephone and Contacts email.
Click the button to the right of Belonged dept., select the organization belonged to from the tree diagram that popped up, and click Add to complete adding organization.
To confirm whether the organization was added successfully, you can view the tree diagram. If the organization was added successfully, you can see the name of the organization added to the right of Belonged dept. on the organizational tree diagram.
Go to AC User Management > Roles to view the current list of roles.
Click Create in the upper right corner to access the role creation page.
Fill in the required field: Role.
In the Permissions field, select the required permissions for the role: click on the parent item to expand the child items, select the necessary options, and click Create to complete the creation.
Enter the newly created role code in the keyword input box, and click Search to view the role details in the list.
Go to AC User Management > Users to view the list of existing users.
Click Create to access the creation page.
Fill in the data or make selections as instructed below. The fields marked with “*” are required.
Click Create to complete the creation.
Enter the username in the keyword input box, and click Search to view the user data.
Log in with the newly created username to verify that the user can log in successfully.
Open the web browser, and enter the following URL in the address bar: https://ip address:port number/dgrv4/ac4/login.
Log in with the username and password you registered to digiRunner in the Username and User password field.
Click Login. If the authentication is correct, you will be directed to the digiRunner Admin Console.
Registering, Enabling, and Calling APIs with No Auth
Register external APIs to digiRunner, and after they are enabled, the APIs can be called through digiRunner.
The system can register the APIs saved on the AP Server into the system, and then have the system manage the APIs.
Go to API Management > API Registration, and click CUSTOMIZE to enter the registration page.
Fill in the required fields: Target URL, API Name, digiRunner Proxy Path and Http Methods.
Since authentication is not required for now, select No Auth.
Click Register to complete the registration of that API.
Enable/Disable can be used to restrict the calling of APIs registered into system management.
Go to API Management > API List to query APIs that have been registered successfully.
Click Test to view the response. In this example, the Status code returned is 503, and the Body contains the data "API was disabled".
Click Test to view the response. In this example, the Status code returned is 200, indicating a successful call, and the Body contains the data defined by that API.
APIs registered into system management can be called from the API test area. NO Auth is used as the example below.
Select No Auth for Authorization. The target URL will be retrieved automatically for the digiRunner URL field, and the default Http Method is GET.
Click Test to view the response. In this example, the Status code returned is 200, and the Body contains the data defined by that API.
Go to API Management > API Test, and fill in the digiRunner URL field with the target URL.
Select No Auth for Authorization.
Click Test to view the response. In this example, the Status code returned is 200, and the Body contains the data defined by that API.
Next, you can try our most common use cases.
Go to API Management > API List to query the API just registered, the default status of the API is disabled ().
For more information on creating an API proxy, please refer to .
Click on the icon to open the testing area, and select No Auth for Authorization.
Return to the list and select the API; the default status at this time is disabled (). Select the API, and click Enable.
A confirmation window for enabling will pop up, click Confirm, and the API status will be updated to enabled ().
Click on the icon to open the testing area, and select No Auth for Authorization.
Go to API Management > API List, and query APIs that have been registered successfully into API, then click on the icon to open the testing area.
JWE Certificate
Client Authorization and Calling APIs
Rate Limiting
Proxy Caching
Load Blancing
Sandbox Testing
VIP Gateway Priprity Settings
The modern healthcare industry is transforming, aiming for patient-centric care powered by seamless data exchange and robust security. A leading healthcare provider embarked on a mission to:
Achieve Data Interoperability: Integrate data from fragmented systems such as EMRs (Electronic Medical Records), HIS (Hospital Information Systems), and IoT devices to improve efficiency and patient outcomes.
Strengthen Security and Compliance: Protect sensitive health data and ensure adherence to regulations like HIPAA.
Modernize Legacy Systems: Transition to Fast Healthcare Interoperability Resources (FHIR) standards and adopt Open Health principles without disrupting operations.
Patient data was isolated across multiple platforms, leading to delays in accessing critical information and hindering real-time decision-making.
Ensuring compliance with data protection laws while enabling secure cross-system communication posed significant challenges.
Integrating outdated systems with new platforms was time-consuming, often resulting in compatibility issues.
Periods of high API usage created bottlenecks, affecting system reliability and patient service delivery.
Protocol Interoperability: Enabled seamless data flow by supporting multiple API standards, including REST and SOAP, bridging modern and legacy systems.
API Onboarding: Simplified API integration with features such as OpenAPI document support, batch imports, and proxy path configurations for regional or dynamic endpoints.
Role-Based Access Control (RBAC): Ensured that only authorized users could access sensitive data.
Token-Based Authentication: Used OAuth2 and JSON Web Tokens (JWT) for secure, stateless communication.
Audit Trails and Certificate Management: Provided complete visibility into API interactions and secure communication using TLS encryption and JWT certification.
Traffic Weighting: Optimized load distribution among backend servers to ensure consistent performance during peak times.
Zero-Downtime Deployment: Employed red/black deployment strategies to update systems without interrupting healthcare services.
API Caching: Improved response times by caching frequently accessed data, reducing backend server load.
Mock Testing: Enabled API behavior simulations to test integrations without affecting live systems, accelerating development timelines.
Insurance and Telemedicine Platforms: Provided ready-to-use APIs for seamless data exchange with insurers and telemedicine applications.
IoT Device Connectivity: Supported real-time data collection and processing from medical devices, enhancing monitoring and diagnostics.
Patient records were accessible in real time, reducing delays and enabling precise, data-driven care decisions.
Robust policies safeguarded patient data, ensuring compliance with HIPAA and other standards.
Optimized API traffic management ensured reliability even during surges, while scalable architecture prepared the system for future demands.
Streamlined workflows reduced manual errors and operational costs while accelerating the rollout of new healthcare initiatives.
Improved data accessibility and integration fostered innovations in personalized medicine and predictive healthcare analytics.
Through digiRunner’s robust API management platform, the healthcare provider successfully overcame data silos, achieved regulatory compliance, and modernized its operations. The transformation empowered the organization to deliver seamless, secure, and innovative care, setting a benchmark for interoperability and excellence in healthcare.
For more insights into digiRunner’s capabilities and its open-source initiative, visit .
To login using a third-party account, options of this system include: Google, Microsoft, LDAP, mLDAP and API.
Go to AC User Management > Delegate AC User, and click Create to proceed.
Fill in the required fields or make selections as instructed below:
User Name and Type: Enter the corresponding data.
Status: Select Allow.
Click Create to complete the creation.
Once created, the newly added user information will be displayed in the Delegate AC User list.
The system provides maintenance functions for Google and Microsoft authentication servers. The following explains how to set up Google as an example.
Click CREATE CREDENTIALS > OAuth client ID, and it will jump to the creation page.
Select Web application from the Application type field drop-down menu.
In the Authorized redirect URIs field, enter the following URL: https://[digiRunner's IP]:[port]/dgrv4/ssotoken/gtwidp/GOOGLE/gtwIdPCallback.
Click CREATE to complete the OAuth client ID creation.
Return to the credentials page, and the created data will be displayed on the OAuth 2.0 client ID list. Click the Edit icon to enter the page.
Copy the Client ID and Client secret from the Additional information field for use in subsequent steps as Client Id and Client Password.
Return to the digiRunner Admin Console. Go to AC User Management > AC OAuth 2.0 IdP, and click Create to proceed.
Fill in the required fields or make selections as instructed below, and click Create to complete the creation.
Client Name*: Fill in the client name.
Client Id* and Client Password*: Paste the Client ID and Client Secret obtained from Google Cloud Platform.
Type*: Fill in GOOGLE.
Client Status*: Fill in Y.
Well Known URL*: Fill in the URL, https://accounts.google.com/.well-known/openidconfiguration.
Callback URL*: Fill in the URL, https://[digiRunner's IP]:[port]/dgrv4/ssotoken/acidp/GOOGLE/acIdPCallback.
After clicking Create, the created OAuth 2.0 IdP data can be seen in the AC OAuth 2.0 IdP list.
Users logging in with Microsoft can refer to the procedure below.
Open the web browser, and enter the following URL in the address bar: https://ip address:port number/dgrv4/ac4/login.
Click on the Google icon; if registration was already completed, the Google data will be retrieved automatically.
If the authentication is correct, the login process is complete.
The system provides maintenance functions for LDAP, mLDAP, and Windows AD authentication servers. The following explains how to set up LDAP as an example.
Go to AC User Management > AC LDAP IdP, and click Create.
Fill in the required fields or make selections as instructed below, and click Create to complete the creation.
URL*, Timeout(ms)*, and Approval Result Mail*: Fill in the corresponding information.
Base DN* and Bind DN*: Fill in the data obtained from LDAP AD.
Enable*: Select Y.
The created LDAP Idp data can be seen in the AC LDAP Idp list.
NOTE: Review is required after initial login.
Users logging in with MLDAP and API can refer to the procedure below.
Open the web browser, and enter the following URL in the address bar: https://ip address:port number/dgrv4/ac4/login.
Click LDAP and you will be directed to the LDAP login portal.
Log in with the username and password below:
Username: LDAP login account
User password: LDAP login password
Click Login. Upon initial login, you will be notified that a review is required.
Use a reviewer account and go to AC User Management > Delegate AC User to enter the page.
Check the LDAP data created automatically, click on the Update icon for the account data to be reviewed to enter the update page.
Change the Status field from Request to Allow, and click Update to complete the update.
Return to the list and confirm that the status is Allow, then this LDAP account can be used for login.
Users logging in with MLDAP and API can refer to the procedure below.
Open the web browser, and enter the following URL in the address bar: https://ip address:port number/dgrv4/ac4/login.
Click LDAP and you will be directed to the LDAP login portal.
Log in with the username and password below:
Username: LDAP login account
User password: LDAP login password
Click Login. If the authentication is correct, the login process is complete.
Role List: Click on , and select the roles that need to be authorized.
Organization Name: Click on to open the organization tree, and then select the organization.
Open your browser and enter the following URL in the address bar: . After registering and logging into the GCP page, navigate to APIs & Services > Credentials to access the credentials page.
AC User Management is used to control user accounts, role functions, and to maintain the organization. New user accounts, roles and the organizations they belong to can be defined here.
Enter the API Key list of that user and click Apply to enter the apply page.
Fill in the required fields.
Enter the keyword to search in the Select API field, and select the API to apply.
Click Save to complete the application of the API Key.
Go to Application Forms > Applications, locate the API Key application form to sign-off in the list of application forms.
Click on the Submit for Review icon, after the confirmation window pops up, click Confirm to complete the submission for review.
Click the Pending order tab to enter the pending order list, click on the Sign-off icon to enter the sign-off page, and click Approve to complete the first review.
Click on the Sign-off icon to enter the sign-off page, and click Approve to complete the second review to obtain the API Key.
Go to System Information > API Key Approval History to view the API Key applied today.
APIs registered in the system can use different OAuth Grant Type for verification, including: Client Credentials, Password, Basic, Auth and DGRK.
In the Authorization field, select DGRK.
In the API Key field, fill in the public key obtained from the email or database.
In the Secret Key field, fill in the private key obtained from the email or database.
Click Test to view the response. In this example, the status code is 200, indicating that the body contains the data defined by the API.
Path: AC User Management > My Profile
My Profile is used to change user account name and password.
Those marked with “*” are required to make changes.
Password not limited to letters and numbers, up to 128 characters.
Modify the desired fields, and click Update to save and exit.
Differences between My Profile and Update user:
Path
AC User Management > My Profile
AC User Management > User > Search user > Update
Similarities
Able to change username and email
Able to change username and email
Differences
Able to change user password.
Able to change organization name, whether to activate user, reset password, reset password attempts and select roles.
Path: AC User Management > Role Mapping
When adding a new user and roles need to be assigned, the roles that can be assigned will be displayed according to the permissions of the creator’s account.
Click Create to access the creation page.
Click Create to save and exit.
Enter keywords in the Keyword Search field to search for the roles list.
Modify the desired fields, and click Update to save and exit.
A warning prompt displaying the message “Confirm Delete?” will pop up. Click Confirm to delete the role list and exit.
If there are users who forgot their passwords, administrators can reset the password and send the new password via E-mail to the E-mail address the user used to register, so that the user can login again using the new password received.
Go to AC User Management > Users to enter the user maintenance page, and enter the username in the keyword search field to query the user to modify, then click Search.
Check the Reset password option, click Update, and the system will send the reset password letter 10 minutes later.
Go to System Information > Scheduled Tasks to enter the schedule page.
Locate the send mail schedule in the list and check the Scheduled Time field to confirm the schedule is set to execute at the specified time.
Check the Status field of the schedule. If it displays wait or Executing, click Search to refresh the page and update the schedule status. If the status displays carry out, it indicates that the schedule has been successfully executed.
Go to System Information > Mail Log to enter the mail log page.
The mail log list will be sorted by time, from newest to oldest. Check if the Result field shows success to confirm that the email has been successfully sent.
Go to your email inbox, confirm receipt of the email, and use the default password to log in and reset your password.
If the system failed to send the confirmation email due to setting errors, review the SMTP settings and make updates.
Go to System Information > Mail Log to enter the mail log page.
The mail log list will be sorted by time, from newest to oldest. Check the Result field, and if it shows failure, proceed with the following steps.
Go to System Configs > Setting to enter the setting page.
The values of SERVICE_MAIL_AUTH and SERVICE_MAIL_ENABLE must both be set to true in order to activate the sender verification process.
The value of SERVICE_MAIL_HOST is smtp.gmail.com by default, which defines its mail server. This system uses Gmail’s SMTP by default.
The value of SERVICE_MAIL_PORT should be set to the SMTP port. By default, it is set to 587, which is used for sending emails with SMTPS encryption. Verify that this port is set correctly.
The value of SERVICE_MAIL_USERNAME should be set to the email account that will be used for sending emails.
The value of SERVICE_MAIL_PASSWORD should be set to the password for the email account used for sending emails.
Go to System Information > Scheduled Tasks to enter the schedule page.
Click on the Redo icon and a confirmation window will pop up. Click OK to execute the mail sending schedule again.
Go to System Information > Mail Log to enter the mail log page.
The mail log list will be sorted by time, from newest to oldest. Check if the Result field shows success to confirm that the email has been successfully sent.
Path: AC User Management > AC OAuth 2.0 IdP
In this section, you can find instructions on how to maintain LDAP / Windows AD authentication servers.
In this section, you can find instructions on how to create AC OAuth 2.0 IdP using OAuth2.0. You can create an AC OAuth 2.0 IdP for login.
Click Create to access the AC OAuth 2.0 IdP creation page.
Fill in the data or make selections as instructed below. The fields marked with “*” are required.
Client Id*: A unique identifier used by third-party applications for identification and accessing protected resources.
Client Name*: An identifiable username.
Client Secret*: User password.
Type*: License Type, a third-party application authorized by the user.
Client Status*: This account is active (Y) or inactive (N).
Callback URL*: Redirect the user back to the specific URL of the client application and include the license certificate.
Well Known URL*: A set of public, fixed URL paths used to store specific configuration information or metadata for a website or application. It helps developers easily find and access important information about their applications without first knowing the specific configuration of the application.
Auth URL: The URL used to guide users through the authentication process, and allows applications to obtain the necessary authorization to perform specific operations or access restricted resources.
Access Token URL: The specific URL used to obtain the Access Token. During the OAuth 2.0 authorization process, Access Token is a credential that represents that a user has been authorized to access protected resources.
Once the client sends the request to the Access Token URL, the authorized service provider will check the legitimacy and validity of the request. If the verification is successful, the Access Token will be included in the response from the authorized service provider. Access tokens are used by the client to access protected resources and usually have a specific expiration date.
Scope: Specify the range of the client application’s access to user resources. Scope might vary based on the needs of OAuth applications and is specified and implemented by an authorized service provider (usually an OAuth 2.0 licensed server).
Click Create to save and exit
View the details of AC OAuth 2.0 IdP.
Modify the desired fields, and click Update to save and exit.
Click Delete to delete the AC OAuth 2.0 IdP and exit.
Go to the Google Cloud Platform to complete the required settings as instructed below.
Apply for an account.
Create a project.
Configure the OAuth Consent screen.
Edit application registration request.
Get the OAuth certificate.
Create an OAuth client ID.
Acquire the client ID and password.
Access the configured client ID and password.
Click on the name in the OAuth 2.0 Client IDs section to access Client ID of the Web Application page, and the client number, password and creation date are displayed in the right-side of the page.
Path: AC User Management > AC OAuth 2.0 IdP
Client Id*: The client ID (client_id), eg. client number, obtained from Google.
Client Name*: Specify the client name for identification.
Client Password*: The client password (client_secret) obtained from Google.
Type*: Fixed value: GOOGLE
Client Status*: Fixed value: Y
Callback URL*: Replace {{hostname}} with the hostname used by digiRunner, and leave the rest of the URL unchanged as it is fixed. https://{{hostname}}/dgrv4/ssotoken/acidp/GOOGLE/acIdPCallback
Well Known URL*: Fixed value: https://accounts.google.com/.well-known/openid-configuration
Auth URL: Not required.
Access Token URL: Not required.
Scope: Not required.
Path: System Configs > Setting
AC_IDP_ACCALLBACK_URL: Replace {{hostname}} with the hostname used by digiRunner, and leave the rest of the URL unchanged as it is fixed. https://{{hostname}}/dgrv4/ac4/idpsso/accallback
AC_IDP_LDAP_REVIEW_ENABLE: Whether true/false enables the automated user creation and approval letter process.
AC_IDP_MSG_URL: Replace {{hostname}} with the hostname used by digiRunner, and leave the rest of the URL unchanged as it is fixed. https://{{hostname}}/dgrv4/ac4/idpsso/errMsg
AC_IDP_REVIEWER_MAILLIST: If AC_IDP_LDAP_REVIEW_ENABLE is enabled, you can specify reviewer emails here, separating multiple groups by commas (,).
AC_IDP_REVIEW_URL: Replace {{hostname}} with the hostname used by digiRunner, and leave the rest of the URL unchanged as it is fixed. https://{{hostname}}/dgrv4/ssotoken/acidp/acIdPReview
Go to Application Forms > API Key, and click on the Details icon of the client to apply.
Click by the Role* field to access the role list, and search for the role.
Only one role can be selected from the role list menu. For instructions to create the role, refer to .
Click on the icon by the Assignable Roles* to select the authorization to assign for this role, and click Confirm.
Search for the role to modify, and click on theicon to proceed.
Access the role list update page; if more role lists need to be added, go to the Assignable Roles field and click on the icon to add the new role. Click on the icon to delete it.
Search for the role list to delete, and click on the icon to proceed.
Click on of the user data to access the update page.
Click on to confirm that the email contains the reset password information.
Click on and check for the error message "Username and Password not accepted", which indicates that the email could not be sent due to account or password errors.
Click on the icon to access the details page.
Click on the icon to access the Update page.
Search for the AC OAuth 2.0 IdP to delete, and click on the icon to access the Delete page.
Path: Google Cloud Platform > Console > > APIs & Services
Path: Google Cloud Platform > Console > > APIs & Services > Credentials
Path: AC User Management > Roles
The roles of digiRunner determine the menu that users can see; this means the roles determine the system permissions that users have access to.
Role maintenance is managing the roles of the system; roles can be added / modified / deleted / searched here.
Click Create to access the role creation page.
Fill in the data or make selections as instructed below. The fields marked with “*” are required.
Role*: Code of the role; limited to alphanumeric characters, underscore (_) and hyphen (-).
Description*: Name that can be used to identify the role; limited to alphanumeric characters, underscore (_) and hyphen (-).
Permissions*: System functions accessible for this role.
Select the role functions to enable.
The following three functions must be selected for roles that can log in to the Admin Console backstage of the system:
User (AC0002)
Roles (AC0012)
Function Management (AC0101)
This is the information needed for login, for expanding the function options. Although you can see Development Mode and AC User Management, you can't actually operate it but only query the information related to the user. The other two are for roles and function query only.
Click Create to save and exit.
To search for roles, Keyword Search can be used to search for role information.
When editing roles, roles can also be renamed and role functions can be changed.
Modify the desired fields, and click Update to save and exit.
Those marked with “*” are required to make changes.
A warning prompt displaying the message “Confirm Delete?” will pop up. Click Confirm to delete the role and exit.
View the role details. The details are view-only, and cannot be edited.
Path: AC User Management > Delegate AC User
In this section, you can find instructions on how to create AC user accounts using OAuth2.0, LDAP, MLDAP, API and MS accounts. You can create, edit, or delete AC user accounts with the feature.
Click Create to access the AC user account creation page.
Fill in the data or make selections as instructed below. The fields marked with “*” are required.
User Name*: Fill in the user name.
User Alias: Fill in the user alias.
User Email: Fill in the the email address of the user.
Type*: Select the linked account from OAuth2.0, LDAP, MLDAP, API, or MS.
Status*: Select the account status from Request, Allow, or Deny.
Role*: Specify the role of the user.
Organization*: Specify the organization of the user.
Click Create to save and exit.
Go to System Configs > Setting, look for AC_IDP_LDAP_REVIEW_ENABLE, and check whether the value is true.
The system displays "Delegate AC user status is 'Request', cannot log in. A letter has been sent to the reviewer. After the review, an email will be sent to notify you.", indicating that the account created by this SSO must be reviewed before it can be used.
Go to System Information > Scheduled Tasks to check whether the approval letter has been sent, and the process has been completed.
Go to System Information > Mail Log to check whether an approval letter has been sent.
Click LDAP to access the LDAP login page and log in to the system using the approved SSO account.
Modify the desired fields, and click Update to save and exit.
A warning prompt displaying the message “Confirm Delete?” will pop up. Click Confirm to delete the AC user account and exit.
Path: AC User Management > AC MLDAP IdP
The system supports multiple sets of LDAP identity providers. Each set may correspond to a different department or service in the organization. Additionally, there are multiple sets of LDAPs with HA architectures, allowing organizations to be more agile in LDAP resource allocation.
Click Create to access the AC MLDAP IdP creation page.
Fill in the data or make selections as instructed below. The fields marked with “*” are required.
Enable*: This account is active (Y) or inactive (N).
Timeout(ms)*: Expiration time (unit: milliseconds).
Policy*: The connection method for this account, either Sequentially or Random.
Approval Result Mail*: Specify the reviewer's email, default for manual review, but the system can also perform an auto-review.
Page Title*: Header of the login page.
Icon: Click Choose file to select and upload an identifiable AC MLDAP IdP image. If no image is uploaded, the system will automatically use the digiRunner logo.
Order*: The connection sequence.
URL*: LDAP / Windows AD host location, one URL can be created.
Base DN*: Specify the start or root node for the search in the LDAP directory tree.
Bind DN*: A node in the LDAP directory tree used to verify the identity of a user or application for appropriate actions in the directories.
Click Create to save and exit.
Modify the desired fields, and click Update to save and exit.
A warning prompt displaying the message “Confirm Delete?” will pop up. Click Confirm to delete the AC MLDAP IdP and exit.
Search for the role to modify, and click on theicon to access the update page.
Search for the role to delete, and click on the icon to proceed.
To view role details, search for the role, and click on theicon.
Gray blocks means selected, and white blocks means not selected.
Go to AC User Management > Delegate AC User to view the users created by SSO, and click on the icon to access the Update page. Check Allow to change the status to allowed, and click Update to proceed.
Click on the icon to access the Update page.
Search for the AC user account to delete, and click on the icon to proceed.
Click on the icon to access the details page.
Click on the icon to access the update page.
Search for the AC MLDAP IdP to delete, and click on the icon to proceed.
All system functions can be searched and defined through Function Management in Development Mode, the system’s returned codes can be searched through Rtn Code Management, and the report that needs to be enabled can be searched through Index Management.
When internal / external personnel need to use API, they must first obtain a set of account and password, and they can only use it after authorized by Client Management. The API group that needs to be used can also be added and edited in Client Management; the verification method of the API, the available APIs and the security level of its group can be set in the group. When users and groups have matching security levels, they can call the API in the group.
Path: Development Mode > Function Management
Displays the system functions (System Menus) and corresponding function codes.
If the function code is AC0X, it means that it is the master system; if the function code is AC0XXX, it means that it is a sub-system.
Enter keywords to search for the system function you want to query.
The rules are as follows: based on FUNC_CODE + LOCALE, if a duplicate exists, it will be updated; if no duplicate exists, a new record will be added.
View the roles associated with the function.
Modify the desired fields, and click Update to save and exit.
Changes made to the Function Name field in a version not associated with the regional language will not take effect, as language switching is controlled by the regional language setting.
Browsers usually have a default language; to change the browser language, you can select the language under Settings > Languages > Preferred languages of the browser.
Select Chinese (Traditional) or Chinese (Simplified) to change the default language of the browser to Traditional Chinese (zh-TW) or Simplified Chinese (zh-CN), and select English (US) to switch back the default language to English (en-US).
The language of the system is hidden under ReqHeader > locale. Press F12 on the keyboard to open developer tools, and select the tab Network > Payload at the bottom-right tab, and expand ReqHeader to locate the locale line.
Path: Development Mode > Rtn Code Management
In order to control the number of the warning message displayed when the system reports errors, corresponding system messages can be searched according to the returned code.
If errors occurred on the system, engineers will compile a return code for this error, and define an error message for the return code on the Rtn Code Management page.
If users made input errors, a warning prompt displaying the message “1298 - No information found” will pop up.
This error message is because the engineer defined the “user input error” operation error as “1298,” and related personnel will go to the Rtn Code Management page and define the “1298” message as “No information found”.
Rtn Code Management is the same as Function Management and will have three of the same return codes, which are the names when the browser language is switched between Chinese and English. Regional language is used to control the switching between Chinese and English.
Return codes must be created by TPIsoftware personnel. General users cannot define or trigger return code events. Therefore, return codes created by users will not be effective and are only for review purposes. If you need to create a return code, please contact TPIsoftware personnel.
Click Create to access the return code creation page.
Fill in the data or make selections as instructed below. The fields marked with “*” are required.
Return code*: Usually a number provided by engineers; custom definitions have no effect.
Return Message*: The message that the system prompts to the user when incidents are triggered. Such as: 1298 - No information found.
Return Description: Detailed descriptions of the return code.
Click Create to save and exit.
Enter the keywords to search for the return code to query.
The rules are as follows: based on FUNC_CODE + LOCALE, if a duplicate exists, it will be updated; if no duplicate exists, a new record will be added.
Those marked with “*” are required to make changes.
Modify the desired fields, and click Update to save and exit.
A warning prompt displaying the message “Confirm Delete?” will pop up. Click Confirm to delete the return code and exit.
Path: AC User Management > AC LDAP IdP
In this section, you can find instructions on how to maintain LDAP / Windows AD authentication servers.
In this section, you can find instructions on how to create AC LDAP IdP using LDAP and Windows AD. You can create an AC LDAP IdP for login.
Click Create to access the AC LDAP IdP creation page.
Fill in the data or make selections as instructed below. The fields marked with “*” are required.
URL*: LDAP / Windows AD host location, one URL can be created.
Base DN*: Specify the start or root node for the search in the LDAP directory tree.
Bind DN*: A node in the LDAP directory tree used to verify the identity of a user or application for appropriate actions in the directories.
Timeout(ms)*: Expiration time (unit: milliseconds).
Enable*: This account is active (Y) or inactive (N).
Approval Result Mail*: Specify the reviewer's email, default for manual review, but the system can also perform an auto-review.
Page Title*: Header of the login page.
Icon: Click Choose file to select and upload an identifiable LDAP image.
Click Create to save and exit.
Modify the desired fields, and click Update to save and exit.
A warning prompt displaying the message “Confirm Delete?” will pop up. Click Confirm to delete the AC LDAP IdP and exit.
Path: AC User Management > Organization
digiRunner adopts organizational hierarchy to manage API visual authorizations, and achieves comprehensive management of data permissions and function permissions based on the controls over role functions; the principle is that the upper-level personnel may only view the API of the lower-level personnel under their organization.
Take the figure below for example.
Personnel A belongs to the organization unit Department of Health, so personnel A can view the information of lower-level Physician and Administrative Assistant.
Personnel B belongs to the organization unit Department of IT > System Development Center, therefore, personnel B cannot see the information of the parallel organization Data Govemance Center, and cannot see the information of the upper-level organization Department of IT.
Click Create to access the organization creation page.
Fill in the data or make selections as instructed below. The fields marked with “*” are required.
Dept. name*: Name that can identify the organization.
Contacts name*: Person responsible for this organization.
Belonged dept.*: Select the upper-level organization.
Contacts telephone*: Phone number of the person responsible for this organization.
Dept. code: Code to help identify the organization; limited to alphanumeric characters, underscore (_) and hyphen (-).
Contacts email*: E-mail of the person responsible for this organization.
When done adding the organization, click Add to save and exit.
In this section, you can find instructions on how to view, update and delete this organization list.
Click on the desired organization to view the details of this organization, and click Update to access the update page.
Modify the desired fields, and click Update to save and exit.
To delete this organization, click Delete and a system prompt will pop up. Click Confirm to delete the organization.
Organizations cannot be deleted if:
The organization contains undeleted sub-organizations. The sub-organizations must be deleted first before the current organization can be deleted. Failure to do so will prevent the organization from being deleted, and a warning prompt will pop up.
The organization contains undeleted users. The users must be deleted or moved to another organization before the current organiztion can be deleted. Failure to do so will prevent the organization from being deleted, and a warning prompt will pop up.
The organization contains undeleted APIs. If a user within the organization has an API created, the user must be deleted or moved to another organization before the current organization can be deleted. Failure to do so will prevent the organization from being deleted, and a warning prompt will pop up.
Click on the parent organization to be modified to view the details of this parent organization.
Click Update to access the Update page.
Modify the desired fields, and click Update to save and exit.
Path: AC User Management > Role & txID
Roles & txID (Transaction ID) enables/disables the role’s CRUD function on the platform.
Click Create to access the role & txID creation page.
Fill in the data or make selections as instructed below. The fields marked with “*” are required.
Role*: The role code that needs to be set.
Transaction ID*: txId that can or cannot be executed.
Type*: Set as whitelist or blacklist.
Set the type as the whitelist or blacklist.
Description
Only allow executing the selected txId (Transaction ID) triggered role.
If the correct txId (Transaction ID) was not filled in, users will not be able to use the system.
Do not allow executing the selected txId (Transaction ID) triggered role.
Entering the wrong txId (Transaction ID) will not cause users unable to operate the system normally.
However, if a specific txId (Transaction ID) was entered, users cannot use the function that corresponds to this txId (Transaction ID).
Example
If AAA was entered in the Transaction ID* field, AA0020
If AAA was entered in the Transaction ID* field, AA0020
Example
Description
AAA is the wrong txId, therefore system operation will not be affected.
However, the function that corresponds to AA0020 is Search of role maintenance, therefore, users can only use the search function of role maintenance.
AAA is the wrong txId, therefore system operation will not be affected.
However, the function that corresponds to AA0020 is Search of role maintenance, therefore, users cannot use the search function of role maintenance.
If whitelist is selected for the list type, and the function clicked was not created in the Transaction ID* of the whitelist, when users operate the system, the prompt “1357 - The roles assigned to you are not authorized to call API txID [AA0510]” will appear. However, when the wrong Transaction ID is entered, the system will not show a prompt to remind you there is an error; therefore, you must be sure of the txId before entering it in the whitelist.
If the Transaction ID was already set in the blacklist first, if this Transaction ID is added to the whitelist, the prompt “1353 - [Role + Transaction ID] already exists: (2000000016 + AA0006)” will appear, meaning that this Transaction ID was already created in the blacklist.
Enter keywords in the Keyword Search field and Type field to search for role & txID.
Modify the desired fields, and click Update to save and exit.
A warning prompt displaying the message “Confirm Delete?” will pop up. Click Confirm to delete the role & txID and exit.
First, press F12 developer tools, then select the tab Network > Name area at the bottom-right is where the txID is placed.
Click any function on the system, such as: Search in User, its corresponding txID is AA0019.
Path: Client Management > API Group
API Group is for creating and maintaining API groups. APIs with the same authentication type can be placed in the same group here; APIs in this group will correspond to authorizable client permissions according to the security levels originally set; when selecting the API Scope, a group is used as the unit and authorized at once. This function is usually used to authorize API clients.
Take the figure below for example. The Module list has three groups /A, /B and C, in which group C contains the four APIs #C1, #C2, #C3 and #C4. If users need to use them, all four APIs in the group will be authorized for them at once.
Click Create Group to access the group creation page.
Fill in the data or make selections as instructed below. The fields marked with “*” are required.
Group name*: Cannot be changed.
Group alias: Alias to help identify the group.
Allowed access duration*: Number of days valid for this group; it will become invalid once expired.
If set to 0, it means there are no limits.
Number of allowed access times*: The maximum number of times this group of APIs can be authorized; it can no longer be used after the number of times has exceeded.
If set to 0, it means there are no limits.
Authentication type: Authentication type is required for the APIs in this group; multiple choices allowed.
Security level*: Security levels include A~F; the security level must correspond to the security level of the client’s account.
Simply select the default system security for the security level.
Description:Description or remarks of the group.
API Module: Enter to select the API module currently mounted on the digiRunner platform.
Further instructions for completing the fields.
API Module: Click Select to enter and select the API module currently mounted on the digiRunner platform.
Access the selection page and search for the module to add with the search field, then click Select to the left to add it into the module list. To cancel, click Delete to the right side of the selected module; make sure to click Apply when finished selecting.
At this time, module is added but not API. It is only added to the group name, but there is nothing inside. Click Select API to complete adding API to the module.
After selecting the API to add, click Apply.
If the group is created with no API added to the module, this module will not be added to the group. Take the figure below for example. APIs are added to /UserManual, and no API is added to /UserManualDgrcGet2. Upon clicking Create, only /UserManual will be saved to the group and not /UserManualDgrcGet2.
Click Create to save and exit.
To search for a group, enter the keywords or the authentication type or security level here to search for related groups.
The information in Details can only be viewed and not edited.
Modify the desired fields, and click Update to save and exit.
Click Delete to delete the group and exit.
Delete the group in the Delete group page, the warning prompt for deletion will NOT appear.
If this group is set as available to a client in API Client > Security > API Group, the error “1417 - Group has been used by Client” will appear, meaning that this group is in use and cannot be deleted.
Path: Development Mode > Embedded Function Management
To add custom reports, create the report using Kibana, obtain the report URL, and paste it into this management page to dynamically display the report on the platform.
Click Create to access the embedded function creation page.
Fill in the data or make selections as instructed below. The fields marked with “*” are required.
Locale*: Return codes are given by engineers; custom definitions have no effect. Return codes are usually numbers.
Function name*: An identifiable function name.
Function description: A brief description of the function.
Embedded URL*: The linked URL.
Upon creation, the report will be displayed in Reports.
Enter keywords to search for the embedded function you want to query.
The rules are as follows: based on FUNC_CODE + LOCALE, if a duplicate exists, it will be updated; if no duplicate exists, a new record will be added.
View the roles associated with the embedded function.
Modify the desired fields, and click Update to save and exit.
A warning prompt displaying the message “Confirm Delete?” will pop up. Click Confirm to delete the embedded function and exit.
Path: Client Management > API Client
Client accounts are usually used by API users; when your partners need to use your API, a client needs to be created here for your partner to browse the API portal, apply for API authorization and perform other actions with this account.
Click Create to access the client creation page.
Fill in the data or make selections as instructed below. The fields marked with “*” are required.
Client ID(username): Client’s account.
Client name*: Code of the client; limited to alphanumeric characters, underscore (_) and hyphen (-).
Application No.: Application number.
Display name*: Client’s name.
Password* and Confirm password*: Client’s password.
Password not limited to letters and numbers, up to 128 characters.
IP Binding: User’s host name and host IP; only ones created can be successfully called when calling APIs with IP.
Start date / Expiry Date / Service time: Client account activation and expiry time.
API Quota: Specifies the total number of API calls the client can make without restriction. If the same API was pressed repeatedly 10 times, it also counts as 10 times.
If set to 0, it means there are no limits.
TPS/Node (Default 10): Specifies the number of times this client can call the API per second. The default for this field is 10, meaning that the API will be called 10 times per second. For example, if both the TPS/Node and API Quota are set to 10, the user can make 10 API calls per second. However, once the user reaches a total of 10 calls for the day, further API access will be denied.
If set to 0, it means there are no limits.
Priority: The order of the priority that this user can use the gateway when the network is busy.
In this field, 0 is highest priority and 9 is the lowest.
Note*: Not limited to anyone.
Status*: This must be enabled for it to be used.
API Audience*: Set whether this client is applicable Internally and externally / foreign / Internally.
Emails: Multiple sets of E-mails can be set; separate them with a comma (,).
Remark: This is the special note left for clients.
Click Create to save and exit.
Enter keywords in the Keyword Search field to search for clients and the group code of the client, and use the Status field to refine your search. The default status is AII.
The information in Details can only be viewed and not edited.
Modify the desired fields, and click Update to save and exit.
In this section, you can find instructions on how to modify and set the security for this user.
Client security configurations include: Security level, API Group, API Scope, Token Setting, X-Api-Key Setting, Status, and Password.
In which level A is the highest. Simply select the default system security for the security level.
If c is selected as the security level for the client here, security levels A and B cannot be found in API Group.
Assign clients to specific API groups or authorization scope groups for the client to have permission to call specific APIs. API groups that don’t need to be used can also be deleted here.
Click Add to access the set group page.
Search for the group to add in Search, and click Update to add it.
Click Add in authorization scope setting to access the setting page. Modify the desired fields, and click Update to save and exit.
In this section, you can find instructions on how to set up the grant type of the clients, expiry of token and times of access, and the URL to be directed to after validation.
OAuth Grant Type:
This field is used to determine which methods users will use to obtain tokens; multiple choices allowed.
Take Password and Client Credentials for example. Password authentication requires two sets of values, namely userId / UserPwd and clientId / clientPwd, to obtain the token. On the other hand, Client Credentials only necessitates clientId / clientPwd to acquire the token.
Tokens:
Contains two tokens, which are Access token and Refresh token. Validity of authorization period or Number of authorization times can be set for both of these; if the Validity of authorization period and Number of authorization times are set simultaneously, it is the number of times it can be accessed within the period.
Take the figure below for example. If the Validity of authorization period is set as 1 day for both the Access token and Refresh token, and the Number of authorization times are set as 3 times, it means that both the Access token and Refresh token can only be accessed 3 times within 1 day; it will become invalid if the number of times or number of days is exceeded.
Redirect URL:
The URL of the redirection page.
The X-Api-Key is a key or secret key used to identify and authenticate API requests, enhancing API security by preventing unauthorized access and providing authentication and authorization mechanisms.
The X-Api-Key is transmitted in plaintext, making it less secure in terms of information security.
Click Add a X Api Key to create a new X-Api-Key.
Fill in the data or make selections as instructed below. The fields marked with "*" are required.
Alias*: An identifiable name for the key.
Effective Date: The date from which the API can be used.
Expiry Date*: The date until which the API remains valid.
In the Authority group* field, click Add to access the list page and select the authorization group for the X-Api-Key, and click Confirm to save and exit.
Click Add a X Api Key to complete the setting, and send a notification to the client.
Users can modify the number of allowed failed login attempts and client status on this page, including resetting the password attempts.
The default number of allowed failed login attempts is 3 times.
Users can change their passwords here; if they forgot their password, select the reset button and the system will send a mail with a set of passwords attached, then use this password to come here to update the password.
Search for the client to delete, and click on the icon to proceed.
A warning prompt displaying the message “Confirm Delete?” will pop up. Click Confirm to delete the client and exit.
Path: AC User Management > AC API IdP
In this section, you can find instructions on how to manage APIs for access control and authentication, which rely on an identity provider (IdP) to handle user identity information.
Click Create to access the AC API IdP creation page.
Fill in the data or make selections as instructed below. The fields marked with “*” are required.
Enable*: This account is active (Y) or inactive (N).
Approval Result Mail*: Specify the reviewer's email, default for manual review, but the system can also perform an auto-review.
Page Title*: Header of the login page.
Icon: Click Choose file to select and upload an identifiable AC API IdP image. If no image is uploaded, the system will automatically use the digiRunner logo.
Request URL*: Specify the Uniform Resource Locator (URL) of the resource or service to be accessed.
Request Header: The metadata section of an HTTP request, containing additional information about the request such as request attributes, browser-related information, user authentication, etc. The Request Header is typically used to convey meta-information about the client (such as the browser) and the request, allowing the server to properly handle the request.
Request Body*: Select from none / form-data / x-www-form-urlencoded / raw.
Response*: Select the response type from HTTP status / HTTP status + return code.
JSON Field: A specific element or attribute within a JSON data structure. JSON (JavaScript Object Notation) is a lightweight data interchange format commonly used for transmitting and storing data between applications. JSON data is organized in name/value pairs and can include various types of values such as strings, numbers, booleans, arrays, and other JSON objects.
Value: The specific data or information returned as a result of a computation, request, or operation. This data is typically obtained through API requests, function calls, queries, or other interactive processes.
ID Token.name: In OAuth 2.0 and OpenID Connect (OIDC), after a user is authenticated, the Authorization Server usually generates an ID Token to provide information about the authenticated user to the client. The ID Token contains several predefined standard claims, one of which is "name".
ID Token.email: In OAuth 2.0 and OpenID Connect (OIDC), the ID Token typically includes an "email" claim representing the authenticated user's email address. The value of the "email" claim is the user's email address, which may be used to identify the user or for subsequent application use.
ID Token.picture: In OpenID Connect (OIDC), the ID Token can include a "picture" claim representing the authenticated user's avatar or photo. The value of the "picture" claim is the URL or other reference to the user's avatar image. This claim is typically used to allow applications to display the authenticated user's avatar, providing a more personalized user experience.
Click Create to save and exit.
Modify the desired fields, and click Update to save and exit.
A warning prompt displaying the message “Confirm Delete?” will pop up. Click Confirm to delete the AC API IdP and exit.
Path: Client Management > API Scope
The API Scope function is for outsourced vendors to use to apply for API functions from our bank in place of users. For example, when a user wants to query his/her demand deposit balance at TPIsoftware Bank through the authentication network, the authentication network will redirect the user to the application authorization page of TPIsoftware Bank, where TPIsoftware Bank will verify the personal information of the user, then ask the user to select the information he/she wishes to view, and authorize it.
API Scope Management is for creating and maintaining APIs that can be selected and authorized for end users.
APIs with the same authentication type can be placed under the same scope here, and the APIs in this scope will correspond to authorizable client permissions according to the security level set.
Click Create API scope to access the creation page.
Fill in the data or make selections as instructed below. The fields marked with “*” are required.
API scope name*: Name of the scope.
API scope alias: Alias to help identify the scope.
Allowed access duration*: Number of days valid for this scope; it will become invalid once expired.
If set to 0, it means there are no limits.
Number of allowed access times*: The maximum number of times this scope of APIs can be authorized; it can no longer be used after the number of times has exceeded.
If set to 0, it means there are no limits.
Authentication type: Authentication type required for the APIs in this scope; multiple choices allowed.
Security level*: Security levels A~F; the security level must correspond to the security level of the client’s account.
Simply select the default system security for the security level.
If C is selected as the security level for the client, security levels A and B cannot be found here at API Group. For more information, refer to Security level.
Description: Description or remarks of the scope.
API Module: Enter to select the API module currently mounted on the digiRunner platform.
Further instructions for completing the fields.
API Module: Click Select module to enter and select the API module currently mounted on the digiRunner platform.
Access the selection page and search for the module to add with the search field, then click Select at the left to add it into the module list. To cancel, click Delete at the right of the selected module.
At this time, module is added but not API. It is only added to the scope name, but there is nothing inside. Click Select API to complete adding API to the module.
After selecting the API to add, click Apply.
If the scope is created with no API added to the module, this module will not be added to the scope.
Click Create to save and exit.
To search for an API scope, enter the keywords or the authentication type or security level here to search for related API scopes.
The information in Details can only be viewed and not edited.
Modify the desired fields, and click Update to save and exit.
Click Delete to delete the API scope and exit.
Delete the API scope in the Delete API scope page, the warning prompt for deletion will NOT appear.
If this scope is set as available for clients under API Client > Security > API Scope, the error “1403 - Failed to remove. This virtual group is being used.” will appear, meaning that this API scope is in use and cannot be deleted.
For example, if Bank A has two apps—one is Bank A's own app, "Bank A App," and the other is an outsourced app, "Online Bank":
When a user applies for account A, the user will be authorized to view the account balance through the "Bank A App."
However, when applying for the outsourced app "Online Bank," the user must authorize and agree for the agent to check the account balance with Bank A. The role of the API Group is similar to "Bank A App," while the role of API Scope is akin to "Online Bank."
Whether it is the master system or sub-system, they both have three of the same function codes, which are the names when switching the browser language between Chinese and English. For more information, refer to .
To modify multiple functions at once, click Export to export the functions as an .xlsx file. Modify the desired fields, click on the icon, and then click Import to import the modified file without needing to rename it.
Search for the function to view, and click on the icon to access the associated role page.
Search for the function to modify, and click on the icon to access the update page.
Locale*: Refers to the language in which the return code messages are displayed; must match the language of the browser. For more information, refer to .
To modify multiple return codes at once, click Export to export the return codes as an .xlsx file. Modify the desired fields, click on the icon, and then click Import to import the modified file without needing to rename it.
Search for the return code to modify, and click the icon to access the update page.
Search for the return code to delete, and click on the icon to proceed.
Click on the icon to access the Update page.
Search for the AC LDAP IdP to delete, and click on the icon to proceed.
The can be used to expand / collapse the sub-organizations under them.
Click on the icon in the Belonged dept.* field to access the Organization chart page, select the department the organization belongs to, and click Confirm to proceed.
Click on the icon in the Role* filed to search for the role to access the role list menu, and click Confirm to save and exit.
For more information, refer to .
Search for the role list to modify, and click theicon to proceed.
Search for the role & txID to delete, and click on theicon to proceed.
If C is selected as the security level for the client, security levels A and B cannot be found here at API Group. For more information, refer to .
Authentication type:Click on the icon to access and select from the authentication list; multiple choices allowed as mentioned above.
Search for the group to view details, and click on theicon to access the group details page.
Search for the group to modify, and click theicon to access the update page.
Search for the group to delete, and click on the icon to proceed.
To modify multiple embedded functions at once, click Export to export the embedded functions as an .xlsx file. Modify the desired fields, click on the icon, and then click Import to import the modified file without needing to rename it.
Search for the desired embedded function to view, and click on the icon to access the associated role page.
Search for the embedded function to modify, and click on the icon to access the update page.
Search for the embedded function to delete, and click on the icon to proceed.
Search for the user to view, and click on the icon to access the client details page.
Search for the client to modify, and click on the icon to access the update page.
First, search for the client to set, and click on the icon to access the client security configuration page.
Click on the icon by authorization setting to delete the group you want to delete.
Click on theicon to access the details page.
Click on the icon to access the Update page.
Search for the AC API IdP to delete, and click on the icon to proceed.
Authentication type: Click on the icon to access and select from the authentication list; multiple choices allowed as mentioned above.
Search for the API scope to view details, and click on theicon to access the API scope details page.
Search for the API scope to modify, and click on the icon to access the update page.
Search for the API scope to delete, and click on the icon to proceed.
Path: Client Management > Security Level
Classifies security levels for clients; security levels available for selection range from A~D. The security levels of API Client and API Group must be the same in order for them to be authorized to API groups.
Simply select the default system security for general security level.
Click Create to access the security level creation page.
Fill in the data or make selections as instructed below. The fields marked with “*” are required.
Security level ID*: ID of the security level.
Security level name*: Name that can identify the security level; it will be displayed in API Client and API Group.
Description: Description of this security level.
Click Create to save and exit.
To search for security levels, enter the keywords to search for related security levels.
Modify the desired fields, and click Update to save and exit.
Click Delete to delete the security level without any system prompts.
Path: Client Management > Authentications
Defining the authentication method required for the API in the system can help users quickly identify the API type and functions when creating API groups; for example: Which APIs will be used for setting the authentication method of the online bank. This page can only query / add / modify / delete authentication methods, but APIs are not added from here.
Click Create to access the authentication creation page.
Fill in the data or make selections as instructed below. The fields marked with “*” are required.
Authentication ID*: Code to identify the authentication; limited to alphanumeric characters, underscore (_) and hyphen (-).
Authentication Name*: Name that can identify the authentication.
Description*: Description of this authentication.
Authentication Level*: No implemented function in the system. It provides information to TSP, and when TSP implements (customer operation) the authentication, it will decide whether secondary authentication is required.
Click Create to save and exit.
To search for authentications, enter the keywords to search for related authentications.
The information in Details can only be viewed and not edited.
Modify the desired fields, and click Update to save and exit.
A warning prompt displaying the message “Confirm Delete?” will pop up. Click Confirm to delete the authentication and exit.
Path: Client Management > GTW API IdP
In this section, you can find instructions on how to maintain the API authentication servers using the gateway.
To search for GTW API IdP, you can search using the relevant information as keywords.
Users can create, update, view details, and delete the clients.
Click Create to access the API IdP Client creation page.
Fill in the data or make selections as instructed below. The fields marked with “*” are required.
Enable*: This account is active (Y) or inactive (N).
Page Title*: Header of the login page.
Icon: Click Choose file to select and upload an identifiable GTW API IdP image. If no image is uploaded, the system will automatically use the digiRunner logo.
Request URL*: Specify the Uniform Resource Locator (URL) of the resource or service to be accessed.
Request Header: The metadata section of an HTTP request, containing additional information about the request such as request attributes, browser-related information, user authentication, etc. The Request Header is typically used to convey meta-information about the client (such as the browser) and the request, allowing the server to properly handle the request.
Request Body*: Select from none / form-data / x-www-form-urlencoded / raw.
Response*: Select the response type from HTTP status / HTTP status + return code.
For HTTP status, the following fields required: ID Token.name, ID Token.email, ID Token.picture.
For HTTP status + return code, the following fields required: JSON Field*, Value*, ID Token.name, ID Token.email, ID Token.picture.
JSON Field: A specific element or attribute within a JSON data structure. JSON (JavaScript Object Notation) is a lightweight data interchange format commonly used for transmitting and storing data between applications. JSON data is organized in name/value pairs and can include various types of values such as strings, numbers, booleans, arrays, and other JSON objects.
Value: The specific data or information returned as a result of a computation, request, or operation. This data is typically obtained through API requests, function calls, queries, or other interactive processes.
ID Token.name: In OAuth 2.0 and OpenID Connect (OIDC), after a user is authenticated, the Authorization Server usually generates an ID Token to provide information about the authenticated user to the client. The ID Token contains several predefined standard claims, one of which is "name".
ID Token.email: In OAuth 2.0 and OpenID Connect (OIDC), the ID Token typically includes an "email" claim representing the authenticated user's email address. The value of the "email" claim is the user's email address, which may be used to identify the user or for subsequent application use.
ID Token.picture: In OpenID Connect (OIDC), the ID Token can include a "picture" claim representing the authenticated user's avatar or photo. The value of the "picture" claim is the URL or other reference to the user's avatar image. This claim is typically used to allow applications to display the authenticated user's avatar, providing a more personalized user experience.
3. Click Create to save and exit.
View the API IdP client details.
Modify the desired fields, and click Update to save and exit.
A warning prompt displaying the message “Confirm Delete?” will pop up. Click Confirm to delete this API IdP client and exit.
Path: Client Management > GTW JDBC IdP
In this section, you can find instructions on how to maintain the JDBC authentication servers using the gateway.
To search for GTW JDBC IdP, you can search using the relevant information as keywords.
Users can create, update, view details, and delete the clients.
Click Create to access the JDBC IdP Client creation page.
Fill in the data or make selections as instructed below. The fields marked with “*” are required.
Enable*: This account is active (Y) or inactive (N).
Page Title*: Header of the login page.
Icon: Click Choose file to select and upload an identifiable GTW JDBC IdP image. If no image is uploaded, the system will automatically use the digiRunner logo.
Connection Name*: A name or label used in many software applications to identify a specific database, network connection, or other resource connection. It is an easy-to-remember name used to identify and manage different connections. You can create a Connection Name in RDB Connection.
SQL (Prepare Statement)*: A mechanism used in programming languages to execute pre-prepared SQL statements. This technique enhances database operation security and performance by preprocessing and parameterizing SQL statements.
SQL Parameters*: Special markers used to pass values into SQL statements during execution. These parameters prevent SQL injection attacks, improve code readability and maintainability, and enhance database query performance. Before executing the SQL query, the parameters need to be bound or set with actual values. This helps separate the structure of the SQL statement from the data values and prevents attacks on the database from malicious user input.
User Secret Algorithm*: An encryption or hashing algorithm used to protect user passwords or sensitive information. When user passwords are saved in the system, a specific algorithm is often used to encrypt or hash them to ensure security.
User Secret Column Name*: The column name in the database table used to save user passwords or sensitive information. When designing the database structure to save user account information, the password is usually saved as an important piece of sensitive information.
ID Token.sub Column Name*: For passing user's identity information to the client during the authentication process. The .sub field is usually used to represent the user's unique identifier to distinguish between different users.
ID Token.name Column Name: For passing user's identity information to the client during the authentication process. The .name field is usually used to represent the user's name or display name.
ID Token.email Column Name: For passing user's identity information to the client during the authentication process. The .email field is usually used to represent the user's email address.
ID Token.picture Column Name: For passing user's identity information to the client during the authentication process. The .picture field is typically used to represent the user's avatar or picture.
Access and view the JDBC IdP client details.
Modify the desired fields, and click Update to save and exit.
A warning prompt displaying the message “Confirm Delete?” will pop up. Click Confirm to delete this JDBC IdP Client and exit.
Search for the security level to modify, and click on the icon to access the update page.
Search for the security level to delete, click on the icon to proceed.
Search for the authentication to view details, and click on theicon to access the authentication details page.
Search for the authentication to modify, and click on the icon to access the update page.
Search for the authentication to delete, and click on the icon to proceed.
To view the details of GTW API IdP, you can search using the relevant information as keywords, and click on the icon to access the GTW API IdP Client List page.
Search for the API IdP client you want to view details, and click on theicon to proceed.
Search for the API IdP client you want to modify, and click on the icon to access the update page.
Search for the client ID to delete, and click on the icon to proceed.
To view the details of GTW JDBC IdP, you can search using the relevant information as keywords, and click on the icon to access the GTW JDBC IdP Client List page.
To view the details of the JDBC IdP client, search for the client you want to view, and click on theicon.
To update an JDBC IdP Client, search for the client you want to modify, and click on the icon to access the Update page.
Select the client ID to delete, and click on the icon to proceed.
API Management allows managing the APIs mounted on the system. In addition, existing or external APIs can be mounted onto the system through API registry; APIs can also be recombined and set through the system, and existing API modules can also be uploaded. The system will play the role of AP server.
Path: Client Management > Client Export/Import
In this section, you can find instructions on how to import and export the client data.
To export the client date, click Export to export the .json file of the desired client.
In this section, you can find instructions on how to import the client data, along with important notes.
To import client-related data, click Import, select the desired JSON file, and click Upload.
Do not modify the content of the JSON file; altering the original data may cause system errors.
Click Upload to automatically compare the new data with the existing data. If the data is new, the Data status will display as Add; if the data is unchanged, the Data status will display as Repeat.
If Lack API appears, it indicates that some APIs on the system have been deleted or modified. You can either check the option "It has been confirmed that if the API used by the client is missing, it will be ignored. If it is not checked, the import operation will not be processed. Please re-import after correction", or manually add the missing APIs to the system.
Click Covered all to display the addition or overwrite status of each setting, allowing the user to confirm the changes.
A warning prompt displaying the message “Confirm cover all” will pop up. Click Confirm to overwrite all.
The Data status will change from red to black.
Click Confirm to successfully import the client data.
The criteria for identifying duplicate data are listed below:
Client Info: Based on the client account.
The API status used by DP, such as application authorization API and login authorization API, will be transferred.
Cannot add or overwrite in the following cases:
If the code or name is duplicated, it cannot be added or overwritten.
If the host list's name or IP is duplicated with other data, it cannot be overwritten.
If the security levels are different, it cannot be overwritten.
Will not be overwritten in the following cases: Passwords and the number of password errors will not be overwritten.
Group: Based on the group code.
Cannot overwrite in the following cases:
The name is duplicated with an existing group.
The state cannot be added.
Authorization Scope: Based on the API scope code.
Cannot overwrite in the following cases:
The name is duplicated with an existing API scope.
There are more than 186 APIs.
The state cannot be added.
Authentications: Based on the authentication method code.
Cannot overwrite in the following cases:
The name is duplicated with an existing authentication name.
The state cannot be added.
Security Level: Based on the security level code.
Cannot overwrite in the following cases:
The name is duplicated with an existing security level.
The state cannot be added.
RDB Connection: Based on the connection name.
The HikariConfig Data Source Properties will use new values for overwriting.
If the data status displays in red, it indicates that the data is not processed.
Path: API Management > API Registry
The system can register the APIs saved on the AP server to the system, and have the system manage the APIs.
The system provides two methods to allow users to register APIs, which are through API documents and http / https to register the APIs to the system.
OPENAPI registers APIs to the system using API documents, and OPENAPI allows batch registration.
API documents must conform to OAS2.0 or OAS3.0 format to use this feature.
To upload an OpenAPI document via URL, select Upload OpenAPI document via URL, paste the DOC URL into the field, and click Upload to proceed.
The information of this API will be displayed below.
Fill in the API related fields.
Target URL*: Only for registered API, if the source URL has been changed, the new URL can be specified here.
After clicking Register, all APIs in this API module will be registered to the system.
Since the registered APIs are all disabled by default, they must be enabled manually from the API List.
In this section, you can find instructions on how to mount external APIs onto the system using URL methods; the default mode is New(dgrc).
Paste the API URL to upload to the URL field first, and click Validate to access the test external URL page.
To check if the Http Method and source URL fields are correct, Click Validate.
Its result will be displayed below. If the result is Status 200 and there were data in Headers and Body, it means that this API can be used.
Click Return and fill in the required fields.
Clone from existing API: Copy from existing API.
Modes: The system has two API modes, which are compatible V3 (tsmpc) and New(dgrc). Compatible V3 (tsmpc) has module names. The New(dgrc) has no module name, and provides the URL Path function.
Target URL*: URL of the API.
API Log Header Mask: Specifies masking for the Header field, applicable only to registered APIs.
For example, if the value is Hello, with a character count of 1 and masking character #, the following will be displayed:
Policy 0: No masking, displays Hello.
Policy 1: Retains the first and last character, displays H###o.
Policy 2: Retains the first character, displays H####.
Policy 3: Retains the last character, displays ####o.
API Log Body Mask Policy: Specifies different masking strategies for keywords in the Body content, applicable only to registered APIs.
For example, if the original text, "name":"test","id":"1", with a character count of 2, masking character #, and keyword name, the following will be displayed:
Policy 0: No masking, displays "name":"test","id":"1".
Policy 1: Masks the first and last 2 characters, displays "#name##"test","id":"1".
Policy 2: Masks the first 2 characters, displays "#name":"test","id":"1".
Policy 3: Masks the last 2 characters, displays "#name##"test","id":"1".
Policy 4 uses regular expressions for definition. For example, with a character count of 1 and a mask of #, and a regular expression of name\d, the following will be displayed:
"name1":"test","id":"1" will display as "name1#:"test","id":"1".
"name2":"test","id":"1" will display as "name2#:"test","id":"1".
"name-3":"test","id":"1" will display as "name-3:"test","id":"1".
Fail Discovery Policy*: Specifies the action to take when an API connection fails. The system default is set to When the connection fails or the HTTP status code is 4xx (client error) or 5xx (server error).
Fail Discovery Policy is only available on dgrc.
Fail Handle Policy*: Specifies how the system handles API connection failures. Choose between No retries or When calling the target URL fails, automatically retry the next target URL.
Fail Handle Policy is only available on dgrc.
API Module*: New module name of the API; it is the URL name of this API when it can be called externally. Only alphanumeric characters, underscore “_” and hyphen “-” can be entered in this field. This only needs to be filled when V3 (tsmpc) mode is selected.
API ID*: API name; it is the URL name of this API when it can be called externally. Only alphanumeric characters, underscore “_” and hyphen “-” can be entered in this field. This only needs to be filled when V3 (tsmpc) mode is selected.
API Name*: API name; it is the URL name of this API when it can be called externally. Only alphanumeric characters, underscore “_” and hyphen “-” can be entered in this field. This only needs to be filled when New(dgrc) is selected.
digiRunner URL: If users want to call the URL used for this API, the system will generate it automatically according to the two fields mentioned above. Check to set the authentication method to Path Parameter or No Auth:
Path Parameter: Upon checking, carries over the URL Path parameter data when calling the API.
No Auth: Upon checking, allows calling the API without authentication, commonly used for Public APIs.
digiRunner Proxy Path*: Path of the target URL; this only needs to be filled when New(dgrc) is selected. For example, the target URL is a.b.c/a1/a2, the Proxy Path is /x1/x2; the target URL is a.b.c/a1/{id}, the Proxy Path is /x1/x2/{p}; the target URL is a.b.c/a1/{id1}/a3/{id2}, the Proxy Path is /x1/{p}/x2/{p}.The first character is /; please use {p} if there are parameters.
No Auth: Upon checking, allows calling the API without authentication, commonly used for Public APIs.
Http Methods*: Set the Http Methods of this API.
Data Format: Select the data format for the upload; it is JSON by default.
JWT Settings: Set whether to use JWE or JWS encryption for Request / Response.
Description: API description.
Label: Up to five labels can be used. Labels with capitalized characters will automatically be switched to lower case, and each label can be no more than 20 characters long.
Since the registered APIs are all disabled by default, they must be enabled manually from the API List. Add the API to the group again in order for users to use it.
If you want to test this API at this time, go to the API list to search and test whether this API can be used by users.
Multiple external APIs can also be added. If multiple APIs were added, the system will open APIs randomly when testing in the test area.
9. Go to Clone from existing API, search for and check the desired API, and click Join.
Click copy to copy and change to a new API.
If the API basic information remains unchanged, a warning prompt will pop up, displaying the error message “1353 - [API] already exists”.
Path: API Management > API Test
In this section, you can find instructions on how to verify the usability of registered APIs.
Fill in the data or make selections as instructed below. The fields marked with “*” are required.
digiRunner URL*: Fill in the API URL.
Authorization: Select the authorization type for testing.
Request Header: Click on the + icon to add items.
Request Body: Select the request body type.
Click Test to run the API test, and the result will be displayed in the Response field.
Check the test result in the Response field. If the Status is 201 and data is displayed in both the Headers and Body, the API is functioning correctly and is ready for use. If the response status is 201 and data is displayed in both the Request Header and Request Body, the API is functioning correctly and is ready for use.
The example is .
For the underlying API, click on the icon to access the test external URL page, then click Validate to test whether this API can be used normally.
Click on the icon of the underlying API to expand the information of this API, and click on the icon to collapse.
The example is from Google API Explorer: .
You can copy an existing API on the system. Click on the icon.
In this chapter, you can find instructions on how to monitor the current operation status of the system, monitor multiple digiRunner (digiRunner Cluster), and able to see the operation situation of all server nodes of the system under cluster environments.
Path: Client Management > GTW OAuth 2.0 IdP
In this section, you can find instructions on how to maintain the OAuth 2.0 third-party authentication servers using the gateway.
To search for GTW OAuth 2.0 IdP, you can search using the relevant information as keywords.
In this section, you can find instructions on how to add a new IdP integration under this client.
Click Create to access the IdP creation page.
Fill in the data or make selections as instructed below. The fields marked with “*” are required.
Client Id*: A unique identifier used by third-party applications for identification and accessing protected resources.
Enable*: This account is active (Y) or inactive (N).
Type*: License Type, a third-party application authorized by the user.
Remark: User's comments.
IdP Client ID*: A unique identifier used by digiRunner for identification and accessing protected resources.
IdP Client Name*: An identifiable username.
IdP Client Password*: User password.
Callback URL*: Redirect the user back to the specific URL of the client application and include the license certificate
Well Known URL*: A set of public, fixed URL paths used to store specific configuration information or metadata for a website or application.
Auth URL: The URL used to guide users through the authentication process, and allows applications to obtain the necessary authorization to perform specific operations or access restricted resources.
Access Token URL: The specific URL used to obtain the Access Token. During the OAuth 2.0 authorization process, Access Token is a credential that represents that a user has been authorized to access protected resources.
Scope: Specify the range of the client application’s access to user resources. Scope might vary based on the needs of OAuth applications and is specified and implemented by an authorized service provider (usually an OAuth 2.0 licensed server).
Click Create to save and exit.
Modify the desired fields, and click Update to save and exit.
A warning prompt displaying the message “Confirm Delete?” will pop up. Click Confirm to delete this GTW OAuth 2.0 IdP and exit.
Path: Monitor & Alert > Alert Settings
When the system detects an abnormality, it will actively send an alert. You cannot add alerts by yourself.
The system default alerts are CPU high, Heap High, and Disk High.
Keywords can be used for searching, or further use role alias and alert status to search for the alert you want to query.
Modify the desired fields, and click Update to save and exit.
A warning prompt displaying the message “Confirm Delete?” will pop up. Click Confirm to delete this alert and exit.
Path: Monitor & Alert > digiRunner Server
digiRunner monitors the following:
The number of:
Users enabled/disabled/locked on the current day.
Roles added on the current day.
Clients enabled/disabled/locked on the current day.
Groups added on the current day.
APIs enabled/disabled on the current day.
Additionally, it tracks the total:
Successful/failed login attempts.
User creations/updates/deletions.
Role creations/updates/deletions.
Client creations/updates/deletions.
Group creations/updates/deletions.
API creations/updates/deletions.
Details of the gateway and Composer, as well as disconnected Composers.
Path: Client Management > GTW LDAP IdP
In this section, you can find instructions on how to maintain the LDAP/Windows AD authentication servers using the gateway.
To search for GTW LDAP IdP, you can search using the relevant information as keywords.
Users can create, update, view details, and delete them from client IDs.
In this section, you can find instructions on how to add an LDAP connection information under this client ID.
Click Create to access the creation page.
Fill in the data or make selections as instructed below. The fields marked with “*” are required.
Client Id*: A unique identifier used by third-party applications for identification and accessing protected resources.
Enable*: This account is active (Y) or inactive (N).
Remark: User's comments.
URL*: LDAP / Windows AD host location, one URL can be created.
Base DN*: Specify the start or root node for the search in the LDAP directory tree.
Bind DN*: A node in the LDAP directory tree used to verify the identity of a user or application for appropriate actions in the directories.
Timeout(ms)*: Expiration time (unit: milliseconds).
Page Title*: Header of the login page.
Icon: Click Choose file to select and upload an identifiable LDAP image.
Click Create to save and exit.
Modify the desired fields, and click Update to save and exit.
A warning prompt displaying the message “Confirm Delete?” will pop up. Click Confirm to delete this client ID and exit.
Path: API Management > API Modify Batch
In this section, you can find instructions on how to quickly modify APIs when changing the host environment or port number. This functionality is applicable for red-black deployment or API version updates, and the system supports batch modification of registered APIs.
In this section, you can find instructions on how to search for APIs by label and by site.
If searching by label, and the label is applied to a composer API, the response will return empty.
Click Search by Label to display the label list.
Check the desired labels to search for, and click Confirm.
APIs matching the specified criteria will be displayed.
Click Search by Site to display the site list.
Check the desired target sites to search for, and click Confirm.
APIs matching the specified criteria will be displayed.
Check multiple APIs at once, and click Enable to enable APIs in batches.
Check multiple APIs at once, and click Disable to disable APIs in batches.
Check multiple APIs at once, and click Active No Auth to activate No Auth for APIs in batches.
Check multiple APIs at once, and click Inactive No Auth to deactivate No Auth for APIs in batches.
Reset label clears all existing labels of selected APIs and replaces them with the input ones. If nothing is entered in the input box, the labels will remain empty.
Check the APIs to modify, and click Reset label.
Enter the desired label, press the Enter key, and click Confirm.
A confirmation prompt displaying the message "The original label will be cleared, Confirm the reset?" will pop up. Click Confirm to apply the label change.
Check the APIs to modify, and click Reset fail handle policy.
Enter the desired Fail Discovery Policy or Fail Handle Policy, and click Confirm.
A confirmation prompt displaying the message "Confirm reset?" will pop up. Click Confirm to apply the policy change.
In this section, you can find instructions on how to modify the string or percentage of the API URL.
Check the APIs to modify, and click API URL Setting.
Fill in the desired API URL, check Percentage, enter a value, and click Preview.
Search/Replace Target*: The URL target or string to be modified.
Percentage: If Percentage is checked, modify the percentage of the input item, and set the rest to zero. If the total percentage is not 100 after modification, it will result in failed. Calculation of Total Percentage:
When there is no routing, the total percentage is the sum of each percentage for that API.
When there is routing, the total percentage is the sum based on the IP field for each item.
When Percentage is checked, the total percentage must be 100.
Check the results in the Preview page, and upon confirming correctness, click Confirm to save and exit.
To replace api.kcg.gov.tw with 127.0.0.1:8080 as shown in the figure below, check the desired API, and click API URL Setting.
Fill in the desired API URL, check Replace String, enter 127.0.0.1:8080 in the input box, and click Preview.
Search/Replace Target*: The URL target or string to be modified.
Replace String: The string to be modified.
The system will search for the specified condition and replace it with the string entered by the user. Check the results in the Preview page, and upon confirming correctness, click Confirm to save and exit.
To view the GTW OAuth 2.0 IdP, first search using the information as keywords, and click on theicon to access the page of the GTW OAuth 2.0 IdP details.
Search for the GTW OAuth 2.0 IdP to view details, and click on theicon to access the page of the GTW OAuth 2.0 IdP details.
Search for the information to modify, and click on the icon to access the update page.
Search for the GTW OAuth 2.0 IdP to delete, and click on the icon to proceed.
Search for the alert to view details, and click on theicon to view the details of this alert.
Search for the alert to modify, and click on the icon to access the update page.
Search for the alert to delete, and click on the icon to proceed.
To view the details of GTW LDAP IdP, you can search using the relevant information as keywords, and click on the icon to access the Client ID page.
Search for the client ID you want to view details, and click on the icon to access the Details page.
Search for the client ID to modify, and click on the icon to access the update page.
Select the client ID to delete, and click on the icon to proceed.
Path: Reports > API Calls
Displays the statistics of API usage by the system (successful or failed).
Select the time unit and start and end dates first.
Click Search to display the usage count report of this API.
Click on the icon to access the API selection page, select the APIs, and click Confirm to save and exit.
Path: Reports > Bad Attempt Report
The system can display the number of rejected requests of API.
Select the time unit and start and end dates first.
Click Search to display the report.
Path: Reports > API Avg. RESP Time
The system can display the average response time for every API called successfully.
Select the time unit and start and end dates first.
Click Search to display the average time calculation analysis of this API.
Path: Reports > API RESP distribution
The system can display the time and number of times APIs were called successfully.
Select the time unit and start and end dates first.
Click Search to display the usage count - time analysis report of this API.
Click on the icon to access the API selection page, select the APIs, and click Confirm to save and exit.
Click on the icon to access the API selection page, select the APIs, and click Confirm to save and exit.
In Certificate Management, you may search, delete, upload, download, and view API clients’ certificates.
Credentials cannot be extended on the system; it simply reminds you that the credentials are about to expire. When the credentials expire, users need to provide new credentials and upload it to the system again.
Path: Reports > API GTW traffic
The system can display the traffic of API requests.
Select the time unit and start and end dates first.
Click Search to display the report.
Path: Certificate Management > JWE Cert. List
Here you may view, search, download, and delete API clients’ JWE credentials.
Credentials that have red expiry dates mean they have expired. Credentials cannot be extended on the system; it simply reminds you that the credentials are about to expire.
JWE encrypted credentials can be searched through months or date intervals.
The system can delete JWE encrypted credentials and download .zip or .txt files.
The system provides batch downloading of .zip or .txt files here; simply check the files to batch download, and click Download Zip file or Download txt file.
Path: Certificate Management > JWE Cert. Management
The system can search API clients, view the credentials of the user, upload, delete and download JWE credentials.
Client search and detailed Certificate Management can be performed on the home page; the client credential details here are more similar to entering the advanced function of Certificate Management.
After entering detailed Certificate Management, its functions include upload credentials, client credential details, download credentials and delete client credentials.
Keywords can be used to search for clients.
Enter client credential details, which is blank by default.
After users upload credentials, client credential details can be viewed, credentials can be downloaded, and client credentials can be deleted. Credentials that will soon expire will be presented with red texts.
A warning prompt displaying the message “Confirm Delete?” will pop up. Click Confirm to delete this certificate and exit.
Upon deleting credentials, the prompt displaying “1298 - No information found” will pop up. Click OK to exit.
To view client credential details, search for the client using keywords, and click on the icon to view the details of the user. The client credential details here are more similar to entering the advanced functions of Certificate Management.
Click on the icon to upload files.
To view credential details, click on theicon to view credential details and access the credential details page.
Search for the certificate to delete, and click on the icon to proceed.
To download credentials, click on the icon to download credentials.
Path: Certificate Management > TLS Cert. Management
The system can search API clients, view, upload, delete, and download the TLS certificates of the client.
Keyword search can be used to search for the TLS certificate you want.
Enter client credential details, which is blank by default.
After users upload credentials, client credential details can be viewed, credentials can be downloaded, and client credentials can be deleted. Credentials that will soon expire will be presented with red texts.
In this section, you can find instructions on how to delete certificates.
A warning prompt displaying the message “Confirm Delete?” will pop up. Click Confirm to delete this certificate and exit.
Upon deleting credentials, the prompt displaying “1298 - No information found” will pop up. Click OK to exit.
To view TLS certificate details, search for the client with keywords, and click on the icon of the client to access the certificate details page for the client. The client credential details here are more similar to entering the advanced functions of Certificate Management.
Click on the icon to upload files.
To view certificate details, click on theicon to access and view the certificate details page.
Search for the certificate to delete, and click on the icon to proceed.
Click on the icon to download certificates.
Path: Certificate Management > TLS Cert. List
In this section, you can view, search, download, and delete API clients’ TLS certificates.
Credentials that have red expiry dates mean they have expired. Credentials cannot be extended on the system; it simply reminds you that the credentials are about to expire.
TLS certificates can be searched through months or date intervals.
The system can delete TLS certificates and download Zip or txt files.
The system provides batch downloading of .zip or .txt files here; simply check the files to batch download and click Download Zip file or click Download txt file.
Path: Application Forms > API Key
API Key allows you to apply for API key for clients.
If there is no API Portal, you may also apply for an API Key here. This application form must be passed through the review process, to make this application valid.
Keywords can be used to search for clients to query.
If the client has not applied for an API key, a prompt displaying “1298 - No information found” will pop up. Click OK to exit and apply for an API key.
Click Apply to access the API key application page.
Effective Date*: The date from which the API can be used.
API Key Name*: Application name and usage.
Expiry Date*: The date until which the API remains valid.
Use Quota*: The number of times this API can be used; -1 means unlimited.
Description*: Reason for application.
Select API*: API to apply.
Several APIs can be selected, and Save has to be clicked when finished selecting in order for the system to carry over the selected APIs.
If the wrong API was selected, select the wrongfully selected API, and click Delete to remove it.
Click Save to submit the application.
After the application form is approved by Applications, the approved application form can be seen. Reviewed application forms can be viewed, modified and revoked in this section.
Modify the desired fields, and click Save to save and exit. Changes will appear in Applications, and the form can be updated again before submission for review.
Modify the desired fields, and click Save to save and exit. Changes will appear in Applications, and the form can be updated again before submission for review.
Search for the client to add the API key first, and click on theicon to access the API ID list page.
Enter keywords in the search field of the selected API, or click on the icon to access the page of the selected API.
To view application details, click on theicon to access the details page.
To modify an application, click on theicon to access the change page.
To revoke an application, click on the icon to access the revoke page.